Check out other books by Al Sweigart, free online or available for purchase:

...and other books as well! Or register for the online video course. You can also donate to support the author directly.
12 DESIGNING AND DEPLOYING COMMAND LINE PROGRAMS

Thus far, we’ve focused on running programs from Mu (or from whatever code editor you’re using). This chapter discusses how to run programs from the command line terminal. The command line can be intimidating, with its cryptic commands and utter lack of user-friendly presentation, and most users stay away from it. But there are some genuine benefits to becoming familiar with it, and it’s no more challenging than any of the programming you’ve done so far.
Once you’ve written a Python program to automate some task, having to open Mu every time you want to run it can be a burden. The command line is a more convenient way to execute Python scripts (especially if you share your programs with friends or co-workers who don’t have Mu, or even Python, installed). In software development, deployment is the process of making our software usable outside our code editors.
A Program by Any Other Name
This chapter (and programming in general) uses a lot of terms that mean a program or some slight variation of the term. You could accurately call all of the following items a program. But there are subtle differences between what these names mean:
Program A complete piece of software, large or small, with instructions that a computer carries out.
Script A program that an interpreter runs from its source-code form rather than from a compiled, machine-code form. This is a very loose term. Python programs are often called scripts even though Python code can be compiled like other languages (as you’ll learn in “Compiling Python Programs with PyInstaller” on page 285).
Command A program that is often run from a text-based terminal and doesn’t have a graphical user interface (GUI). All configuration is done up front by specifying command line arguments before running the command (although interactive commands may sometimes interrupt their operation with an “Are you sure? Y/N” question for the user). Both dir and ls, explained in “The cd, pwd, dir, and ls Commands” on page 260, are examples of commands.
Shell script A single text file that conveniently runs several bundled terminal commands in one batch. This way, a user can run one shell script instead of manually entering several commands individually. On macOS and Linux, shell script files have a .sh file extension (or no extension), while Windows uses the term batch file for shell scripts with a .bat file extension.
Application A program that has a GUI and contains multiple related features. Excel and Firefox are examples of applications. Applications usually have several files that an installer program sets up on your computer (and that an uninstaller program can remove), rather than consisting of just a single executable file copied to a computer.
App A common name for mobile phone and tablet applications, but the term can be used for desktop applications as well.
Web app A program that runs on a web server, and which users interact with over the internet through a web browser.
You’re welcome to nitpick about precise definitions; these explanations should merely give you a general sense of the terms’ usage. If you want to become familiar with more terminology, my book Beyond the Basic Stuff with Python (No Starch Press, 2020) has additional definitions in its “Programming Jargon” chapter.
Using the Terminal
Until the 1990s, when Apple and Microsoft popularized computers with GUIs that could run multiple programs simultaneously, programs were launched from a command line interface (CLI, pronounced either as “see-el-eye” or as a word that rhymes with “fly”) and were often limited to text-based input and output. You might also hear CLIs called the command prompt, terminal, shell, or console. Software developers still make use of CLIs and often have several terminal windows open on their computers at any given time. While a text-based terminal might not have the icons, buttons, and graphics of a GUI, it’s an effective way to use a computer once you’ve learned several commands.
To open a terminal window, do the following:
- On Windows, click the Start button (or press the Windows key) and enter Command Prompt (or PowerShell or Terminal if you have them installed).
- On macOS, click the Spotlight icon in the upper-right corner (or press -spacebar) and enter Terminal.
- On Ubuntu Linux, press the Windows key to bring up Dash, and enter Terminal. Alternatively, use the keyboard shortcut CTRL-ALT-T.
Just as the interactive shell has a >>> prompt, the terminal will display a prompt for you to enter commands. On Windows, this will be the full path of the folder you are currently in, followed by an angle bracket (>):
C:\Users\al>your commands go hereOn macOS, the prompt shows your username, your computer’s name, and the current working directory (with your home folder represented as ~ for short), followed by a percent sign (%):
al@Als-MacBook-Pro ~ % your commands go hereOn Ubuntu Linux, the prompt is similar to the prompt in macOS, except it begins with the username and an @ sign:
al@al-VirtualBox:~$ your commands go hereWhile it’s easier to run programs from the Start menu (Windows) or Spotlight (macOS), it’s also possible to start them from the terminal. The Python interpreter itself is a program often run from the terminal.
In this chapter, we’ll assume the Python program you want to run is named yourScript.py and that it’s located in a Scripts folder under your home folder. You don’t need to open Mu to access the Python interactive shell. From a terminal window, you can enter python on Windows or python3 on macOS and Linux to start it. (You should then see its familiar >>> prompt.) To run one of your .py Python files from the terminal, enter its filepath after python or python3—either in its absolute form, like python C:\Users\al\Scripts\yourScript.py, or in its relative form, like python yourScript.py, if the current working directory is set to C:\Users\al\Scripts, the same folder that yourScript.py is in.
The cd, pwd, dir, and ls Commands
Just as all running programs have a current working directory (CWD) to which relative filepaths are attached, the terminal too has a current working directory. You can see this CWD as part of the terminal prompt, or view it by running pwd (for print working directory) on macOS and Linux or the cd command, without any command line arguments, on Windows.
Your Python programs can change the CWD by calling the os.chdir() function. In the terminal, you can do the same thing by entering the cd command followed by the relative or absolute filepath of the folder to change to:
C:\Users\al>cd Desktop
C:\Users\al\Desktop>cd ..
C:\Users\al>cd C:\Windows\System32
C:\Windows\System32>
On Windows, you may have the added step of needing to switch the drive letter. You can’t change the drive you are in with the cd command. Instead, enter the drive letter followed by a colon, then use cd to change directories on the drive:
C:\Windows\System32>D:
D:\>cd backup
D:\backup>
The dir command on Windows and the ls command on macOS and Linux will list the file and subfolder contents of the CWD:
C:\Users\al>dir
--snip--
08/26/2036  06:42 PM           171,304 _recursive-centaur.png
08/18/2035  11:25 AM             1,278 _viminfo
08/13/2035  12:58 AM    <DIR>          __pycache__
              77 File(s)     83,805,114 bytes
             108 Dir(s)  149,225,267,200 bytes free
While navigating the file system in the terminal, you’ll often bounce between cd to change directories and dir/ls to see the contents of the directory. You can list all the executable files in the CWD by running dir *.exe on Windows and file * | grep executable on macOS and Linux. Once you are in the folder containing a program, you can run it in the following ways:
- On Windows, enter the program name with or without the .exe extension: example.exe.
- On macOS and Linux, enter ./ followed by the program name: ./example.
Of course, you can always enter the full absolute path of a program: C:\full\path\to\example.exe or /full/path/to/example.
If you want to open a non-program file, such as a text file named example.txt, you can open it with its associated application by entering example.txt on Windows or open example.txt on macOS and Linux. This does, from the terminal, the same thing as double-clicking the example.txt file’s icon in a GUI. If there is no associated application set for .txt files, the operating system will prompt the user to select one and remember it for the future.
The PATH Environment Variable
All running programs, no matter the language they’re written in, have a set of string variables called environment variables. One of these is the PATH environment variable, which contains a list of folders the terminal checks when you enter the name of a program. For example, if you enter python on Windows or python3 on macOS and Linux, the terminal checks for a program with that name in the folders listed in PATH. Operating systems have slightly different rules for how they use PATH:
- Windows first checks the CWD for a program of that name, then the folders in PATH.
- Linux and macOS check only the folders in PATH and don’t check the CWD at all. If you want to run a program named example in the CWD, you must enter ./example rather than example.
To view the contents of the PATH environment variable, run echo %PATH% on Windows or echo $PATH on macOS and Linux. The value stored in PATH is a long string composed of folder names separated by a semicolon (on Windows) or a colon (on macOS and Linux). For example, on Ubuntu Linux, the PATH environment variable may look like the following:
al@al-virtual-machine:~$ echo $PATH
/home/al/.local/bin:/home/al/bin:/usr/local/sbin:/usr/local/bin:/usr/sbin:/
usr/bin:/sbin:/bin:/usr/games:/usr/local/games:/snap/bin
If you were to enter python3 into the Linux terminal with this PATH, Linux would check for a program named python3 in the /home/al/.local/bin folder first, then in the /home/al/bin folder, and so on. It would eventually find python3 in /usr/bin and run that. The PATH environment variable is convenient because you can just drop a program in a folder on the PATH to spare yourself from cd-ing to its folder every time you want to run it.
Note that the terminal window doesn’t search subfolders under a PATH folder. If C:\Users\al\Scripts is listed in the PATH, running spam.exe will run a C:\Users\al\Scripts\spam.exe file but not a C:\Users\al\Scripts\eggs\spam.exe file.
PATH Editing
So far, you may have been saving your .py files to the mu_code folder that the Mu editor uses by default. However, I recommend creating a Scripts folder under your home folder. If your username happens to be al, this folder would be:
- C:\Users\al\Scripts on Windows
- /Users/al/Scripts on macOS
- /home/al/Scripts on Ubuntu Linux
Let’s add this folder to the PATH.
Windows
Windows has two sets of environment variables: system environment variables (which apply to all users) and user environment variables (which override the system environment variables but apply to the current user only). To edit them, click the Start menu and then enter Edit environment variables for your account, which should open the Environment Variables window.
Select Path from the User variable list on the top of the screen (not the System variable list on the bottom of the screen), click Edit, add the new folder name C:\Users\al\Scripts in the text field that appears with a semicolon separator, and click OK.
macOS and Linux
To add folders to the PATH environment variables, you’ll need to edit the terminal startup script. This is the .zshrc file on macOS and the .bashrc file on Linux. Both of these files are in your home folder and contain commands that are run whenever a new terminal window is opened. On macOS, add the following to the bottom of the .zshrc file:
export PATH=/Users/al/Scripts:$PATHOn Linux, add the following to the bottom of the .bashrc file:
export PATH=/home/al/Scripts:$PATHThis line modifies PATH for all future terminal windows that you open, so the change won’t have an effect on currently open terminal windows.
The which and where Commands
If you ever want to find out which folder in the PATH environment variable a program is located in, you can run the which program on macOS and Linux and the where program on Windows. For example, enter the following which command into the macOS terminal:
al@Als-MacBook-Pro ~ % which python3
/Library/Frameworks/Python.framework/Versions/3.13/bin/python3
On Windows, enter the following where command into the terminal:
C:\Users\al>where python
C:\Users\al\AppData\Local\Programs\Python\Python313\python.exe
C:\Users\al\AppData\Local\Programs\Python\Python312\python.exe
The where command shows each folder in PATH that contains a program named python. The one in the topmost folder is the version that is run when you enter python. The which and where commands are helpful if you are unsure how PATH is configured and need to find the location of a particular program.
Virtual Environments
Say you have two Python programs, one that uses version 1.0 of a package and another that uses version 2.0 of that same package. Python can’t have two versions of the same package installed at the same time. If version 2.0 is not backward compatible with version 1.0, you’d be uninstalling one version and reinstalling the other each time you wanted to switch programs to run.
Python’s solution to this problem is virtual environments; separate installations of Python that have their own set of installed third-party packages. In general, each Python application you create needs its own virtual environment. But you can use one virtual environment for all your small scripts while learning to program. Python can create virtual environments with its built-in venv module. To create a virtual environment, cd to your Scripts folder and run python –m venv .venv (using python3 on macOS and Linux):
C:\Users\al>
C:\Users\al>cd Scripts
C:\Users\al\Scripts>python -m venv .venv
This creates the virtual environment’s files in a new folder named .venv. You can choose any folder name you want, but .venv is conventional. Files and folders whose names begin with a period are hidden, though you can follow the steps in this book’s introduction to make your operating system show them by default.
When you run python or python3 from the terminal, you’ll still run your original Python installation’s interpreter. To use the virtual environment’s Python version, you must activate it. Do so by running the C:\Users\al\Scripts\.venv\Scripts\activate.bat script on Windows:
C:\Users\al\Scripts>cd .venv\Scripts
C:\Users\al\Scripts\.venv\Scripts>activate.bat
(.venv) C:\Users\al\Scripts\.venv\Scripts>where python.exe
C:\Users\Al\Scripts\.venv\Scripts\python.exe
C:\Users\Al\AppData\Local\Programs\Python\Python313\python.exe
C:\Users\Al\AppData\Local\Programs\Python\Python312\python.exe
Running where python.exe after activating the virtual environment shows that running python from the terminal will run the Python interpreter in the .venv\Scripts folder and not the system Python (discussed shortly).
The equivalent script on macOS and Linux is ~/Scripts/.venv/bin/activate, but due to security permissions, you can’t directly run it. Instead, run the command source activate:
al@al-virtual-machine:~/Scripts$ cd .venv/bin
al@al-virtual-machine:~/Scripts/.venv/bin$ source activate
(.venv) al@al-virtual-machine:~/Scripts/.venv/bin$ which python3
/home/al/Scripts/.venv/bin/python3
Activation changes the PATH environment variable so that python or python3 runs the Python interpreter inside the .venv folder instead of the original one. It also changes your terminal prompt to include (.venv) so that you know the virtual environment is active. Running which python3 in the activated virtual environment shows that python3 runs the Python interpreter in the newly created .venv/bin folder. These changes apply to the current terminal window only; any existing or new terminal windows won’t have these environment variable or prompt changes. This fresh Python installation has only the default packages, and none of the packages you may have already installed in the original Python installation. You can confirm this by running python –m pip list to list the installed packages:
(.venv) C:\Users\al\Scripts\.venv\Scripts>python -m pip list
Package    Version
---------- -------
pip        23.0
setuptools 65.5.0
The standard practice is to create a virtual environment for each Python project you’re working on, since every project could have its own unique package dependencies. However, on Windows, we can be a bit more lax with the random small scripts we write in our Scripts folder: they can all share this one.
The macOS and Linux operating systems have their own programs that rely on the Python installation that comes with the operating system. Installing or updating packages for this original Python installation, called the system Python, has the slight chance of introducing incompatibilities that can cause these programs to fail. Running your own scripts with the system Python is fine; installing third-party packages to the system Python is slightly risky, but creating a virtual environment in your Scripts folder is a good precaution against installing incompatible packages.
Keep in mind that Mu has its own virtual environment. When you press F5 to run a script in Mu, it won’t have the packages you’ve installed to the Scripts\.venv folder’s virtual environment. As you advance in your programming ability, you may find it easier to have the Mu window open to edit your code while keeping a terminal window open to run it. You can quickly swap focus between windows with the ALT-TAB keyboard shortcut on Windows and Linux and -TAB on macOS.
To deactivate the virtual environment, run deactivate.bat (on Windows) or deactivate (on macOS and Linux) in the same folder as the activate script. You can also simply close the terminal window and open a new one. If you want to permanently delete the virtual environment along with its installed packages, just delete the .venv folder and its contents.
The following sections tell you how to deploy your script after you’ve set up the virtual environment and added your Scripts folder to PATH.
Installing Python Packages with pip
Python comes with a command line package manager program called pip (written in lowercase unless it’s at the start of a sentence). Pip is a recursive acronym for pip installs package. While Python’s standard library comes with modules such as sys, random, and os, there are also hundreds of thousands of third-party packages you can find on PyPI (pronounced “pie-pee-eye” and not “pie-pie”), the Python Package Index, at https://
While pip is a program on its own, it’s easier to run it through the Python interpreter by running python –m pip on Windows or python3 –m pip on macOS and Linux, rather than running the pip (on Windows) or pip3 (on macOS and Linux) program directly. This prevents errors in the rare cases where you have multiple Python installations, your PATH is misconfigured, and pip/pip3 is installing to a different Python interpreter than the one that runs when you enter python/python3.
To install a package from PyPI, enter the following into the terminal:
C:\Users\al>python –m pip install package_nameRemember to run python3 if on macOS or Linux instead of python for these various commands. Also note that you’ll need to run this from the terminal window, and not from the Python interactive shell.
To list all the packages you have installed along with their version numbers, run python –m pip list:
C:\Users\al>python -m pip list
Package                   Version     Editable project location
------------------------- ----------- -------------------------
altgraph                  0.17.3
argon2-cffi               21.3.0
argon2-cffi-bindings      21.2.0
async-generator           1.10
--snip--
wsproto                   1.2.0
You can also upgrade a package to the latest version on PyPI by running python –m pip install –U package_name, or install a particular version (say, 1.17.4) by running python –m pip install package_name==1.17.4.
To uninstall a package, run python –m pip uninstall package_name. You can find more information about pip by running python –m pip --help.
Self-Aware Python Programs
Python’s standard library doesn’t come with any modules that give your programs sentience. (Yet.) But several built-in variables can give your Python program useful information about itself, the operating system it’s on, and the Python interpreter running it. The Python interpreter sets these variables automatically.
The __file__ variable contains the .py file’s path as a string. For example, if I run a yourScript.py file in my home folder, it evaluates to 'C:\Users\al\yourScript.py'. Importing from pathlib import Path and calling Path(__file__) returns a Path object of this file. This information is useful if you need to locate files that exist in the Python program’s folder. The __file__ variable doesn’t exist when you run the Python interactive shell.
The sys.executable variable contains the full path and file of the Python interpreter program itself, and the sys.version variable contains the string that appears at the top of the interactive shell with version information about the Python interpreter.
The sys.version_info.major and sys.version_info.minor variables contain integers of the major and minor version numbers of the Python interpreter. On my laptop running Python version 3.13.1, these are 3 and 13, respectively. You can also pass sys.version_info to the list() function to obtain more specific information: list(sys.version_info) returns [3, 13, 1 'final', 0] on my laptop. Having the version information in this form is much easier to work with than trying to pull it out of the sys.version string.
The os.name variable contains the string 'nt' if running on Windows and 'posix' if running on macOS or Linux. This is useful if your Python script needs to run different code depending on what operating system it’s running on.
For more specific operating system identification, the sys.platform variable contains 'win32' on Windows, 'darwin' on macOS, and 'linux' on Linux.
If you need highly specific information about the OS version and type of CPU, the built-in platform module can retrieve this information. This module is documented online at https://
If you need to check whether a module is installed, put the import statement in a try block and catch the ModuleNotFoundError exception:
try:
    import nonexistentModule
except ModuleNotFoundError:
    print('This code runs if nonexistentModule was not found.')
If the module is necessary for your program to function, you can put a descriptive error message here and call sys.exit() to terminate the program. This will be more helpful to the user than a generic error message and traceback.
Text-Based Program Design
Before GUI-supporting operating systems were common, all programs used text to communicate with their user. This book focuses on creating small, useful programs rather than professional software applications, so the programs in this book use print() and input() through a command line interface rather than the windows, buttons, and graphics that a GUI provides.
Even when limited to text, however, software applications can still provide a user interface similar to modern GUIs. Figure 12-1 shows Norton Commander, an application for browsing the filesystem. These kinds of applications are retroactively called TUI (pronounced “two-ee”), or text-based user interface, applications.
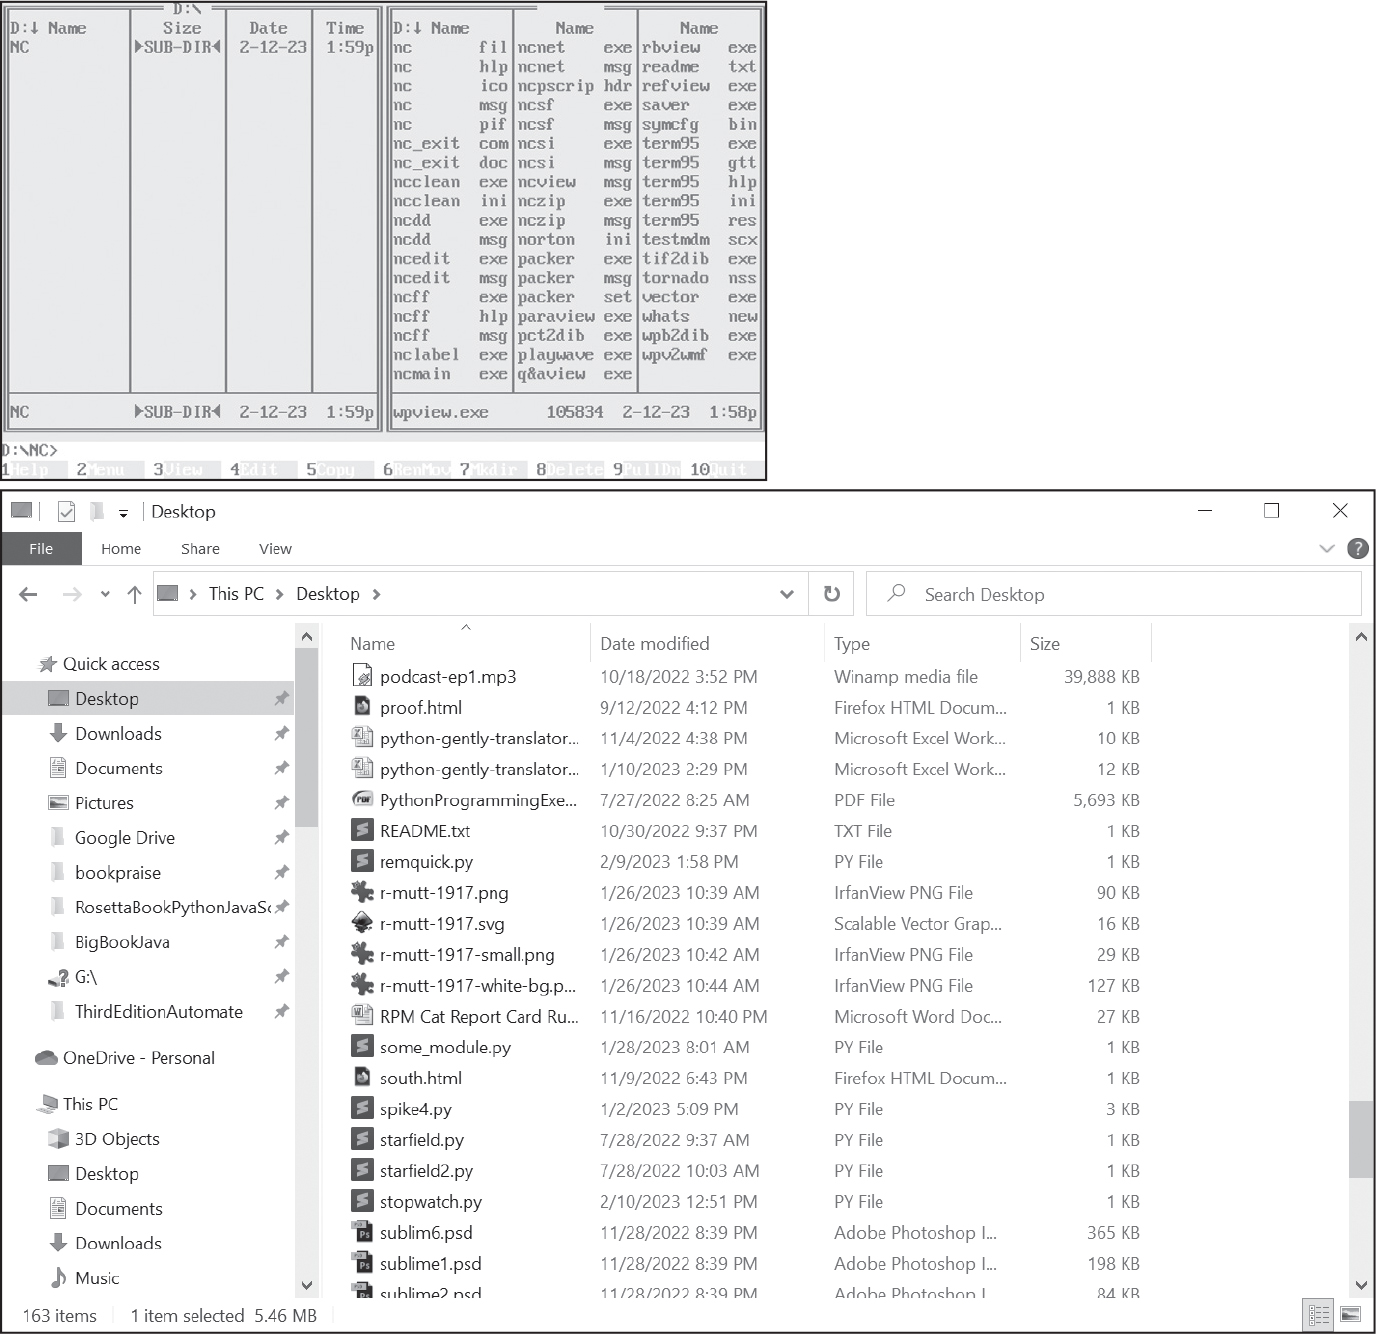
Figure 12-1: The text-based Norton Commander (top) alongside a modern GUI application (bottom)
Even if you aren’t a professional software developer, the advantage of text-based user interfaces is their simplicity. This section describes several design approaches your programs can take for their user interface.
Short Command Names
Users often run text-based programs from the command line rather than by clicking an icon on the desktop or Start menu. These commands can sometimes seem difficult to understand. When I started learning the Linux operating system, I was surprised to find that the Windows copy command I knew well was named cp on Linux. The name copy was much more readable than cp. Was a terse, cryptic name really worth saving two characters’ worth of typing?
As I gained more experience on the command line, I realized the answer is a firm yes. We read source code more often than we write it, so using verbose names for variables and functions helps. But we type commands into the command line more often than we read them, so in this case, the opposite is true: short command names make the command line easier to use, and they reduce strain on your wrists.
If your program is a command that you’ll likely type a dozen times a day, try to think of a short name for it. You can use the which and where commands to check if the name already exists for another program. You can also do an internet search for any existing commands by that name. A short name goes a long way toward making it easy to use.
Command Line Arguments
To run a program from the command line, simply enter its name. For .py Python source code files, you must run the python (Windows) or python3 (macOS and Linux) program and then supply the .py filename after it, like this: python yourScript.py.
The bit of text supplied after a command is called a command line argument. Command line arguments are passed to commands in much the same way as arguments to a function call. For example, the ls command by itself lists the files in the CWD. But you could also run ls exampleFolder, and the exampleFolder command line argument would direct the ls command to list the files in the exampleFolder folder. Command line arguments allow you to configure the behavior of the command.
Python scripts can access the command line scripts given to the Python interpreter from the sys.argv list. For example, if you entered python3 yourScript.py hello world, the python3 program would receive the command line arguments and forward them to your Python script in the sys.argv variable. The sys.argv variable would contain ['yourScript.py', 'hello', 'world'].
Note that the first item in sys.argv is the filename of the Python script. The remaining arguments are split by spaces. If you need to include space characters in a command line argument, put them inside double quotation marks when running the command. For example, python3 yourScript.py "hello world" would set sys.argv to ['yourScript.py', 'hello world'].
The main usefulness of command line arguments is that you can specify a wide variety of configurations before you start the program. There’s no need to go through a configuration menu or multistep process. Unfortunately, this approach means that command line arguments can become incredibly complicated and unreadable. If you pass /? after any Windows command or --help after any macOS or Linux command, you’ll often find page after page of command line argument documentation.
If the set of command line arguments your program accepts is simple, then it’s easiest to have your program read the sys.argv list directly. However, as you add more command line arguments, the possible combinations can become cumbersome to manage. Should python yourScript.py spam eggs do the same thing as python yourScript.py eggs spam? If the user can have either a cheese argument or a bacon argument, what happens if they provide both? This complexity would require you to write a lot of code to handle the various edge cases. At this point, you’re probably better off using Python’s built-in argparse module to handle these complicated situations. The argparse module is beyond the scope of this book, but you can read its documentation online at https://
Clipboard I/O
You don’t need to rely on input() to read text from files or the keyboard. You can also use the clipboard for your Python program’s text input and output. The cross-platform pyperclip module has a copy() function for placing text on the clipboard and a paste() function that returns the clipboard’s text as a string. Pyperclip is a third-party package installed from the terminal with pip: python –m pip install pyperclip. On Linux, you’ll also have to run sudo apt install xclip to make Pyperclip work. See Appendix A for full instructions.
All of your clipboard I/O programs will follow this basic design:
1. Import the pyperclip module.
2. Call pyperclip.paste() to obtain the input text from the clipboard.
3. Perform some work on the text.
4. Copy the results to the clipboard by passing them to pyperclip.copy().
The “Add Bullets to Wiki Markup” project in Chapter 8 is an example of this kind of program. The design of this program becomes especially useful once you’ve deployed it following the instructions in “Deploying Python Programs” on page 275. Just highlight the input text, press CTRL-C to copy it, and run the program. The results will be on the clipboard, ready to paste wherever needed.
Later in this chapter we’ll look at two projects, the ccwd command and the Clipboard Recorder, that make use of the clipboard.
Colorful Text with Bext
You can print colorful text using the third-party Bext package built on top of Jonathan Hartley’s Colorama package. Install Bext with pip by following the instructions in Appendix A. Bext only works in programs run from a terminal window, and not from Mu or most other code editors. To have print() produce colorful text, call the fg() and bg() functions to change the (foreground) text color or the background color with a string argument such as 'black', 'red', 'green', 'yellow', 'blue', 'magenta', 'purple', 'cyan', or 'white'. You can also pass 'reset' to change the color back to the terminal window’s default color. For example, enter the following into the interactive shell:
>>> import bext
>>> bext.fg('red')
>>> print('This text is red.')
This text is red.
>>> bext.bg('blue')
>>> print('Red text on blue background is an ugly color scheme.')
Red text on blue background is an ugly color scheme.
>>> bext.fg('reset')
>>> bext.bg('reset')
>>> print('The text is normal again. Ah, much better.')
The text is normal again. Ah, much better.
Keep in mind that the user may have their terminal window set to light mode or dark mode, so there’s no telling if the terminal’s default appearance is black text on a white background or white text on a black background. You should also be limited in your use of color: too much can make your program look tacky or unreadable.
Bext also has some limited TUI-like features, including the following:
bext.clear() Clears the screen
bext.width() and bext.height() Returns the current width (in columns) and height (in rows) of the terminal window, respectively
bext.hide() and bext.show() Hides and shows the cursor, respectively
bext.title(text) Changes the title bar of the terminal window to the text string
bext.goto(x, y) Moves the cursor to column x and row y in the terminal, where 0, 0 is the top-left position
bext.get_key() Waits for the user to press any key and then returns a string describing the key
Think of the bext.get_key() function as a single-key version of input(). The returned string includes 'a', 'z', and '5', but also keys like 'left', 'f1', and 'esc'. The TAB and ENTER keys return '\t' and '\n', respectively. Call bext.get_key() in the interactive shell to test various keys and see their return values.
For a demonstration of what Bext can do, run the source code for the ASCII Art Fish Tank program from https://
Terminal Clearing
The bext.clear() function is useful if you’d like your program to remove any text left over from before it ran. You can also use it to do flipbook-style animation: call clear() to clear the terminal, then use print() calls to fill it with text, pause for a moment with Python’s time.sleep(), and then repeat. There is a Python one-liner (a single line of code to do a special trick) to clear the screen that you can place in your own clear() function:
import os
def clear():
    os.system('cls' if os.name == 'nt' else 'clear')
This code lets your program clear the terminal screen without requiring the installation of the Bext package and only works in Python scripts run from the terminal, not from Mu or another code editor. The os.system() call, which you’ll learn more about in Chapter 11, runs the cls program (on Windows) or the clear program (on macOS and Linux). The odd syntax here is an example of Python’s conditional expressions (also called ternary operators in other languages). The syntax is value1 if condition else value2, which evaluates to value1 if condition is True and value2 if condition is False. In our case, the conditional expression evaluates to 'cls' if the condition os.name == 'nt' is True; otherwise, it evaluates to 'clear'. Conditional expressions (and one-liners in general) often produce unreadable code and are usually best avoided, but this is a simple enough case.
Sound and Text Notification
Terminal programs existed before the rich audio that today’s computers provide. Today, there’s no reason your text-based programs must be silent. There are, however, good reasons to keep sounds to a minimum or to exclude them altogether. Sounds can provide notification that a task is complete or a problem has occurred when the user is busy looking at other windows. But, like colorful text, it’s easy to overuse sounds to the point of annoyance. The user may already be doing a task that involves playing audio, or perhaps they’re in an online meeting that the sound would rudely interrupt. And if the user’s computer is muted, they won’t hear the sound notification anyway.
If you just need to play a simple audio file, you can use the playsound3 third-party package. Once it’s installed, you can play an audio file by calling the playsound3 module’s playsound() function and passing the filepath of an MP3 or WAV audio file. Download the hello.mp3 file from https://
>>> import playsound3
>>> playsound3.playsound('hello.mp3')
The playsound() function won’t return until the audio file has finished playing; that is, the function blocks until the audio has finished. Keep in mind that this will halt your program for a while if you give it a long audio file to play. If playsound() raises exceptions (which happens if the filename contains odd characters such as an equal sign), try passing a Path object of the audio file instead of a string.
Similarly, you may want to limit the text produced by your program. Under the Unix philosophy of command design, piping the text output of one command to another is easier if the command outputs only relevant information, as extraneous text output would have to be filtered. Many commands keep their text output to a minimum, or they have none at all and communicate success or error with the exit code. (Exit codes are covered in Chapter 19.) However, if you aren’t piping the output to another command but, as a human user, want to see more information, many commands accept a -v or --verbose command line argument to enable this verbose mode. Other commands take the opposite approach and flood the output with information, but offer a -q or --quiet command line argument to offer a quiet mode of no text output instead. (This could double as a way to mute sound notifications as well.) Or better yet, make silence the default behavior and have --verbose or --beep enable sound or alert beeps.
If your program doesn’t require this level of sophistication, you can ignore this consideration. However, once you start sharing your programs with others who may use it in clever ways you didn’t foresee, offering these options goes a long way toward making your programs user-friendly.
A Short Program: Snowstorm
Let’s create a text-based snowstorm animation. Our program uses block text characters that fill out the top half-block, bottom half-block, and full block of a single character cell. These text characters are returned as strings by chr(9600), chr(9604), and chr(9608), respectively, and our program stores them in the constants TOP, BOTTOM, and FULL to make our code more readable.
Enter the following code into a file named snowstorm.py:
import os, random, time, sys

TOP    = chr(9600)  # Character 9600 is '▀'
BOTTOM = chr(9604)  # Character 9604 is '▄'
FULL   = chr(9608)  # Character 9608 is '█'

# Set the snowstorm density to the command line argument:
DENSITY = 4  # Default snow density is 4%
if len(sys.argv) > 1:
    DENSITY = int(sys.argv[1])

def clear():
    os.system('cls' if os.name == 'nt' else 'clear')

while True:
    clear()  # Clear the terminal window.

    # Loop over each row and column:
    for y in range(20):
        for x in range(40):
            if random.randint(0, 99) < DENSITY:
                # Print snow:
                print(random.choice([TOP, BOTTOM]), end='')
            else:
                # Print empty space:
                print(' ', end='')
        print()  # Print a newline.

    # Print the snow-covered ground:
    print(FULL * 40 + '\n' + FULL * 40)
    print('(Ctrl-C to stop.)')

    time.sleep(0.2)  # Pause for a bit.
First, the program imports the os, random, sys, and time modules. These modules are in the Python standard library and don’t require installing any third-party packages. Then, the program sets up the constants TOP, BOTTOM, and FULL with return values from chr(). The program uses these constant names because they’re easier to understand than the numbers 9600, 9604, and 9608.
The user can specify the density of the snowstorm by supplying a command line argument. If no command line argument is given, then sys.argv is set to ['snowstorm.py'] and the program leaves DENSITY at 4. But if the user were to run the program with, say, python snowstorm.py 20, then sys.argv would be set to ['snowstorm.py', '20'] and the program would update DENSITY to int(sys.argv[1]), or 20. The user would then be able to modify the behavior of the snowstorm without having to change the source code.
Inside an infinite while loop, this program first clears the screen with the cls/clear one-liner. Next, it uses two nested for loops to loop over every row and column in a 40×20 space on the terminal. (You can increase or decrease these numbers to change the size of your snowstorm.) At each row and column, the program prints a single character: either a randomly selected TOP or BOTTOM character to represent snow, or an empty space character. (Only four percent of the characters are not empty spaces by default.) These print() calls pass the end='' keyword argument so that print() doesn’t automatically print a newline character after each call. The program prints this newline itself by calling print() with no arguments after finishing a row.
After the nested for loops, the program prints two rows of 40 FULL characters to represent the ground, along with a reminder that the user can press CTRL-C to stop the program. All of this code produces one “frame” of the snowstorm animation, and time.sleep(0.2) briefly holds this frame before the execution loops back to clear the terminal and start the process all over again.
I chose the snowstorm animation because it’s fun rather than practical, like a terminal-based snow globe. A more useful application of this technique is creating a dashboard app: a program that runs in a terminal window you leave open to convey information at a glance. This program prints relevant information, then clears the screen and reprints updated information every second, minute, hour, or other interval.
Pop-up Message Boxes with PyMsgBox
While designing a full GUI for your program requires learning an entire code library such as Tkinter, wxPython, or PyQt, you can add small GUI message boxes to your program with the PyMsgBox package. This is a third-party package you can install by running pip install pymsgbox from the terminal. PyMsgBox lets you create dialogs using Tkinter, which comes with Python on Windows and macOS. On Ubuntu Linux, you must first install Tkinter by running sudo apt install python3-tk in the terminal. Appendix A has full instructions.
PyMsgBox has functions with names that mirror JavaScript’s message box functions:
pymsgbox.alert(text) Displays a text message until the user clicks OK, then returns the string 'OK'
pymsgbox.confirm(text) Displays a text message until the user clicks OK or Cancel, then returns 'OK' or 'Cancel'
pymsgbox.prompt(text) Displays a text message along with a text field, then returns the text the user entered as a string or None if they clicked Cancel
pymsgbox.password(text) Is the same as pymsgbox.prompt(), but the text the user enters is masked by asterisks
These functions won’t return until the user clicks OK, Cancel, or X (close). If your program requires only the occasional notification or user input, using PyMsgBox’s dialogs could be a suitable replacement for print() and input().
Deploying Python Programs
Once your Python program is finished, you might not want to run Mu, load the .py file, and then click the Run button each time you want to execute it. This section explains how to deploy your Python program so that you can run it in as few keystrokes as possible.
Be sure to follow the steps in “The PATH Environment Variable” on page 261 to add a Scripts folder to your PATH environment variable. Since my username is al, the path to this folder is C:\Users\al\Scripts on Windows, /Users/al/Scripts on macOS, and /home/al/Scripts on Linux. Also, you’ll need to set up a virtual environment for your Python scripts, as described next.
Windows
On Windows, you can bring up the Run dialog by pressing the Windows key and the R key simultaneously (or right-clicking the Start menu button and selecting Run). This opens a small window that acts like a one-use terminal: in it, you can run a single command. To run your Python scripts from here, you’ll need to do the following:
1. Place the yourScript.py Python script in your Scripts folder.
2. Create a yourScript.bat batch file in your Scripts folder to run the Python script.
Batch files contain terminal commands that can be run together by running the batch file. They have a .bat file extension and are similar to shell scripts on Linux or .command scripts on macOS. If you place a batch file named yourScript.bat in a PATH folder, you can run it from the Run dialog by entering yourScript. On Windows, you don’t need to enter the file extension to run .bat or .exe files.
The content of a batch file is plaintext, just like a .py file, so you can create batch files with Mu or a text editor like Notepad. Batch files contain one command per line. To run a yourScript.py file located in a folder C:\Users\al\Scripts, create a file named yourScript.bat with the following contents:
@call %HOMEDRIVE%%HOMEPATH%\Scripts\.venv\Scripts\activate.bat
@python %HOMEDRIVE%%HOMEPATH%\Scripts\yourScript.py %*
@pause
@deactivate
The batch file can be named anything, but it’s easier to remember if it has the same name as the Python script. This batch file runs three commands. The first command activates the virtual environment you created for your Scripts folder. The @ symbol at the start makes the command itself not appear in the terminal window. The %HOMEDRIVE% environment variable is 'C:' and the %HOMEPATH% environment variable is the path to your home folder, like '\Users\al'. (The tilde [~] doesn’t represent the home folder on Windows.) When combined, this provides the path to the virtual environment activation script no matter what your username is. (This is helpful if you share these files with a co-worker for them to run on their computer.) Note that the call is necessary; if a batch file (like yourScript.bat) runs another batch file (like activate.bat) without call, the rest of the first batch file’s commands won’t be run.
Next, the batch file runs python.exe, which then runs yourScript.py. The %* causes the batch file to forward any command line arguments it received to your Python program. It’s a good idea to always include the %* in case you later add command line arguments to your Python program.
The third command runs the pause command, which causes Windows to display Press any key to continue and wait for the user to press a key. This prevents the terminal window from immediately closing after the Python program finishes so that you can see any remaining printed output. If your program has no printed output, you can omit this line. Finally, the @deactivate line deactivates the virtual environment in case you ran this batch file from the terminal and the terminal window remains open after finishing the Python program.
With the batch file set up, now you can run your Python script by pressing the Windows key + R key combination to bring up the Run dialog and entering yourScript (followed by any command line arguments) to run the yourScript.bat script. Or, if you have a terminal window open, you can just enter yourScript in the terminal from any folder. This is far quicker than running it from a code editor like Mu.
If you create other Python scripts, you can reuse this batch file. Just copy the file with a new name and change the yourScript.py filename to the new Python script’s name. Everything else can stay the same.
macOS
Pressing the COMMAND key and the spacebar simultaneously on macOS brings up Spotlight, allowing you to enter the name of a program to run. To add your own Python scripts to Spotlight, you must do the following:
1. Place the yourScript.py Python script in your Scripts folder.
2. Create a text file named yourScript.command to run the Python script.
3. Run chmod u+x yourScript.command to add execute permissions to the yourScript.command file.
Once you have your .py Python script in your Scripts folder, such as /Users/al/Scripts, create a text file named yourScript.command in the Scripts folder with the following content:
source ~/Scripts/.venv/bin/activate
python3 ~/Scripts/yourScript.py
deactivate
The ~ represents the home folder, such as /Users/al. The first line activates the virtual environment and the second line runs the Python script using the virtual environment’s Python installation.
Finally, in a terminal, cd to ~/Scripts and run the command chmod u+x yourScript.command. This adds execute permissions so that you can run the script from Spotlight. Now you’ll be able to quickly run the Python script by pressing ⌘-spacebar and entering yourScript.command. (Spotlight should autocomplete the full name for you after you enter the first few characters.) You’ll also be able to run your Python script from the terminal by entering yourScript.command.
The yourScript.command file is required because if you try to run the yourScript.py file from Spotlight, Spotlight sees the .py file extension and assumes you want to open this file in Mu or some other code editor, rather than running it directly.
Note that if you use macOS’s TextEdit to create the yourScript.command file, be sure to make it a plaintext file by pressing SHIFT-⌘-T (or clicking the Format and Make Plain Text menu items). TextEdit will also try to be helpful by automatically capitalizing python3 to Python3, which causes an error in Spotlight.
Unfortunately, Spotlight has no means of letting the user pass command line arguments to the Python script. Any command line arguments must be preemptively written in the .command file.
Ubuntu Linux
Ubuntu Linux Dash can be brought up by pressing the Windows key and entering the name of the program you want to run. To add your Python script to Dash, you must do the following:
1. Place the yourScript.py Python script in your Scripts folder.
2. Create a shell script named yourScript to activate the virtual environment and run your Python script.
3. Run the chmod u+x yourScript command to add execute permissions to the shell script.
4. Create a yourScript.desktop file in the ~/.local/share/applications folder to run the shell script from Dash.
Once you have your .py Python script in your Scripts folder, such as /home/al/Scripts, create a text file named yourScript (with no file extension) in the Scripts folder with the following content:
#!/usr/bin/env bash
source ~/Scripts/.venv/bin/activate
python3 ~/Scripts/yourScript.py
read -p "Press any key to continue..." -n1 –s
deactivate
The ~ represents the home folder, such as /Users/al. The first line identifies this file as a shell script. A .sh file extension isn’t necessary for this file.
The second line activates the virtual environment, and the third line runs the Python script using the virtual environment’s Python installation. The read command causes the terminal to display Press any key to continue and wait for the user to press a key. This prevents the terminal window from immediately closing after the Python program finishes so that you can see any remaining printed output. If your program has no printed output, you can omit this line.
After creating this shell script, cd to ~/Scripts and run the command chmod u+x yourScript. This adds execute permissions so that you can run it. At this point, you’ll also be able to run your Python script from the terminal by entering yourScript. To run your Python script from Dash, you must create a yourScript.desktop file.
In Mu or another text editor such as gedit, create a yourScript.desktop file with the following content:
[Desktop Entry]
Name=yourScript
Exec=gnome-terminal -- /home/al/Scripts/yourScript
Type=Application
Save this file to the /home/al/.local/share/applications folder (replacing al with your own username) as yourScript.desktop. (Note that the Exec field requires you to spell out /home/al; you cannot replace the value with a ~ in this file.) If your text editor doesn’t show the .local folder (because folders that begin with a period are considered hidden), press CTRL-H in the Save File dialog to show hidden files.
Now you’ll be able to quickly run the Python script by pressing the Windows key to bring up Dash and entering yourScript. Dash should autocomplete the full name for you. The yourScript text in the Name field of yourScript.desktop will appear in Dash and can be anything, but it’s convenient to give it the same name as yourScript.py.
Next, let’s create two programs using the principles in this chapter and deploy them for easy use.
A Short Program: Copying the Current Working Directory
While the pwd command on macOS and Linux will print the current working directory, it’s sometimes useful to copy this value to the clipboard for pasting elsewhere. For example, on Windows, I constantly find myself copying the current working directory from a terminal so that I can paste it in a Save File dialog to save a file in that same directory. Although I could use the mouse to select the current working directory from the Windows prompt to copy (or, on macOS and Linux, run the pwd command to print the working directory and select that text to copy), this requires several steps for what could be a one-step process.
My idea is to write a program named ccwd (for copy current working directory). First, I’ll enter where ccwd on Windows and which ccwd on macOS and Linux to make sure there isn’t currently a command with the same name, then maybe also do a quick internet search for ccwd to be sure. The name ccwd is short enough to type but also unique.
As an additional feature, say the terminal’s current working directory was set to C:\Users\al\Scripts, but what I wanted copied to the clipboard was C:\Users\al. I could just run the cd .. command, then ccwd, then cd Scripts to return to C:\Users\al\Scripts. But it would be easier if I could pass a relative filepath to ccwd as a command line argument. For example, ccwd .. would copy C:\Users\al to the clipboard when the current working directory was C:\Users\al\Scripts. You don’t have to specify this command line argument (the program defaults to the current working directory if none is given), but it’s available as a feature if the user wants it. These tiny improvements may seem trivial, but online retailers have “one-click buying” features on their websites because they know that slight improvements to convenience can have a major effect.
We’ll use the Pyperclip package to handle the clipboard, so be sure to install this into the Scripts folder’s virtual environment. Create a new file in Mu and enter the following content:
import pyperclip, os, sys
if len(sys.argv) > 1:
    os.chdir(sys.argv[1])
pyperclip.copy(os.getcwd())
Save this program as ccwd.py in the Scripts folder under your home folder.
The first line imports the modules the program needs. The second line checks if there are any command line arguments passed to the program. Remember that sys.argv is a list that always contains at least one string: the 'ccwd.py' name of the script. If it has more than one string, we know the user supplied command line arguments to the program. In that case, the third line changes the current working directory of the program. Note that every program has its own current working directory setting, and changing this setting with os.chdir() doesn’t change the current working directory of the terminal that ran the program. Finally, the fourth line copies the current working directory to the clipboard.
The program is finished, but to run it from a terminal, we’d have to enter the full path to it: something like python C:\Users\al\Scripts\ccwd.py. That’s a lot to type and defeats the purpose of having a quick and easy script to copy the current working directory to the clipboard. To improve this process, let’s go over the deployment steps for this program on each operating system.
Windows
Save the Python file as C:\Users\al\Scripts\ccwd.py (changing al to your username). In the same Scripts folder, create a ccwd.bat file with the following content:
@call %HOMEDRIVE%%HOMEPATH%\Scripts\.venv\Scripts\activate.bat
@python %HOMEDRIVE%%HOMEPATH%\Scripts\ccwd.py %*
@deactivate
This batch file doesn’t have the @pause line, because it has no print() output. You can now run this program from the terminal in any folder by running ccwd:
C:\Users\al>ccwd
C:\Users\al>
At this point, 'C:\Users\al' is on the clipboard.
macOS
Save the Python file as /Users/al/Scripts/ccwd.py (changing al to your username). In the same Scripts folder, create a text file with the name ccwd.command and the following content:
source ~/Scripts/.venv/bin/activate
python3 ~/Scripts/ccwd.py
deactivate
Then, in a terminal, cd to the Scripts folder and run chmod u+x ccwd.command:
al@Als-MacBook-Pro ~ % cd ~/Scripts
al@Als-MacBook-Pro Scripts % chmod u+x ccwd.command
You can now run this program from the terminal in any folder by running ccwd.command:
al@Als-MacBook-Pro ~ % ccwd.command
al@Als-MacBook-Pro ~ %
At this point, '/Users/al' should be on the clipboard.
Ubuntu Linux
Save the Python file as /home/al/Scripts/ccwd.py (changing al to your username). In the same Scripts folder, create a text file named ccwd with the following content:
#!/usr/bin/env bash
source ~/Scripts/.venv/bin/activate
python3 ~/Scripts/ccwd.py
deactivate
This ccwd shell script doesn’t need the read -p "Press any key to continue..." -n1 –s line, because it will be run only from the terminal and not from Dash, and the terminal window won’t disappear after running the Python script.
Then, in a terminal, cd to the Scripts folder and run chmod u+x ccwd:
al@al-VirtualBox:~$ cd ~/Scripts
al@al-VirtualBox:~/Scripts$ chmod u+x ccwd
You can now run this program from the terminal in any folder by running ccwd:
al@al-VirtualBox:~$ ccwd
al@al-VirtualBox:~$
At this point, '/home/al' should be on the clipboard.
A Short Program: Clipboard Recorder
Let’s say that part of your job is to copy the URLs for links on a web page and paste them into a spreadsheet. (In Chapter 13, you’ll learn how to scrape all the links for the HTML source of the page. But let’s say you only need to copy some of them, and a human must decide which ones on a case-by-case basis.) You could follow these steps:
1. Right-click a link in a web browser.
2. Select the Copy Link or Copy Link Address item from the context menu.
3. Switch to the spreadsheet app.
4. Press CTRL-V to paste the link.
5. Switch back to the web browser.
This is a boring task, especially if the page has dozens or hundreds of links. Let’s create a small clipboard-recording program to make it faster. We’ll deploy this program on our computer so that we can conveniently run it when needed. Our program will monitor the clipboard to see if new text has been copied to it, and if so, it will print it to the terminal screen. This way, we can convert our five-step process into a two-step process:
1. Right-click a link in a web browser.
2. Select the Copy Link or Copy Link Address item from the context menu.
Then, the user can just copy all the text from the clipboard recorder’s terminal window and paste it into the spreadsheet at once. Enter the following into the file editor and save it as cliprec.py:
import pyperclip, time

print('Recording clipboard... (Ctrl-C to stop)')
previous_content = ''
try:
    while True:
        content = pyperclip.paste()  # Get clipboard contents.

        if content != previous_content:
            # If it's different from the previous, print it:
            print(content)
            previous_content = content

        time.sleep(0.01)  # Pause to avoid hogging the CPU.
except KeyboardInterrupt:
    pass
Let’s look at each part of this program, starting with the beginning:
import pyperclip, time

print('Recording clipboard... (Ctrl-C to stop)')
previous_content = ''
This program copies and pastes text from the clipboard, so we’ll need to import the pyperclip module. We’ll also import the time module to use its sleep() function. The program displays a quick message to say that it is running and reminds the user that CTRL-C causes the program to stop. The program will know that the clipboard contents have changed by keeping track of what the contents were previously with a previous_content variable, which is initially set to a blank string.
try:
    while True:
        content = pyperclip.paste()  # Get clipboard contents.
The bulk of the program exists in an infinite while loop, which itself is inside a try block. When the user presses CTRL-C, Python raises a KeyboardInterrupt exception, causing the execution to move to the except block at the bottom of the source code.
This loop continuously monitors the contents of the clipboard and notes each time the user copies new text to it. Within the loop, the first step is to collect the text on the clipboard by calling pyperclip.paste().
        if content != previous_content:
            # If it's different from the previous, print it:
            print(content)
            previous_content = content
If the current content on the clipboard is different from the previous content, then the program prints the current content and updates previous_content to content. This sets up the loop for the next time the user copies new text to the clipboard.
time.sleep(0.01) # Pause to avoid hogging the CPU.If the clipboard contents are the same as the previously obtained clipboard contents, we could have our program do nothing. However, this program can easily execute this loop tens of thousands of times a second, and it’s unlikely that the user will be updating the clipboard that frequently. (They’d probably wear out the CTRL and C keys on their keyboard if they tried.) To prevent the program from hogging the CPU by running this unproductive loop as fast as possible, we introduce a 0.01-second delay so that the loop checks for clipboard updates a mere 100 times a second.
except KeyboardInterrupt:
    pass
The last part of the program is the except clause, which uses Python’s pass statement. This statement literally does nothing, but Python is expecting at least one line in the block that follows the except statement. This is what the pass statement was created for. When the user presses CTRL-C, the execution moves to this except clause and proceeds to the end of the program, where it terminates.
With this app running, the user can copy several things without having to switch back and forth between apps. Small programs like this can make your workflow much easier, especially if you have to do this work every day. Now let’s deploy this program on each operating system.
Windows
Save the Python file as C:\Users\al\Scripts\cliprec.py (changing al to your username). In the same Scripts folder, create a cliprec.bat file with the following content:
@call %HOMEDRIVE%%HOMEPATH%\Scripts\.venv\Scripts\activate.bat
@python %HOMEDRIVE%%HOMEPATH%\Scripts\cliprec.py %*
@pause
@deactivate
You can now run this program from the terminal or by pressing the Windows key and the R key simultaneously to open the Run dialog, and then entering cliprec.
macOS
Save the Python file as /Users/al/Scripts/cliprec.py (changing al to your username). In the same Scripts folder, create a text file with the name cliprec .command and the following content:
source ~/Scripts/.venv/bin/activate
python3 ~/Scripts/cliprec.py
deactivate
Then, in a terminal, cd to the Scripts folder and run chmod u+x cliprec.command:
al@Als-MacBook-Pro ~ % cd ~/Scripts
al@Als-MacBook-Pro Scripts % chmod u+x cliprec.command
You can now run this program by pressing ⌘-spacebar to bring up Spotlight and entering cliprec.command.
Ubuntu Linux
Save the Python file as /home/al/Scripts/cliprec.py (changing al to your username). In the same Scripts folder, create a text file named cliprec with the following content:
#!/usr/bin/env bash
source ~/Scripts/.venv/bin/activate
python3 ~/Scripts/cliprec.py
read -p "Press any key to continue..." -n1 –s
deactivate
Then, in a terminal, cd to the Scripts folder and run chmod u+x cliprec:
al@al-VirtualBox:~$ cd ~/Scripts
al@al-VirtualBox:~/Scripts$ chmod u+x cliprec
Finally, create a text file saved as ~/.local/share/applications/cliprec.desktop with the following content:
[Desktop Entry]
Name=Clipboard Recorder
Exec=gnome-terminal -- /home/al/cliprec
Type=Application
You can now run this program by pressing the Windows key to bring up Dash and entering Clipboard Recorder, or entering the first few characters of the name and letting autocomplete finish it for you.
Compiling Python Programs with PyInstaller
Python is often called an interpreted language, though programming languages themselves are neither interpreted nor compiled. You can create an interpreter or compiler for any language. Instead, programs written in Python are mostly run by interpreters. But it’s also possible to create executable programs from Python code with the PyInstaller package, which generates executable programs you can run from the command line.
PyInstaller doesn’t compile Python programs into machine code per se; rather, it creates an executable program that contains a copy of the Python interpreter and your script. As such, these programs tend to be fairly large. Even a simple “Hello, world” program compiled with PyInstaller can be close to 8MB in size, literally a thousand times larger than a version written in assembly language. However, the benefit of compiling your Python program is that you can share your program with others who don’t have Python installed. You’d be able to send them one executable file.
You can install PyInstaller by running pip install pyinstaller. You must run PyInstaller on the operating system that you want the executable to run on. That is, if you’re on Windows, PyInstaller can create a Windows executable program but not a macOS or Linux program, and vice versa.
From the terminal, run the following command (using python3 instead of python on macOS and Linux) to compile a Python script named yourScript.py:
C:\Users\al>python -m PyInstaller --onefile yourScript.py
378 INFO: PyInstaller: X.X.X
378 INFO: Python: 3.XX.XX
392 INFO: Platform: Windows-XX-XX.X.XXXX
393 INFO: wrote C:\Users\al\Desktop\hello-test\hello.spec
399 INFO: UPX is not available.
--snip--
11940 INFO: Appending PKG archive to EXE
11950 INFO: Fixing EXE headers
13622 INFO: Building EXE from EXE-00.toc completed successfully.
Notice that you must enter PyInstaller with a capital P and capital I or else you’ll get a “No module named pyinstaller” error message. Also, note that the --onefile argument has two dashes.
After running PyInstaller, there will be a build folder (which you can delete) and a dist folder. The dist folder contains the executable program. You don’t need to create a virtual environment for it. You can then copy this program to other computers or send it as an email attachment. Keep in mind that, as a security precaution, many email providers may block emails that contain an executable program.
The instructions here work for basic Python programs. The online documentation at https://
Summary
In this chapter, you learned how to take your programs out of the code editor and deploy them so that users can run them quickly and conveniently. You also learned more guidelines about how to design programs that have text-based user interfaces instead of more modern graphical ones. While a GUI is user friendly, TUIs are simpler to code. When you need to automate tasks for yourself, making your program look like a professional application isn’t worth the extra effort. You just need something that works.
That said, there are several ways you can design your program to be easy to use. Often, this involves the command line terminal, which many users aren’t familiar with. It may take a while to learn command line concepts such as navigating the file system with cd and dir/ls, the PATH environment variable, and command line arguments. But the terminal allows you to very quickly issue commands and run programs, especially after you finish writing the programs and deploy them.
This chapter also covered several third-party packages. The Bext package lets you add colorful text, position the cursor, and clear the screen. The PyMsgBox package creates GUI boxes for alerts or basic input without using the terminal window. Because you may one day run programs that require incompatible versions of the same package, it’s best to run scripts in separate virtual environments. You can create virtual environments with the venv module that comes with Python. Virtual environments are activated from the terminal, and can prevent you from breaking existing programs by giving you a separate place to install packages.
Finally, the PyInstaller package allows you to compile your .py files into executable programs. They may be several megabytes in size, but you can share these programs with co-workers who might not have Python (and the third-party packages your program uses) on their computer.
This chapter didn’t cover many programming language concepts; rather, it covered how to make your programs usable and convenient on a day-to-day basis. At this point, you know enough Python syntax to create basic programs (although there’s always more to learn!). In Part II of this book, you’ll explore several third-party packages that extend the capabilities of your Python programs.
Practice Questions
1. What command lists folder contents on Windows? What about on macOS and Linux?
2. What does the PATH environment variable contain?
3. What does the __file__ variable contain?
4. What command erases the text from the terminal window on Windows? What about on macOS and Linux?
5. How do you create a new virtual environment?
6. What command line argument should you pass to PyInstaller when compiling programs?
Practice Program: Make Your Programs Deployable
Make your existing programs easy to run by creating shell scripts in a PATH folder that executes them, or else compiling them with PyInstaller. Do this for the following projects:
- “Back Up a Folder into a ZIP File” from Chapter 11
- “Extract Contact Information from Large Documents” from Chapter 9
- “Add Bullets to Wiki Markup” from Chapter 8
- “Interactive Chessboard Simulator” from Chapter 7
- Any other programs you’ve created and want to easily launch or share with others