Check out other books by Al Sweigart, free online or available for purchase:


...and other books as well! Or register for the online video course. You can also donate to support the author directly.
15 GOOGLE SHEETS

Google Sheets, the free, web-based spreadsheet application available to anyone with a Google account or Gmail address, has become a useful, feature-rich competitor to Excel. Google Sheets has its own API, but this API can be confusing to learn and use. This chapter covers the EZSheets third-party library, which presents you with a simpler way to perform common actions, handling the details of the Google Sheets API so that you don’t have to learn them.
Installing and Setting Up EZSheets
You can install EZSheets with the pip command line tool by following the instructions in Appendix A.
Before your Python scripts can use EZSheets to access and edit your Google Sheets spreadsheets, you need a credentials JSON file and two token JSON files. There are five parts to creating credentials:
1. Create a new Google Cloud project.
2. Enable the Google Sheets API and Google Drive API for your project.
3. Configure the OAuth consent screen.
4. Create credentials.
5. Log in with the credentials file.
This may seem like a lot of work, but you have to perform this setup only once, and doing it is free. You’ll need a Google/Gmail account; I strongly recommend creating a new Google account instead of using your existing one, to prevent a bug in your Python script from affecting the spreadsheets in your personal Google account. Throughout this chapter, I’ll say your Google account and your Gmail email address to refer to the Google account that owns the spreadsheets your Python program accesses.
Google may slightly change the layout or wording on its Google Cloud Console website. However, the basic steps I’ve outlined should remain the same.
Creating a New Google Cloud Project
First, you need to set up a Google Cloud project. In your browser, go to https://
Google Cloud will generate a project name like “My Project 23135” for you, along with a random project ID, like “macro-nuance-362516.” These values won’t be visible to users of your Python scripts, and you can change the project name to whatever name you want, but you cannot change the project ID. I just use the default name that the website generates for me. You can leave the location set to “No organization.” Free Google accounts can have up to 12 projects, but you need only one project for all the Python scripts you want to create. Click the blue Create button to create the project.
Enabling the Sheets and Drive APIs
On the https://
Scroll down, locate the Google Sheets API, and click it, or enter “Google Sheets API” into the search bar to find it. This should take you to the Google Sheets API page. Click the blue Enable button to enable your Google Cloud project to use the Google Sheets API. You’ll be redirected to the APIs & ServicesEnabled APIs & Services page, where you can find information about how often your Python scripts are using this API. Repeat this process for the Google Drive API to enable it as well.
Next, you need to configure your project’s OAuth consent screen.
Configuring the OAuth Consent Screen
The OAuth consent screen will appear to the user when they first run import ezsheets. On the Step 1 OAuth consent screen page, select External and click the blue Create button. The next page should show what the OAuth consent screen looks like. Pick a name for the App Name field (I use something generic, like “Python Google API Script”), and enter your email address for the User Support Email and Developer Contact Information field. Then click the Save and Continue button.
On the Step 2 Scopes page, define your project’s scopes, or the permissions for the resources the project is allowed to access. Click the Add or Remove Scopes button, and in the new panel that appears, go through the table and check the checkboxes for the scopes .../auth/drive (the Google Drive API) and .../auth/spreadsheets (the Google Sheets API). Then, click the blue Update button and then click Save and Continue.
The Step 3 Test users page requires you to add the Gmail email addresses of the Google accounts that own the spreadsheets your Python script will interact with. Unless you go through Google’s app approval process, your scripts are limited to interacting with the email addresses you provide in this step. Click the + Add Users button. In the new panel that appears, enter the Gmail address of your Google account and click the blue Add button. Then click Save and Continue.
The Step 4 Summary page provides a summary of the previous steps. If all the information looks right, click the BACK TO DASHBOARD button. The next step is to create credentials for your project.
Creating Credentials
First, you’ll need to create a credentials file. EZSheets needs this to use the Google API, even for spreadsheets that are publicly shared. From the Navigation sidebar menu, click APIs & Services and then Credentials to go to the Credentials page. Then click the + Create Credentials link at the top of the page. A submenu should open asking what kind of credentials you want to create: API Key, OAuth Client ID, or Service Account. Click OAuth Client ID.
On the next page, select Desktop App for the Application Type and leave Name as the default “Desktop client 1.” You can change it to a different name if you want; it doesn’t appear to the users of your Python script. Click the blue Create button.
A pop-up window should appear. Click Download JSON to download the credentials file, which should have a name like client_secret_282792235794-p2o9gfcub4htibfg2u207gcomco9nqm7.apps.googleusercontent.com.json. Place it in the same folder as your Python script. For simplicity, you can also rename the JSON file to credentials-sheets.json. EZSheets searches for credentials-sheets.json or any file that matches the client_secret_*.json format.
Logging In with the Credentials File
Run the Python interactive shell from the same folder that the credentials JSON file is in and then run import ezsheets. EZSheets automatically checks the current working directory for the credentials JSON file by calling the ezsheets.init() function. If the file is found, EZSheets launches your web browser to the OAuth consent screen to generate token files. EZSheets also requires these token files, named token-drive.pickle and token-sheets .pickle, along with the credentials file to access spreadsheets. Generating token files is a one-time setup step that won’t happen the next time you run import ezsheets.
Sign in with your Google account. This must be the same email address you provided for the “Test User” when configuring the Google Cloud project’s OAuth consent screen. You should get a warning message that reads, “Google hasn’t verified this app,” which is fine, because you are the app creator. Click the Continue link. You should arrive at another page that says something like “Python Google API Script wants access to your Google Account” (or whichever name you gave in the OAuth consent screen setup). Click Continue. You’ll come to a plain web page that says, “The authentication flow has completed.” You can now close the browser window.
Once you’ve completed the authentication flow for the Sheets API, you must repeat this process for the Drive API in the window that opens next. After closing the second window, you should now see token-drive.pickle and token-sheets.pickle files in the same folder as your credentials JSON file. Treat these files like passwords and do not share them: they can be used to log in and access your Google Sheets spreadsheets.
Revoking the Credentials File
If you accidentally share the credential or token files with someone, they won’t be able to change your Google account password, but they will have access to your spreadsheets. You can revoke these files by logging in to https://
Spreadsheet Objects
In Google Sheets, a spreadsheet can contain multiple sheets (also called worksheets), and each sheet contains columns and rows of cells. Cells contain data such as numbers, dates, or bits of text. Cells also have properties such as fonts, widths and heights, and background colors. Figure 15-1 shows a spreadsheet titled Sweigart Books containing two sheets, titled Books and Websites. You can view this spreadsheet in your browser by going to https://
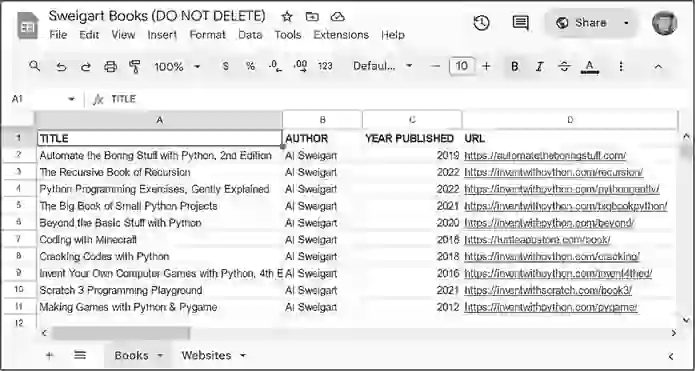
Figure 15-1: A spreadsheet titled Sweigart Books with two sheets, Books and Websites
While most of your work will involve modifying the Sheet objects, you can also modify Spreadsheet objects, as you’ll see in the next section.
Creating, Uploading, and Listing Spreadsheets
You can make a new Spreadsheet object from an existing Google Sheets spreadsheet, a new blank spreadsheet, or an uploaded Excel spreadsheet. All Google Sheets spreadsheets have a unique ID that can be found in their URL, after the spreadsheets/d/ part and before the /edit part. For example, in the URL https://
A Google Sheets spreadsheet is represented as an ezsheets.Spreadsheet object, which has id, url, and title attributes. You can create a new, blank spreadsheet with the Spreadsheet() function:
>>> import ezsheets
>>> ss = ezsheets.Spreadsheet()
>>> ss.title = 'Title of My New Spreadsheet'
>>> ss.title
'Title of My New Spreadsheet'
>>> ss.url
'https://docs.google.com/spreadsheets/d/1gxz-Qr2-RNtqi_d7wWlsDlbtPLRQigcEXvCtdVwmH40/'
>>> ss.id
'1gxz-Qr2-RNtqi_d7wWlsDlbtPLRQigcEXvCtdVwmH40'
You can also load an existing spreadsheet by passing its ID or URL, or a URL that redirects to its URL:
>>> import ezsheets
>>> ss1 = ezsheets.Spreadsheet('https://autbor.com/examplegs')
>>> ss2 = ezsheets.Spreadsheet('https://docs.google.com/spreadsheets/d/1TzOJxh
NKr15tzdZxTqtQ3EmDP6em_elnbtmZIcyu8vI/')
>>> ss3 = ezsheets.Spreadsheet('1TzOJxhNKr15tzdZxTqtQ3EmDP6em_elnbtmZIcyu8vI')
>>> ss1 == ss2 == ss3  # These are the same spreadsheet.
True
To upload an existing Excel, OpenOffice, CSV, or TSV spreadsheet to Google Sheets, pass the spreadsheet’s filename to ezsheets.upload(). Enter the following into the interactive shell, replacing my_spreadsheet.xlsx with a spreadsheet file of your own:
>>> import ezsheets
>>> ss = ezsheets.upload('my_spreadsheet.xlsx')
>>> ss.title
'my_spreadsheet'
You can list the spreadsheets in your Google account by calling the listSpreadsheets() function. This function returns a dictionary whose keys are spreadsheet IDs and whose values are the titles of each spreadsheet. It includes deleted spreadsheets in your account’s Trash folder. Try entering the following into the interactive shell after uploading a spreadsheet:
>>> ezsheets.listSpreadsheets()
{'1J-Jx6Ne2K_vqI9J2SO-TAXOFbxx_9tUjwnkPC22LjeU': 'Education Data'}
Once you’ve obtained a Spreadsheet object, you can use its attributes and methods to manipulate the online spreadsheet hosted on Google Sheets.
Accessing Spreadsheet Attributes
While the actual data lives in a spreadsheet’s individual sheets, the Spreadsheet object has the following attributes for manipulating the spreadsheet itself: title, id, url, sheetTitles, and sheets. Let’s examine the spreadsheet at https://
>>> import ezsheets
>>> example_ss = ezsheets.Spreadsheet('https://autbor.com/examplegs')
>>> ss = ezsheets.Spreadsheet()
>>> example_ss.sheets[0].copyTo(ss)
>>> ss.sheets[0].delete()  # Delete the Sheet1 sheet.
>>> ss.url
'https://docs.google.com/spreadsheets/d/15gjrbgTmUzItRt9KUcL4JajLaQU70xanstB1dXKoSlM/'
The newly copied sheet will have the title Copy of Books, as Books was the name of the original sheet. Continue the interactive shell example with the following code:
>>> ss.title  # The title of the spreadsheet
'Untitled spreadsheet'
>>> ss.title = 'Sweigart Books'  # Change the title.
>>> ss.id  # The unique ID (a read-only attribute)
'15gjrbgTmUzItRt9KUcL4JajLaQU70xanstB1dXKoSlM'
>>> ss.url  # The original URL (a read-only attribute)
'https://docs.google.com/spreadsheets/d/15gjrbgTmUzItRt9KUcL4JajLaQU70xanstB1dXKoSlM/'
>>> ss.sheetTitles  # The titles of all the Sheet objects
('Copy of Books',)
>>> ss.sheets  # The Sheet objects in this Spreadsheet, in order
(<Sheet sheetId=1464919459, title='Copy of Books', rowCount=1000, columnCount=26>,)
>>> ss.sheets[0]  # The first Sheet object in this Spreadsheet
<Sheet sheetId=1464919459, title='Copy of Books', rowCount=1000, columnCount=26>
>>> ss['Copy of Books']  # Sheets can also be accessed by title.
<Sheet sheetId=1464919459, title='Copy of Books', rowCount=1000, columnCount=26>
>>> ss.Sheet('New blank sheet')  # Create a new sheet.
<Sheet sheetId=1759616008, title='New blank sheet', rowCount=1000, columnCount=26>
>>> ss.sheets[1].delete()  # Delete the second Sheet object in this Spreadsheet.
If someone changes the spreadsheet in their browser, your script can update the Spreadsheet object to match the online data by calling the refresh() method:
>>> ss.refresh()This will refresh not only the Spreadsheet object’s attributes but also the data in the Sheet objects it contains. You’ll see the changes you make to the Spreadsheet object applied to the online spreadsheet in real time.
Downloading and Uploading Spreadsheets
You can download a Google Sheets spreadsheet in a number of formats: Excel, OpenOffice, CSV, TSV, and PDF. You can also download it as a ZIP file containing HTML files of the spreadsheet’s data. EZSheets contains functions for each of these options:
>>> import ezsheets
>>> ss = ezsheets.Spreadsheet('https://autbor.com/examplegs')
>>> ss.title
'Sweigart Books (DO NOT DELETE)'
>>> ss.downloadAsExcel()  # Downloads the spreadsheet as an Excel file
'Sweigart_Books.xlsx'
>>> ss.downloadAsODS()  # Downloads the spreadsheet as an OpenOffice file
'Sweigart_Books.ods'
>>> ss.downloadAsCSV()  # Downloads only the first sheet as a CSV file
'Sweigart_Books.csv'
>>> ss.downloadAsTSV()  # Downloads only the first sheet as a TSV file
'Sweigart_Books.tsv'
>>> ss.downloadAsPDF()  # Downloads the spreadsheet as a PDF
'Sweigart_Books.pdf'
>>> ss.downloadAsHTML()  # Downloads the spreadsheet as a ZIP of HTML files
'Sweigart_Books.zip'
Note that files in the CSV or TSV format can contain only one sheet; therefore, if you download a Google Sheets spreadsheet in either of these formats, you will get the first sheet only. To download other sheets, you’ll need to reorder the Sheet objects before downloading.
The download functions all return a string of the downloaded file’s filename. You can also specify your own filename for the spreadsheet by passing the new filename to the download function:
>>> ss.downloadAsExcel('a_different_filename.xlsx')
'a_different_filename.xlsx'
The function returns the local filename.
Deleting Spreadsheets
To delete a spreadsheet, call the delete() method:
>>> import ezsheets
>>> ss = ezsheets.Spreadsheet()  # Create the spreadsheet.
>>> ezsheets.listSpreadsheets()  # Confirm that we've created a spreadsheet.
{'1aCw2NNJSZblDbhygVv77kPsL3djmgV5zJZllSOZ_mRk': 'Delete me'}
>>> ss.delete()  # Delete the spreadsheet.
>>> ezsheets.listSpreadsheets()  # Spreadsheets in the Trash folder are still listed.
{'1aCw2NNJSZblDbhygVv77kPsL3djmgV5zJZllSOZ_mRk': 'Delete me'}
The delete() method will move your spreadsheet to the Trash folder on your Google Drive. You can view the contents of your Trash folder at https://
>>> ss.delete(permanent=True)
>>> ezsheets.listSpreadsheets()
{}
In general, permanently deleting your spreadsheets with automated scripts is not a good idea, because it’s impossible to recover a spreadsheet that a bug in your script accidentally deleted. Even free Google Drive accounts have gigabytes of storage available, so you most likely don’t need to worry about freeing up space.
Sheet Objects
A Spreadsheet object will have one or more Sheet objects. The Sheet objects represent the rows and columns of data in each sheet. You can access these sheets using the square brackets operator and an integer index.
The Spreadsheet object’s sheets attribute holds a tuple of Sheet objects in the order in which they appear in the spreadsheet. To access the Sheet objects in a spreadsheet, enter the following into the interactive shell:
>>> import ezsheets
>>> ss = ezsheets.Spreadsheet()  # Starts with a sheet named Sheet1
>>> sheet2 = ss.Sheet('Spam')
>>> sheet3 = ss.Sheet('Eggs')
>>> ss.sheets  # The Sheet objects in this Spreadsheet, in order
(<Sheet sheetId=0, title='Sheet1', rowCount=1000, columnCount=26>, <Sheet sheetId=284204004,
title='Spam', rowCount=1000, columnCount=26>, <Sheet sheetId=1920032872, title='Eggs',
rowCount=1000, columnCount=26>)
>>> ss.sheets[0]  # Gets the first Sheet object in this Spreadsheet
<Sheet sheetId=0, title='Sheet1', rowCount=1000, columnCount=26>
The Spreadsheet object’s sheetTitles attribute holds a tuple of all the sheet titles. For example, enter the following into the interactive shell:
>>> ss.sheetTitles  # The titles of all the Sheet objects in this Spreadsheet
('Sheet1', 'Spam', 'Eggs')
Once you have a Sheet object, you can read data from it and write data to it using the Sheet object’s methods, as explained in the next section.
Reading and Writing Data
Just as in Excel, Google Sheets worksheets have columns and rows of cells containing data. You can use the square brackets operator [] to read and write data from and to these cells. For example, to create a new spreadsheet and add data to it, enter the following into the interactive shell:
>>> import ezsheets
>>> ss = ezsheets.Spreadsheet()
>>> ss.title = 'My Spreadsheet'
>>> sheet = ss.sheets[0]  # Get the first sheet in this spreadsheet.
>>> sheet.title
'Sheet1'
>>> sheet['A1'] = 'Name'  # Set the value in cell A1.
>>> sheet['B1'] = 'Age'
>>> sheet['C1'] = 'Favorite Movie'
>>> sheet['A1']  # Read the value in cell A1.
'Name'
>>> sheet['A2']  # Empty cells return a blank string.
''
>>> sheet[2, 1]  # Column 2, Row 1 is the same address as B1.
'Age'
>>> sheet['A2'] = 'Alice'
>>> sheet['B2'] = 30
>>> sheet['C2'] = 'RoboCop'
>>> sheet['B2']  # Note that all data is returned as strings.
'30'
These instructions should produce a Google Sheets spreadsheet that looks like Figure 15-2.
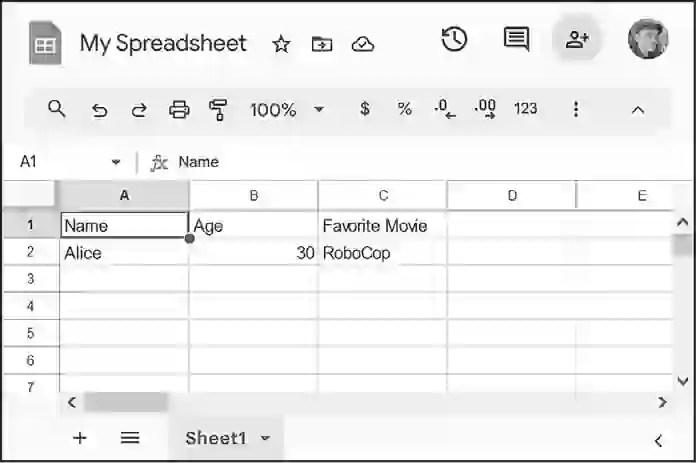
Figure 15-2 The spreadsheet created with the example instructions
All of the data in the Sheet object is loaded when the Spreadsheet object is first loaded, so the data is read instantly. However, writing values to the online spreadsheet requires a network connection and can take about a second. If you have thousands of cells to update, updating them one at a time might be quite slow. Instead, the next couple of sections will show you how to update entire rows and columns at once.
Addressing Columns and Rows
Cell addressing works in Google Sheets just like in Excel. The only difference is that, unlike Python’s 0-based list indexes, Google Sheets have 1-based columns and rows: the first column or row is at index 1, not 0. You can convert from the 'A2' string-style address to the (column, row) tuple-style address (and vice versa) with the convertAddress() function. The getColumnLetterOf() and getColumnNumberOf() functions will also convert a column address between letters and numbers. For example, enter the following into the interactive shell:
>>> import ezsheets
>>> ezsheets.convertAddress('A2')  # Converts addresses...
(1, 2)
>>> ezsheets.convertAddress(1, 2)  # ...and converts them back, too.
'A2'
>>> ezsheets.getColumnLetterOf(2)
'B'
>>> ezsheets.getColumnNumberOf('B')
2
>>> ezsheets.getColumnLetterOf(999)
'ALK'
>>> ezsheets.getColumnNumberOf('ZZZ')
18278
The 'A2' string-style addresses are convenient if you’re typing addresses into your source code. But the (column, row) tuple-style addresses are convenient if you’re looping over a range of addresses and need a numeric identifier for the column. The convertAddress(), getColumnLetterOf(), and getColumnNumberOf() functions are helpful when you need to convert between the two formats.
Reading and Writing Entire Columns and Rows
As mentioned, writing data one cell at a time can often take too long. Fortunately, EZSheets has Sheet methods for reading and writing entire columns and rows at the same time. The getColumn(), getRow(), updateColumn(), and updateRow() methods will, respectively, read and write columns and rows. These methods make requests to the Google Sheets servers to update the spreadsheet, so they require that you be connected to the internet. In this section’s example, we’ll upload produceSales3.xlsx from Chapter 14 to Google Sheets. You can download it from this book’s online resources. The first eight rows look like Table 15-1.
A |
B |
C |
D |
|
|---|---|---|---|---|
1 |
PRODUCE |
COST PER POUND |
POUNDS SOLD |
TOTAL |
2 |
Potatoes |
0.86 |
21.6 |
18.58 |
3 |
Okra |
2.26 |
38.6 |
87.24 |
4 |
Fava beans |
2.69 |
32.8 |
88.23 |
5 |
Watermelon |
0.66 |
27.3 |
18.02 |
6 |
Garlic |
1.19 |
4.9 |
5.83 |
7 |
Parsnips |
2.27 |
1.1 |
2.5 |
8 |
Asparagus |
2.49 |
37.9 |
94.37 |
To upload this spreadsheet, put the produceSales3.xlsx file in the current working directory and enter the following into the interactive shell:
>>> import ezsheets
>>> ss = ezsheets.upload('produceSales3.xlsx')
>>> sheet = ss.sheets[0]
>>> sheet.getRow(1)  # The first row is row 1, not row 0.
['PRODUCE', 'COST PER POUND', 'POUNDS SOLD', 'TOTAL', '', '']
>>> sheet.getRow(2)
['Potatoes', '0.86', '21.6', '18.58', '', '']
>>> sheet.getColumn(1)
['PRODUCE', 'Potatoes', 'Okra', 'Fava beans', 'Watermelon', 'Garlic',
--snip--
>>> sheet.getColumn('A')  # The same result as getColumn(1)
['PRODUCE', 'Potatoes', 'Okra', 'Fava beans', 'Watermelon', 'Garlic',
--snip--
>>> sheet.getRow(3)
['Okra', '2.26', '38.6', '87.24', '', '']
>>> sheet.updateRow(3, ['Pumpkin', '11.50', '20', '230'])
>>> sheet.getRow(3)
['Pumpkin', '11.50', '20', '230', '', '']
>>> columnOne = sheet.getColumn(1)
>>> for i, value in enumerate(columnOne):
...     # Make the Python list contain uppercase strings:
...     columnOne[i] = value.upper()
...
>>> sheet.updateColumn(1, columnOne)  # Update the entire column in one request.
The getRow() and getColumn() functions retrieve the data from every cell in a specific row or column as a list of values. Note that empty cells become blank string values in the list. You can pass getColumn() either a column number or a letter to tell it to retrieve a specific column’s data. The previous example shows that getColumn(1) and getColumn('A') return the same list.
The updateRow() and updateColumn() functions will overwrite the data in the row or column, respectively, with the list of values passed to the function. In this example, the third row initially contains information about okra, but the updateRow() call replaces it with data about pumpkins. Call sheet.getRow(3) again to view the new values in the third row.
Updating cells one at a time is slow if you have many cells to update. Getting a column or row as a list, updating the list, and then updating the entire column or row with the list is much faster, because you can make all changes in one request to Google’s cloud services.
To get all of the rows at once, call the getRows() method to return a list of lists. The inner lists inside the outer list each represent a single row of the sheet. You can modify the values in this data structure to change the produce name, pounds sold, and total cost of some of the rows. Then, you can pass it to the updateRows() method by entering the following into the interactive shell:
>>> rows = sheet.getRows()  # Get every row in the spreadsheet.
>>> rows[0]  # Examine the values in the first row.
['PRODUCE', 'COST PER POUND', 'POUNDS SOLD', 'TOTAL', '', '']
>>> rows[1]
['POTATOES', '0.86', '21.6', '18.58', '', '']
>>> rows[1][0] = 'PUMPKIN'  # Change the produce name.
>>> rows[1]
['PUMPKIN', '0.86', '21.6', '18.58', '', '']
>>> rows[10]
['OKRA', '2.26', '40', '90.4', '', '']
>>> rows[10][2] = '400'  # Change the pounds sold.
>>> rows[10][3] = '904'  # Change the total.
>>> rows[10]
['OKRA', '2.26', '400', '904', '', '']
>>> sheet.updateRows(rows)  # Update the online spreadsheet with the changes.
You can update the entire sheet in a single request by passing updateRows() the list of lists returned from getRows(), amended with the changes made to rows 1 and 10.
Note that the rows in the Google Sheets spreadsheet have empty strings at the end. This is because the uploaded sheet has a column count of 6, but we have only four columns of data. You can read the number of rows and columns in a sheet with the rowCount and columnCount attributes. Then, by setting these values, you can change the size of the sheet:
>>> sheet.rowCount  # The number of rows in the sheet
23758
>>> sheet.columnCount  # The number of columns in the sheet
6
>>> sheet.columnCount = 4  # Change the number of columns to 4.
>>> sheet.columnCount  # Now the number of columns in the sheet is 4.
4
These instructions should delete the fifth and sixth columns of the produceSales3.xlsx spreadsheet, as shown in Figure 15-3.
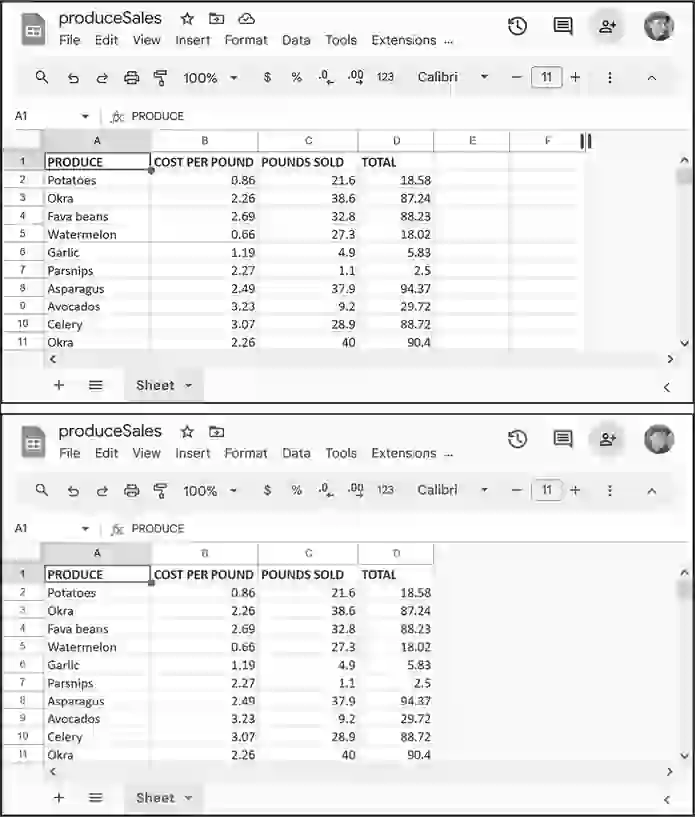
Figure 15-3: The sheet before (top) and after (bottom) changing the column count to four
According to Google’s documentation, Google Sheets spreadsheets can have up to 10 million cells in them. However, it’s a good idea to make sheets only as big as you need to minimize the time it takes to update and refresh the data.
Creating, Moving, and Deleting Sheets
All Google Sheets spreadsheets start with a single sheet named Sheet1. You can add additional sheets to the end of the list of sheets with the Sheet() method, which accepts an optional string to use as the new sheet’s title. An optional second argument can specify the integer index of the new sheet. To create a spreadsheet and then add new sheets to it, enter the following into the interactive shell:
>>> import ezsheets
>>> ss = ezsheets.Spreadsheet()
>>> ss.title = 'Multiple Sheets'
>>> ss.sheetTitles
('Sheet1',)
>>> ss.Sheet('Spam')  # Create a new sheet at the end of the list of sheets.
<Sheet sheetId=2032744541, title='Spam', rowCount=1000, columnCount=26>
>>> ss.Sheet('Eggs')  # Create another new sheet.
<Sheet sheetId=417452987, title='Eggs', rowCount=1000, columnCount=26>
>>> ss.sheetTitles
('Sheet1', 'Spam', 'Eggs')
>>> ss.Sheet('Bacon', 0)  # Create a sheet at index 0 in the list of sheets.
<Sheet sheetId=814694991, title='Bacon', rowCount=1000, columnCount=26>
>>> ss.sheetTitles
('Bacon', 'Sheet1', 'Spam', 'Eggs')
These instructions add three new sheets to the spreadsheet: Bacon, Spam, and Eggs (in addition to the default Sheet1). The sheets in a spreadsheet are ordered, and new sheets go to the end of the list unless you pass a second argument to Sheet() specifying the sheet’s index. Here, you create the sheet titled Bacon at index 0, making Bacon the first sheet in the spreadsheet and displacing the other three sheets by one position. This is similar to the behavior of the insert() list method.
You can see the new sheets on the tabs at the bottom of the screen, as shown in Figure 15-4.
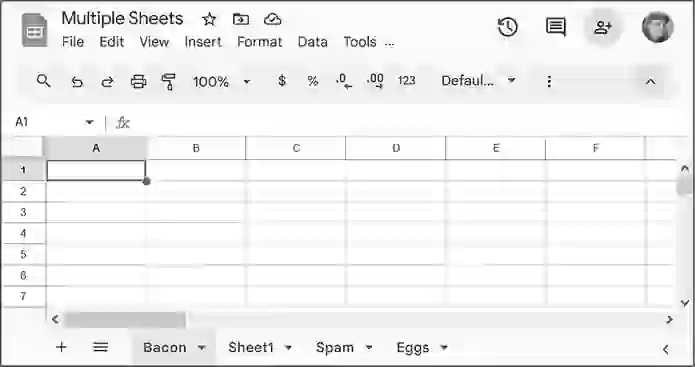
Figure 15-4: The Multiple Sheets spreadsheet after adding sheets Spam, Eggs, and Bacon
You can get the order of a sheet from its index attribute and then assign a new index to this attribute to reorder the sheet:
>>> ss.sheetTitles
('Bacon', 'Sheet1', 'Spam', 'Eggs')
>>> ss.sheets[0].index
0
>>> ss.sheets[0].index = 2  # Move the sheet at index 0 to index 2.
>>> ss.sheetTitles
('Sheet1', 'Spam', 'Bacon', 'Eggs')
>>> ss.sheets[2].index = 0  # Move the sheet at index 2 to index 0.
>>> ss.sheetTitles
('Bacon', 'Sheet1', 'Spam', 'Eggs')
The Sheet object’s delete() method will delete the sheet from the spreadsheet. If you want to keep the sheet but delete the data it contains, call the clear() method to clear all the cells and make it a blank sheet. Enter the following into the interactive shell:
>>> ss.sheetTitles
('Bacon', 'Sheet1', 'Spam', 'Eggs')
>>> ss.sheets[0].delete()  # Delete the sheet at index 0: the "Bacon" sheet.
>>> ss.sheetTitles
('Sheet1', 'Spam', 'Eggs')
>>> ss['Spam'].delete()  # Delete the "Spam" sheet.
>>> ss.sheetTitles
('Sheet1', 'Eggs')
>>> sheet = ss['Eggs']  # Assign a variable to the "Eggs" sheet.
>>> sheet.delete()  # Delete the "Eggs" sheet.
>>> ss.sheetTitles
('Sheet1',)
>>> ss.sheets[0].clear()  # Clear all the cells on the "Sheet1" sheet.
>>> ss.sheetTitles  # The "Sheet1" sheet is empty but still exists.
('Sheet1',)
Deleting sheets is permanent; there’s no way to recover the data. However, you can back up sheets by copying them to another spreadsheet with the copyTo() method, as explained in the next section.
Copying Sheets
Every Spreadsheet object has an ordered list of the Sheet objects it contains, and you can use this list to reorder the sheets (as shown in the previous section) or copy them to other spreadsheets. To copy a Sheet object to another Spreadsheet object, call the copyTo() method. Pass it the destination Spreadsheet object as an argument. To create two spreadsheets and copy the first spreadsheet’s data to the other sheet, enter the following into the interactive shell:
>>> import ezsheets
>>> ss1 = ezsheets.Spreadsheet()
>>> ss1.title = 'First Spreadsheet'
>>> ss1.sheets[0].title = 'Spam'  # ss1 will have a sheet named Spam.
>>> ss2 = ezsheets.Spreadsheet()
>>> ss2.title = 'Second Spreadsheet'
>>> ss2.sheets[0].title = 'Eggs'  # ss2 will have a sheet named Eggs.
>>> ss1[0]
<Sheet sheetId=0, title='Spam', rowCount=1000, columnCount=26>
>>> ss1[0].updateRow(1, ['Some', 'data', 'in', 'the', 'first', 'row'])
>>> ss1[0].copyTo(ss2)  # Copy the ss1's Sheet1 to the ss2 spreadsheet.
>>> ss2.sheetTitles  # ss2 now contains a copy of ss1's Sheet1.
('Eggs', 'Copy of Spam')
Copied sheets appear with a prefix of Copy of at the end of the list of the destination spreadsheet’s sheets. If you wish, you can change their index attribute to reorder them in the new spreadsheet.
Google Forms
Your Google account also gives you access to Google Forms at https://
In Chapter 19, you’ll learn to schedule your Python programs to run at regular, specified times. You could write a program that regularly checks a Google Forms spreadsheet for responses and detect any new entries it hasn’t seen before. Then, using the information in Chapter 20, you can have the program send you a text so that you can get real-time notifications when a form is filled out.
As you’ve seen, Python is well-known as a “glue” language for tying together multiple existing software systems, letting you create an automated process more powerful than the sum of its parts.
Project 11: Fake Blockchain Cryptocurrency Scam
In this project, we’ll use Google Sheets as a fake blockchain to track the transactions of Boringcoin, a cryptocurrency scam I’m promoting. (It turns out that investors and customers don’t care if your blockchain product uses a real blockchain data structure; they will give you money anyway.)
The URL https://
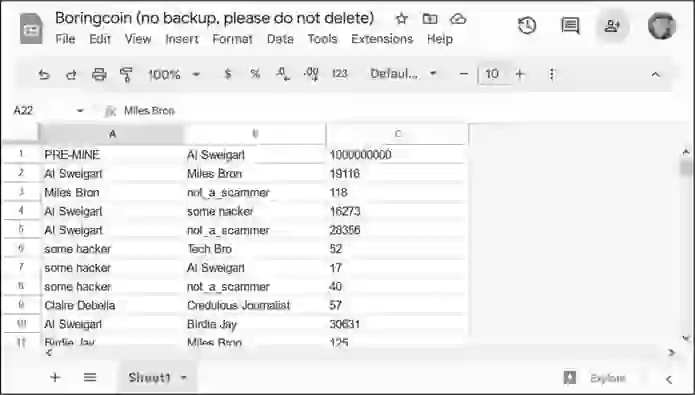
Figure 15-5: The fake blockchain for Boringcoin, stored on a Google Sheet
The first transaction has the sender 'PRE-MINE' and the recipient 'Al Sweigart', and the amount is a humble 1000000000. The 'Al Sweigart' account then transfers 19116 Boringcoins to 'Miles Bron', who then transfers 118 Boringcoins to 'not_a_scammer'. The fourth transaction transfers 16273 Boringcoins from 'Al Sweigart' to 'some hacker'. (I did not authorize this transaction and have since stopped using python12345 as my Google account password.)
Let’s write two programs. First, the auditBoringcoin.py program examines all the transactions and generates a dictionary of all accounts and their current balance. Second, the addBoringcoinTransaction.py program adds a row to the end of the Google Sheets for a new transaction. These blockchain programs are just for fun and not real (though “real” blockchain projects such as NFTs and “web3” are just as much a fantasy).
Step 1: Audit the Fake Blockchain
We need to write a program to examine the entire “blockchain” and determine the current balance of all accounts. We’ll use a dictionary to hold this data, where the keys are strings of the account name and the values are integers of how many Boringcoins are in them. We also want the program to display how many total Boringcoins are in the cryptocurrency network. We can start by importing EZSheets and setting up the dictionary:
import ezsheets
ss = ezsheets.Spreadsheet('https://autbor.com/boringcoin')
accounts = {}  # Keys are names, and values are amounts.
Next, we’ll loop through every row in the spreadsheet, identifying the sender, recipient, and amount. Keep in mind that Google Sheets always returns data as a string, so we need to convert it to an integer to do math with the amount value:
# Each row is a transaction. Loop over each one:
for row in ss.sheets[0].getRows():
    sender, recipient, amount = row[0], row[1], int(row[2])
If the sender is the special account 'PRE-MINE', then it is simply a source of infinite money into other accounts. All of the best cryptocurrency scams use pre-mined coins, and ours is no exception. Add the amount to the recipient account in the accounts dictionary. The setdefault() method sets the value of the account to 0 if it doesn’t already exist in the dictionary:
    if sender == 'PRE-MINE':
        # The 'PRE-MINE' sender invents money out of thin air.
        accounts.setdefault(recipient, 0)
        accounts[recipient] += amount
Otherwise, we should deduct the amount from the sender and add it to the recipient:
    else:
        # Move funds from the sender to the recipient.
        accounts.setdefault(sender, 0)
        accounts.setdefault(recipient, 0)
        accounts[sender] -= amount
        accounts[recipient] += amount
After the loop finishes, we can see the current balances by printing the accounts dictionary.
print(accounts)As part of our audit, let’s also go through this dictionary and add up the totals of everyone’s balance to find out how many Boringcoins are in the entire network. Start a total variable at 0, and then have a for loop go through each value in the key-value pairs of the accounts dictionary. After adding each value to total, we can print the total amount of Boringcoins:
total = 0
for amount in accounts.values():
    total += amount
print('Total Boringcoins:', total)
When we run this program, the output looks like this:
{'Al Sweigart': 999058553, 'Miles Bron': 38283, 'not_a_scammer': 48441,
'some hacker': 44429, 'Tech Bro': 53424, 'Claire Debella': 54443,
'Credulous Journalist': 50408, 'Birdie Jay': 36832, 'Carol': 82867, 'Mark Z.':
 68650, 'Bob': 37920, 'Andi Brand': 57218, 'Eve': 88296, 'Al Sweigart sock
#27': 78080, 'Tax evader': 40937, 'Duke Cody': 17544, 'Lionel Toussaint':
54650, 'some scammer': 2694, 'Alice': 44503, 'David': 41828}
Total Boringcoins: 1000000000
The total is 1000000000, which makes sense, because that’s how many Boringcoins were pre-mined.
Step 2: Make Transactions
The next program, addBoringcoinTransaction.py, adds additional rows to the “blockchain” Google Sheet to add new transactions. It reads three command line arguments from the list in sys.argv: the sender, the recipient, and the amount. For example, you could run the following from the terminal:
python addBoringcoinTransaction.py "Al Sweigart" Eve 2000The program would access the Google Sheet, add a blank row to the bottom, and then fill it in with the values 'Al Sweigart', 'Eve', and '2000'. Note that in the terminal, you’ll need to enclose any command line argument that contains a space in double quotes, like "Al Sweigart"; otherwise, the terminal will think they are two separate arguments.
The start of addBoringcoinTransactions.py checks the command line arguments and assigns the sender, recipient, and amount variables based on them:
import sys, ezsheets

if len(sys.argv) < 4:
    print('Usage: python addBoringcoinTransaction.py sender recipient amount')
    sys.exit()

# Get the transaction info from the command line arguments:
sender, recipient, amount = sys.argv[1:]
You won’t need to convert amount from a string to an integer, because we’ll be writing it as a string to the spreadsheet.
Next, EZSheets connects to the Google Sheets containing the fake blockchain and selects the first sheet in the spreadsheet (at index 0). Note that you don’t have permission to edit the Boringcoin Google Sheets, so open that URL in a web browser while logged in to your Google account and then select FileMake a Copy to copy it to your Google Account. Then, replace the 'https://autbor.com/boringcoin' string with a string of your Google Sheet’s URL from the browser address bar:
# Change this URL to your copy of the Google Sheet, or else you'll
# get a "The caller does not have permission" error.
ss = ezsheets.Spreadsheet('https://autbor.com/boringcoin')
sheet = ss.sheets[0]
Finally, you should get the number of rows in the sheet, increase it by one, and then fill in the columns of this row with the sender, recipient, and amount data:
# Add one more row to the sheet for a new transaction:
sheet.rowCount += 1

sheet[1, sheet.rowCount] = sender
sheet[2, sheet.rowCount] = recipient
sheet[3, sheet.rowCount] = amount
Now when you run python addBoringcoinTransaction.py "Al Sweigart" Eve 2000 from the terminal, the Google Sheets will have a new row with Al Sweigart, Eve, and 2000 added at the bottom. You can rerun the auditBoringcoin.py program to see the updated account balances of everyone in the cryptocurrency network.
The use of Google Sheets for our blockchain data structure is irresponsible, error prone, and a security catastrophe waiting to happen. This makes it on par with most marketed blockchain products. Don’t miss out! Contact me to get in on this limited offer to buy Boringcoin before the pyramid scheme collapses!
Working with Google Sheets Quotas
Because Google Sheets is online, you can easily share sheets among multiple users who can all access the sheets simultaneously. However, this also means that reading and updating the sheets will be slower than reading and updating Excel files stored locally on your hard drive. In addition, Google Sheets limits how many read and write operations you can perform.
According to Google’s developer guidelines, users are restricted to creating 250 new spreadsheets a day, and free Google accounts can perform a few hundred requests per minute. You can find Google’s usage limits at https://
This means that, on occasion, your EZSheets method calls may take several seconds before they return. If you want to view your API usage or increase your quota, go to the IAM & Admin Quotas page at https://
Summary
Google Sheets is a popular online spreadsheet application that runs in your browser. Using the EZSheets third-party package, you can download, create, read, and modify spreadsheets. EZSheets represents spreadsheets as Spreadsheet objects, each of which contains an ordered list of Sheet objects. Each sheet has columns and rows of data that you can read and update in several ways.
While Google Sheets makes sharing data and cooperative editing easy, its main disadvantage is speed: you must update spreadsheets with web requests, which can take a few seconds to execute. But for most purposes, this speed restriction won’t affect Python scripts using EZSheets. Google Sheets also limits how often you can make changes.
For complete documentation of EZSheets’ features, visit https://
Practice Questions
1. What three files do you need for EZSheets to access Google Sheets?
2. What two types of objects does EZSheets have?
3. How can you create an Excel file from a Google Sheets spreadsheet?
4. How can you create a Google Sheets spreadsheet from an Excel file?
5. The ss variable contains a Spreadsheet object. What code will read data from the cell B2 in a sheet titled Students?
6. How can you find the column letters for column 999?
7. How can you find out how many rows and columns a sheet has?
8. How do you delete a spreadsheet? Is this deletion permanent?
9. What functions will create a new Spreadsheet object and a new Sheet object, respectively?
10. What would happen if, by making frequent read and write requests with EZSheets, you exceed your Google account’s quota?
Practice Programs
For practice, write programs to do the following tasks.
Downloading Google Forms Data
I mentioned earlier that Google Forms allows you to create simple online forms that make it easy to collect information from people. The information entered into a form is stored in a Google Sheets spreadsheet. For this project, write a program that can automatically download the form information that users have submitted. Go to https://
On the Responses tab of your form, click the green Create Spreadsheet button to create a Google Sheets spreadsheet that will hold the responses that users submit. You should see your example responses in the first rows of this spreadsheet. Then, write a Python script using EZSheets to collect a list of the email addresses on this spreadsheet.
Converting Spreadsheets to Other Formats
You can use Google Sheets to convert a spreadsheet file to other formats. Write a script that passes a submitted file to upload(). Once the spreadsheet has uploaded to Google Sheets, download it using downloadAsExcel(), downloadAsODS(), and other such functions to create a copy of the spreadsheet in these other formats.
Finding Mistakes in a Spreadsheet
After a long day at the bean-counting office, I’ve finished a spreadsheet with all the bean totals and uploaded them to Google Sheets. The spreadsheet is publicly viewable (but not editable). You can get this spreadsheet with the following code:
>>> import ezsheets
>>> ss = ezsheets.Spreadsheet('1jDZEdvSIh4TmZxccyy0ZXrH-ELlrwq8_YYiZrEOB4jg')
View the spreadsheet in your browser by going to https://
As a hint, you can access the individual cells in a row with ss.sheets[0].getRow(rowNum), where ss is the Spreadsheet object and rowNum is the row number. Remember that row numbers in Google Sheets begin at 1, not 0. The cell values will be strings, so you’ll need to convert them to integers before your program can work with them. The expression int(ss.sheets[0].getRow(2)[0]) * int(ss.sheets[0].getRow(2)[1]) == int(ss.sheets[0].getRow(2)[2]) evaluates to True if row 2 has the correct total. Put this code in a loop to identify which row in the sheet has the incorrect total.