Check out other books by Al Sweigart, free online or available for purchase:
...and other books as well! Or register for the online video course. You can also donate to support the author directly.
17 PDF AND WORD DOCUMENTS
While you might think of PDF and Word as formats for storing text, these documents are binary files also containing font, color, and layout information, making them much more complex than simple plaintext files. If you want your programs to read or write PDFs or Word documents, you’ll need to do more than simply pass their filenames to open(). Fortunately, several Python packages make these interactions easy. This chapter will cover two of them: PyPDF and Python-Docx.
PDF Documents
PDF stands for Portable Document Format and uses the .pdf file extension. Although PDFs support many features, this section will focus on three common tasks: extracting a document’s text content, extracting its images, and crafting new PDFs from existing documents.
PyPDF is a Python package for creating and modifying PDF files. Install the package by following the instructions in Appendix A. If the package was installed correctly, running import pypdf in the interactive shell shouldn’t display any errors.
While PDF files are great for laying out text in a way that is easy for people to print and read, they’re not easy to parse into plaintext. As a result, PyPDF might make mistakes when extracting text from a PDF and may even fail to open some PDFs. There isn’t much you can do about this, unfortunately. PyPDF may simply be unable to work with some of your particular files. That said, I haven’t personally encountered a PDF file that PyPDF couldn’t open.
Extracting Text
To begin working with PyPDF, let’s use the PDF of a sample chapter from my book on recursive algorithms, The Recursive Book of Recursion (No Starch Press, 2022), shown in Figure 17-1.
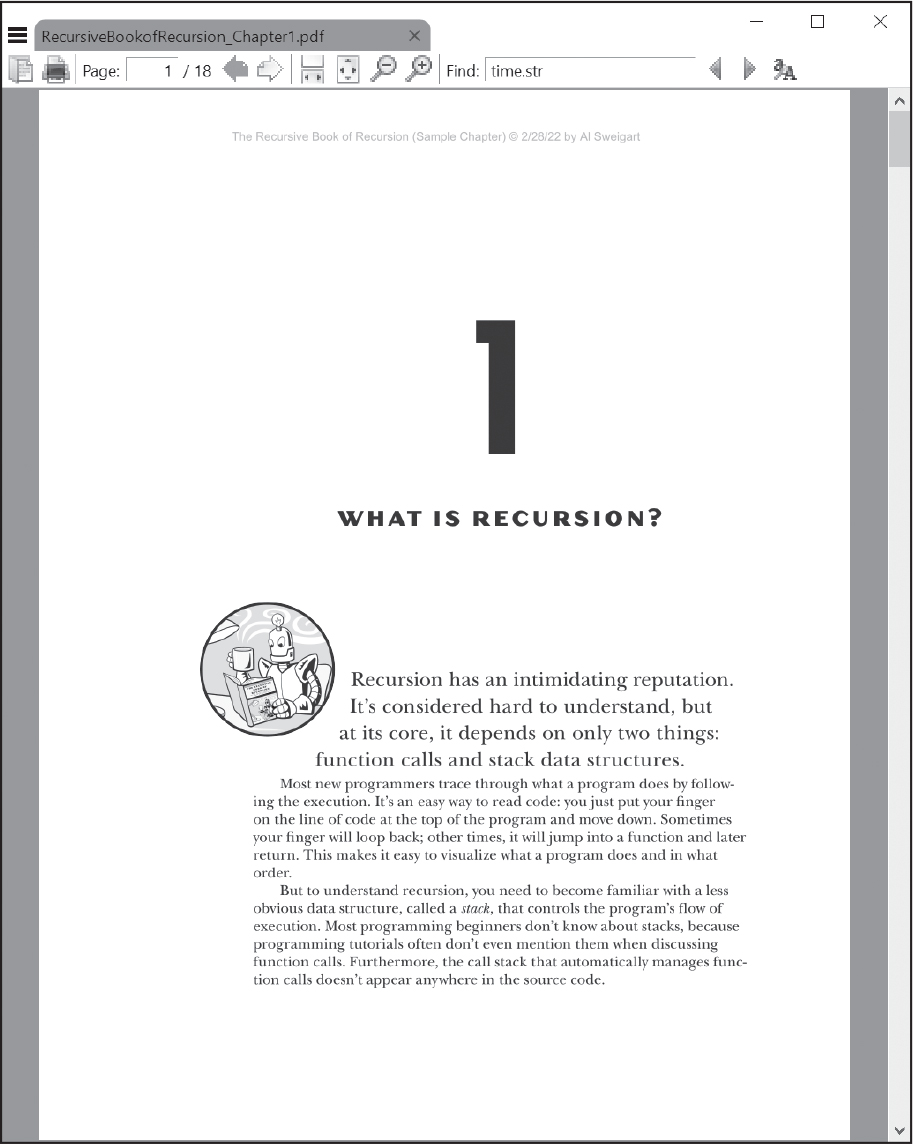
Figure 17-1: The PDF file from which we will be extracting text
Download this Recursion_Chapter1.pdf file from the online resources at https://
>>> import pypdf
❶ >>> reader = pypdf.PdfReader('Recursion_Chapter1.pdf')
❷ >>> len(reader.pages)
18
Import the pypdf module, then call pypdf.PdfReader() with the filename of the PDF to get a PdfReader object that represents the PDF ❶. Store this object in a variable named reader.
The pages attribute of the PdfReader object is a list-like data structure of Page objects that represent individual pages in the PDF. Like actual Python lists, you can pass this data structure to the len() function ❷. This example PDF has 18 pages.
To extract the text from this PDF and output it to a text file, open a new file editor tab and save the following code to extractpdftext.py:
import pypdf
import pdfminer.high_level

PDF_FILENAME = 'Recursion_Chapter1.pdf'
TEXT_FILENAME = 'recursion.txt'

text = ''
try:
    reader = pypdf.PdfReader(PDF_FILENAME)
  ❶ for page in reader.pages:
      ❷ text += page.extract_text()
except Exception:
  ❸ text = pdfminer.high_level.extract_text(PDF_FILENAME)
with open(TEXT_FILENAME, 'w', encoding='utf-8') as file_obj:
  ❹ file_obj.write(text)
We use the pypdf module to extract the text, but if it fails for a particular PDF file and raises an exception, we fall back on the pdfminer module. Inside a try block, we use a for loop ❶ to iterate over each Page object in the PDF file’s PdfReader object. Calling the Page object’s extract_text() method ❷ returns a string that we can concatenate to the text variable. When the loop finishes, text will contain a single string of the entire text of the PDF.
If the PDF file has an unconventional format that PyPDF can’t understand, we can try using pdfminer.high_level, an older module included in this book’s third-party packages. The module’s extract_text() function obtains the PDF’s contents as a single string, rather than operating one page at a time ❸.
Finally, we can use the open() function and the write() method covered in Chapter 10 to write the string to a text file ❹.
Post-Processing with AI
The text extraction we just performed isn’t perfect. The PDF file format is infamously convoluted and was originally designed for printing documents, not for making them machine readable. Even if there are no problems with the extraction, the text layout is fixed: the string will contain newline characters after each row of text and hyphenated words at the ends of rows. For instance, the extracted text from our example PDF looks like this:
1
WHAT IS RECURSION?
Recursion has an intimidating reputation.
It's considered hard to understand, but
at its core, it depends on only two things:
 function calls and stack data structures.
Most new programmers trace through what a program does by follow -
ing the execution. It's an easy way to read code: you just put your finger
--snip--
As you can see, there are many subjective decisions to make:
- Where should paragraphs in the PDF end and begin?
- Should page numbers, headers, and footers be included in the extracted text?
- How should tables of data in the PDF be converted to plaintext?
- How much whitespace should be included in the extract text?
Cleaning up this text is boring and cannot easily be automated with code. However, a large language model (LLM) AI such as ChatGPT can understand the context of the text well enough to produce a cleaned-up version automatically. Use a prompt such as the following before copying and pasting the extracted text:
The following is text extracted from several pages of a PDF of a book on recursive algorithms. Clean up this text. By this, I mean put paragraphs on a single, separate line. Also remove the footer and header text from each page. Also get rid of the hyphens at the end of each line for words split up across the line. Do not make any spelling, grammar corrections, or rewording. Here is the text ...
In a trial, this prompt produced the following text:
WHAT IS RECURSION?

Recursion has an intimidating reputation. It's considered hard
to understand, but at its core, it depends on only two things:
function calls and stack data structures. Most new programmers
trace through what a program does by following the execution.
It's an easy way to read code: you just put your finger...
A human must always review the output of any AI system. For example, the LLM removed the chapter number 1 from the start of the text, which wasn’t my intention. You may have to refine the prompt to correct any misunderstandings.
If you don’t have access to an LLM, the PyPDF documentation has a list of post-processing tips with code snippets at https://
Extracting Images
PyPDF can also extract the images from a PDF document. Each Page object has an images attribute containing a list-like data structure of Image objects. We can write the bytes of these Image objects to an image file opened in 'wb' (write-binary) mode. An Image object also has a name attribute that contains a string of the image’s name. Here is code that extracts images from all pages of the sample chapter PDF. Open a new file editor tab and save the following code as extractpdfimages.py:
import pypdf
PDF_FILENAME = 'Recursion_Chapter1.pdf'

reader = pypdf.PdfReader(PDF_FILENAME)
❶ image_num = 0
❷ for i, page in enumerate(reader.pages):
    print(f'Reading page {i+1} - {len(page.images)} images found...')
    try:
      ❸ for image in page.images:
          ❹ with open(f'{image_num}_page{i+1}_{image.name}', 'wb') as file:
              ❺ file.write(image.data)
            print(f'Wrote {image_num}_page{i+1}_{image.name}...')
          ❻ image_num += 1
    except Exception as exc:
      ❼ print(f'Skipped page {i+1} due to error: {exc}')
The output of this program will look like this:
Reading page 1 - 7 images found...
Wrote 0_page1_Im0.jpg...
Wrote 1_page1_Im1.png...
--snip--
Reading page 7 - 1 images found...
Skipped page 7 due to error: not enough image data
--snip--
Reading page 17 - 0 images found...
Reading page 18 - 0 images found...
The images in a PDF document often have generic names, like Im0.jpg or Im1.png, so we use a variable counter named image_num ❶ along with the page number to assign them unique names. First, we loop over each Page object in the pages attribute of the PdfReader object. Recall that Python’s enumerate() function ❷ returns integer indexes and the list item of the list-like object we pass it. Each Page object has an images attribute that we’ll iterate over as well ❸.
Inside that second, nested for loop that iterates over the Image objects in the images attribute, we call open() and use an f-string to provide the filename ❹. This filename is made up of the integer in the image_num counter, the page number, and the string in the name attribute of the Image object. Because i starts at 0 while PDF page numbers start at 1, we use i+1 to store the page number. This name will include the file extension, such as .png or .jpg. We must also pass 'wb' to the open() function call so that the file is opened in write-binary mode. The bytes of the image file are stored in the Image object’s data attribute, which we pass to the write() method ❺. After writing an image, the code increments image_num by 1 ❻.
If some incompatibility between the PDF file and PyPDF causes a Page object’s images attribute to raise an exception, our try and except statements can catch it and print a short error message ❼. This way, a problem on one page won’t cause the entire program to crash.
Like text extraction, image extraction may be imperfect. For example, PyPDF failed to detect many of the images from the sample chapter PDF, and showed an error message instead. Meanwhile, you may be surprised that PyPDF extracts small, blank images used as background or spacers. When working with PDFs, you’ll often require human review to ensure that the output is acceptable.
Creating PDFs from Other Pages
PyPDF’s counterpart to PdfReader is PdfWriter, which can create new PDF files. But PyPDF cannot write arbitrary text to a PDF like Python can with plaintext files. Instead, PyPDF’s PDF-writing capabilities are limited to copying, merging, cropping, and transforming pages from other PDFs into new ones. The code in this interactive shell example creates a copy of the sample chapter PDF with just the first five pages:
>>> import pypdf
❶ >>> writer = pypdf.PdfWriter()
❷ >>> writer.append('Recursion_Chapter1.pdf', (0, 5))
>>> with open('first_five_pages.pdf', 'wb') as file:
❸ ...     writer.write(file)
...
(False, <_io.BufferedWriter name='first_five_pages.pdf'>)
First, we create a PdfWriter object by calling pypdf.PdfWriter() ❶. The PdfWriter object in the writer variable represents a blank PDF document with zero pages. Then, the PdfWriter object’s append() method copies the first five pages from the sample chapter PDF, which we identify by the 'Recursion_Chapter1.pdf' filename ❷. (Despite the identical name, the PdfWriter object’s append() method differs from the append() list method.)
The second argument to this method is the tuple (0, 5), which tells the PdfWriter object to copy pages starting at page index 0 (the first page in the PdfWriter object), up to but not including page index 5. PyPDF considers index 0 to be the first page, even though PDF applications call it page 1.
Finally, to write the contents of the PdfWriter object to a PDF file, call open() with the filename and 'wb' mode, and then pass the File object to the write() method of the PdfWriter object ❸. This should generate a new PDF file.
The tuple provided to append() can contain either two or three integers. If a third integer is provided, the method skips that number of pages. Because this behavior matches the range() function, you could pass the two or three integers to list(range()) to see which pages the code would copy:
>>> list(range(0, 5))  # Passing (0, 5) makes append() copy these pages:
[0, 1, 2, 3, 4]
>>> list(range(0, 5, 2))  # Passing (0, 5, 2) makes append() copy these pages:
[0, 2, 4]
The append() method can also accept a list argument with page number integers for each page to append. For example, say we replace the code in the previous interactive shell example with this:
>>> writer.append('Recursion_Chapter1.pdf', [0, 1, 2, 3, 4])This code would also copy the first five pages of the PDF document to the PdfWriter object. Note that append() interprets tuples and list arguments differently; the tuple (0, 5) tells append() to copy pages at index 0 up to but not including page index 5, but the list [0, 5] would tell append() to individually copy page index 0 and then copy page index 5. This difference in meaning between tuples and lists is unconventional, and you won’t see it in other Python libraries, but it’s part of PyPDF’s design.
The append() method adds the copied pages to the end of the PdfWriter object. To insert copied pages before the end, call the merge() method instead. The merge() method has an additional integer argument that specifies where to insert the pages. For example, look at this code:
>>> writer.merge(2, 'Recursion_Chapter1.pdf', (0, 5))This code copies the pages at index 0 up to but not including index 5 and inserts them where page index 2 (the third page) is in the PdfWriter object in writer. The original page at index 2, and all other pages, get shifted back after the inserted set of pages.
Rotating Pages
We can also rotate the pages of a PDF in 90-degree increments with the rotate() method of Page objects. Pass either 90, 180, or 270 as an argument to this method to rotate the page clockwise, and either -90, -180, or -270 to rotate the page counterclockwise. Rotating pages is useful if you have many PDFs that are, for whatever reason, already incorrectly rotated and you need to rotate them back, or else need to rotate only a few select pages in a PDF document. PDF apps often have rotation features that you can use to manually correct PDFs, but Python allows you to quickly apply rotations to many PDFs to automate this boring task.
For example, enter the following into the interactive shell to rotate the pages of the sample chapter PDF:
>>> import pypdf
>>> writer = pypdf.PdfWriter()
>>> writer.append('Recursion_Chapter1.pdf')
❶ >>> for i in range(len(writer.pages)):
...   ❷ writer.pages[i].rotate(90)
...
{'/ArtBox': [21, 21, 525, 687], '/BleedBox': [12, 12, 534, 696],
--snip--

>>> with open('rotated.pdf', 'wb') as file:
...     writer.write(file)
...
(False, <_io.BufferedWriter name='rotated.pdf'>)
We create a new PdfWriter object and copy the pages of the sample chapter PDF to it. Then, we use a for loop to loop over each page number. The call to len(writer.pages) returns the number of pages ❶ as an integer. The expression writer.pages[i] accesses each Page object on an iteration of the for loop, and the rotate(90) method call ❷ rotates this page in the PdfWriter object.
The resulting PDF should consist of all pages rotated 90 degrees clockwise, as shown in Figure 17-2.
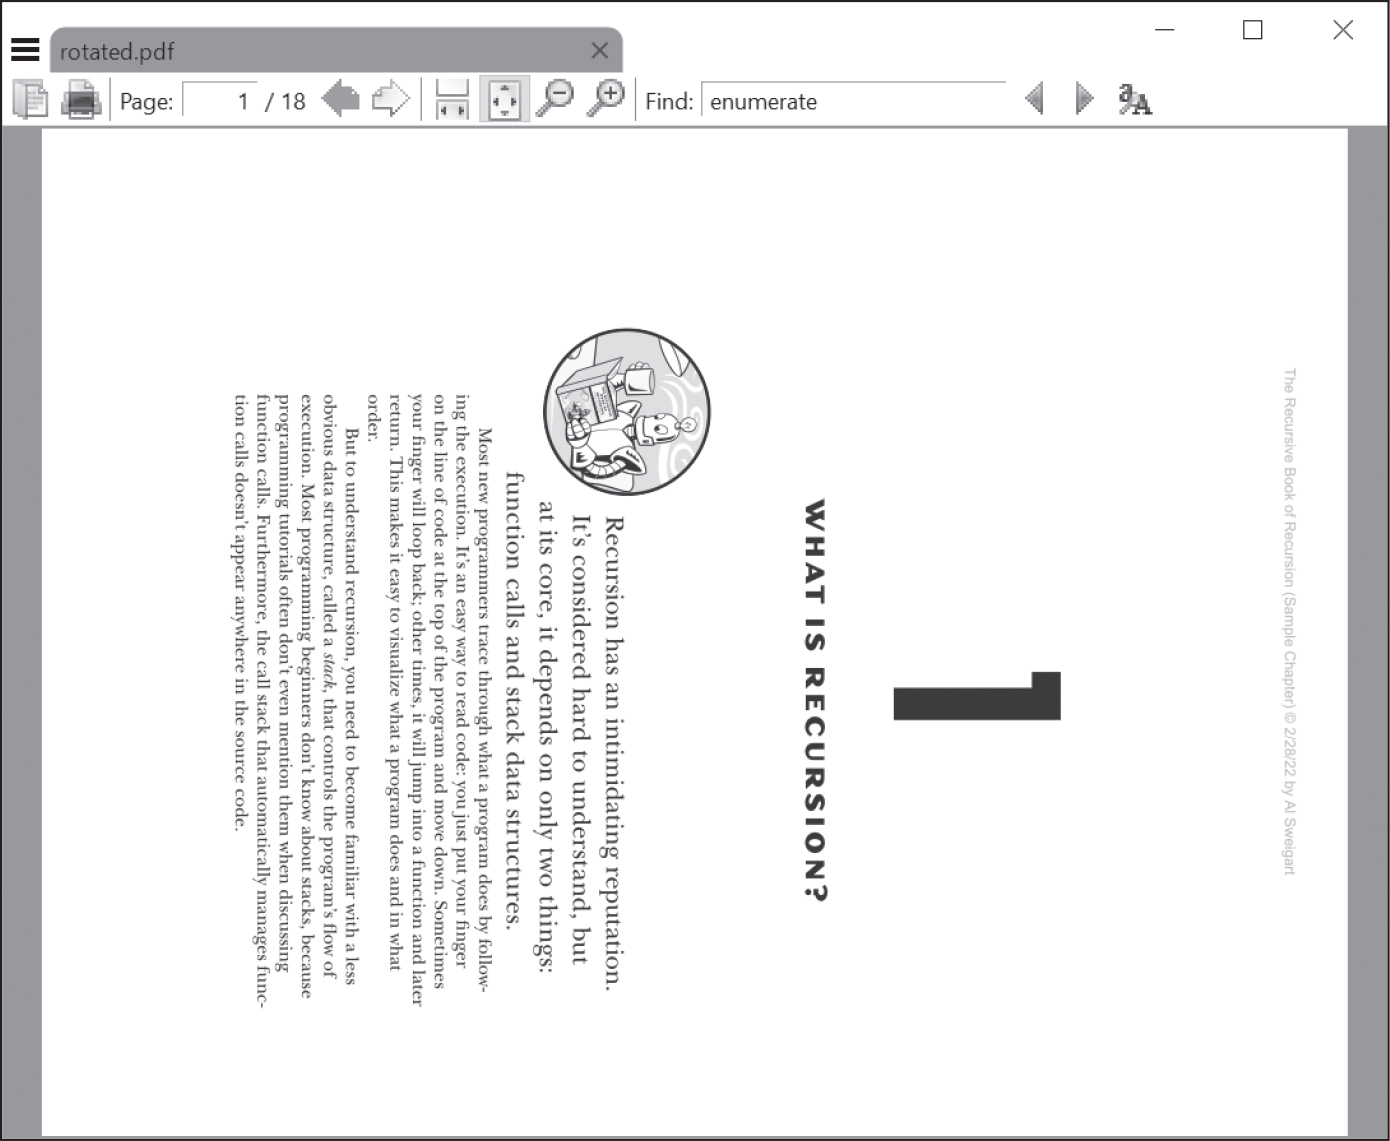
Figure 17-2: The rotated.pdf file with the page rotated 90 degrees clockwise
PyPDF can’t rotate documents in increments other than 90 degrees.
Inserting Blank Pages
You can insert or append a blank page to a PdfWriter object with the insert _blank_page() and add_blank_page() methods. The size of the new page will be the same as that of the preceding page. For example, let’s create a copy of the sample chapter PDF with blank pages at the end and on page 3:
>>> import pypdf
>>> writer = pypdf.PdfWriter()
>>> writer.append('Recursion_Chapter1.pdf')
❶ >>> writer.add_blank_page()
{'/Type': '/Page', '/Resources': {}, '/MediaBox': [0.0, 0.0,
546, 708], '/Parent': IndirectObject(1, 0, 2629126028624)}
❷ >>> writer.insert_blank_page(index=2)
{'/Type': '/Page', '/Parent': NullObject, '/Resources': {},
'/MediaBox': RectangleObject([0.0, 0.0, 546, 708])}
>>> with open('with_blanks.pdf', 'wb') as file:
...     writer.write(file)  # Save the writer object to a PDF file.
...
(False, <_io.BufferedWriter name='with_blanks.pdf'>)
After copying all the pages from the sample chapter PDF to the PdfWriter object, the add_blank_page() method adds a blank page to the end of the document. The insert_blank_page() method inserts a blank page at page index 2 (which is the third page, as page index 0 is the first page). This method requires that you specify the index parameter name.
You can either leave these pages blank or add content to them later, such as overlays and watermarks, as the next section explains.
Adding Watermarks and Overlays
PyPDF can also overlay the contents of one page on top of another, which is useful for adding a logo, timestamp, or watermark to a page. In PyPDF, a stamp or overlay is content placed on top of the page’s existing content, while a watermark or underlay is content placed underneath the page’s existing content.
Download watermark.pdf from the book’s online resources and place the PDF in the current working directory along with the sample chapter PDF. Then, enter the following into the interactive shell:
>>> import pypdf
>>> writer = pypdf.PdfWriter()
>>> writer.append('Recursion_Chapter1.pdf')
❶ >>> watermark_page = pypdf.PdfReader('watermark.pdf').pages[0]
>>> for page in writer.pages:
❷ ...     page.merge_page(watermark_page, over=False)
...
>>> with open('with_watermark.pdf', 'wb') as file:
...     writer.write(file)
...
(False, <_io.BufferedWriter name='with_watermark.pdf'>)
This example creates a copy of the sample chapter PDF in a new PdfWriter object, saved in the writer variable. We also obtain the Page object for the first page of the watermark PDF and store it in the watermark_page variable. The for loop then loops over all the Page objects in the PdfWriter object and applies the watermark by passing it to merge_page(). (Don’t confuse the merge_page() method of Page objects with the merge() method of PdfWriter objects discussed earlier in this chapter.)
The merge_page() method also has an over keyword argument. Pass True for this argument to create a stamp or overlay, or pass False to create a watermark or underlay.
After modifying the PdfWriter object’s pages in the loop, the code then saves it as with_watermark.pdf. Figure 17-3 shows the original watermark PDF and two pages from the sample chapter PDF with the watermark applied.
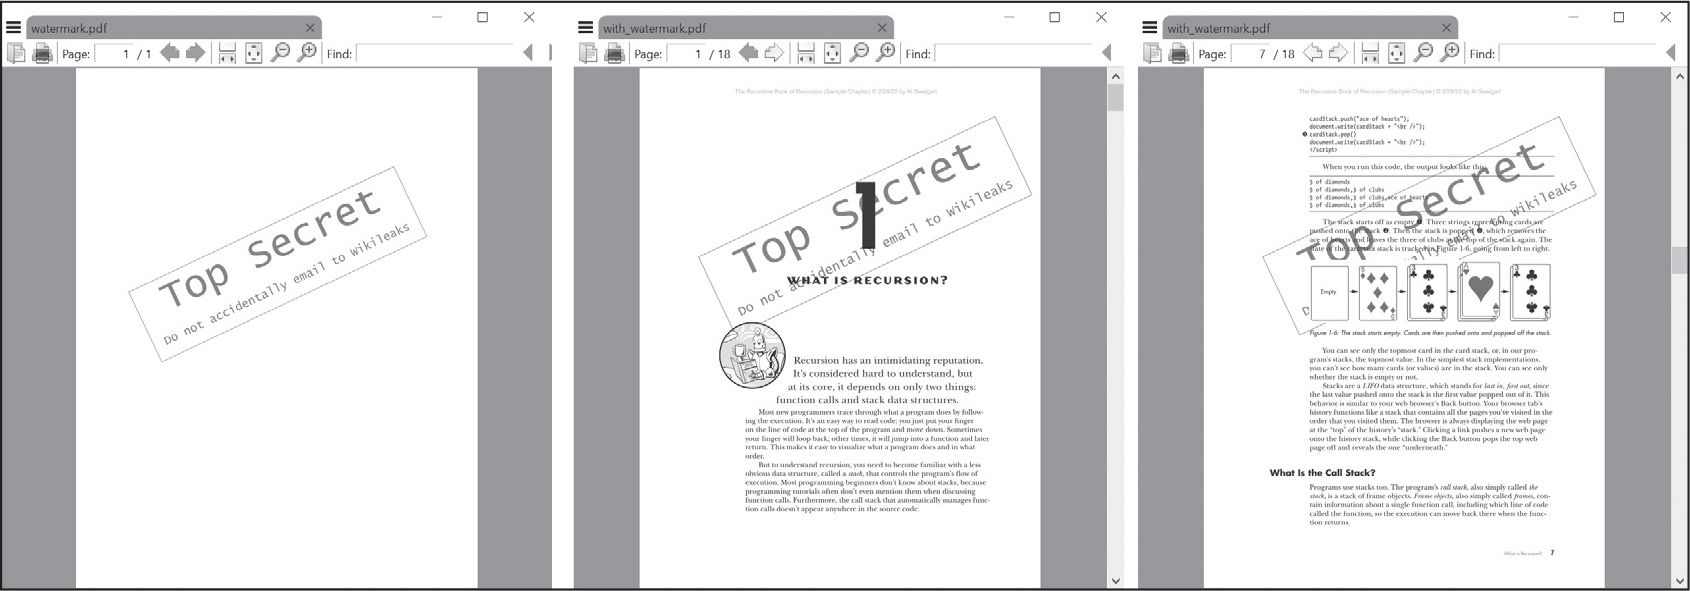
Figure 17-3: The watermark PDF (left) and pages with the added watermark (center, right)
The merge_page() method is useful for making broad changes to PDF documents, such as merging the contents of two pages.
Encrypting and Decrypting PDFs
PDFs allow you to encrypt their contents, making them unreadable. The encryption is only as strong as the password you choose, so create a password that uses different character types, isn’t a word in the dictionary, and has around 14 to 16 characters. Keep in mind that PDFs have no password reset mechanism; if you forget the password, the PDF will be forever unreadable unless you can guess it.
The encrypt() method of PdfWriter objects accepts a password string and a string that selects the encryption algorithm. The 'AES-256' argument implements a recommended modern encryption algorithm, so we’ll always use that. Enter the following into the interactive shell to create an encrypted copy of the sample chapter PDF:
>>> import pypdf
>>> writer = pypdf.PdfWriter()
>>> writer.append('Recursion_Chapter1.pdf')
>>> writer.encrypt('swordfish', algorithm='AES-256')
>>> with open('encrypted.pdf', 'wb') as file:
...     writer.write(file)
...
(False, <_io.BufferedWriter name='encrypted.pdf'>)
The encrypt('swordfish', algorithm='AES-256') method call on the PdfWriter object encrypts the content of the PDF. After we write this encrypted PDF to the encrypted.pdf file, no PDF app, including PyPDF, should be able to open it without entering the password swordfish. (This is a poor password, as it’s a word that occurs in the dictionary and is therefore easy to guess.) Encrypted data looks random unless you apply the correct decryption key or password, and decrypting the document with the wrong password results in garbage data. PDF apps will detect this, then prompt you to try the password again.
PyPDF can apply a password to an encrypted PDF to decrypt it. Enter the following into the interactive shell to detect encrypted PDFs with the is_encrypted attribute and decrypt them with decrypt():
>>> import pypdf
❶ >>> reader = pypdf.PdfReader('encrypted.pdf')
>>> writer = pypdf.PdfWriter()
❷ >>> reader.is_encrypted
True
❸ >>> reader.pages[0]
Traceback (most recent call last):
--snip--
pypdf.errors.FileNotDecryptedError: File has not been decrypted
❹ >>> reader.decrypt('an incorrect password').name
'NOT_DECRYPTED'
❺ >>> reader.decrypt('swordfish').name
'OWNER_PASSWORD'
❻ >>> writer.append(reader)
>>> with open('decrypted.pdf', 'wb') as file:
...     writer.write(file)
...
(False, <_io.BufferedWriter name='decrypted.pdf'>)
We load the encrypted PDF into a PdfReader object just like any other PDF ❶. The PdfReader object has an is_encrypted attribute ❷ that is set to either True or False. If you try to read the PDF content by, for example, accessing the pages attribute ❸, PyPDF raises a FileNotDecryptedError because it’s unable to read it.
PDFs can have a user password that allows you to view the PDF and an owner password that allows you to set permissions for printing, commenting, extracting text, and other features. The user password and owner password are the first and second arguments to encrypt(), respectively. If only one string argument is passed to encrypt(), PyPDF will use it for both passwords.
To decrypt the PdfReader object, call the decrypt() method and pass it the string of the password. This method call returns a PasswordType object; we’re interested only in the name attribute of this object. If name is set to 'NOT_DECRYPTED' ❹, we provided the wrong password. If name is set to 'OWNER_PASSWORD' or 'USER_PASSWORD' ❺, we’ve entered the correct owner or user password.
We can now append the pages from the PdfReader object to a PdfWriter object ❻ and save the decrypted PDF to a file.
Project 12: Combine Select Pages from Many PDFs
Say you have the boring job of merging several dozen PDF documents into a single PDF file. The first page of each document is a cover sheet, but you don’t want the cover sheets repeated in the final result. Even though there are lots of free programs for combining PDFs, many of them simply merge entire files together. Let’s write a Python program to customize the pages to include in the combined PDF.
At a high level, here is what the program will do:
- Find all PDF files in the current working directory and sort them alphabetically.
- For each PDF, copy all the pages after the first page to an output PDF.
- Save the output PDF to a file.
In terms of implementation, your code will need to do the following:
- Call os.listdir() to find all the files in the working directory and remove any non-PDF files. (We covered this function in Chapter 11.)
- Call Python’s sort() list method to alphabetize the filenames.
- Create a PdfWriter object for the output PDF.
- Loop over each PDF file, creating a PdfReader object for it.
- From the PdfReader object, copy to the output PDF all the pages after the first page.
- Write the output PDF to a file.
Open a new file editor tab for this project and save it as combine_pdfs.py.
Step 1: Find All PDF Files
First, your program needs to get a list of all files with the .pdf extension in the current working directory and sort them. Make your code look like the following:
# combine_pdfs.py - Combines all the PDFs in the current working directory
# into a single PDF

❶ import pypdf, os

# Get all the PDF filenames.
pdf_filenames = []
for filename in os.listdir('.'):
    if filename.endswith('.pdf'):
      ❷ pdf_files.append(filename)
❸ pdf_filenames.sort(key=str.lower)

❹ writer = pypdf.PdfWriter()

# TODO: Loop through all the PDF files.

# TODO: Copy all pages after the first page.

# TODO: Save the resulting PDF to a file.
This code imports the pypdf and os modules ❶. The os.listdir('.') call will return a list of every file in the current working directory. The code then loops over this list, adding files with the .pdf extension to a list in the pdf_filenames variable ❷. Next, we sort this list in alphabetical order with the key=str.lower keyword argument to sort() ❸. For technical reasons, the sort() method puts uppercase characters like Z before lowercase characters like a; the keyword argument we provide prevents this by comparing the lowercase form of the strings. We create a PdfWriter object to hold the combined PDF pages ❹. Finally, a few comments outline the rest of the program.
Step 2: Open Each PDF
Now the program must read each PDF file in pdf_filenames. Add the following to your program:
# combine_pdfs.py - Combines all the PDFs in the current working directory
# into a single PDF

import pypdf, os

--snip--

# Loop through all the PDF files:
for pdf_filename in pdf_filenames:
    reader = pypdf.PdfReader(pdf_filename)
    # Copy all pages after the first page:
    writer.append(pdf_filename, (1, len(reader.pages)))

# TODO: Save the resulting PDF to a file.
For each PDF filename, the loop creates a PdfReader object and stores it in a variable named reader. Now the code inside the loop can call len(reader.pages) to find out how many pages the PDF has. It uses this information in the append() method call to copy pages starting at 1 (the second page, because PyPDF uses 0 as the first page index) up to the end of the PDF. Then, it appends the content to the same PdfWriter object in writer.
Step 3: Save the Results
Once these for loops have finished looping, the writer variable should contain a PdfWriter object with the pages of all the PDFs combined. The last step is to write this content to a file on the hard drive. Add this code to your program:
# combine_pdfs.py - Combines all the PDFs in the current working directory
# into a single PDF

import pypdf, os

--snip--

# Save the resulting PDF to a file:
with open('combined.pdf', 'wb') as file:
    writer.write(file)
Passing 'wb' to open() opens the output PDF file, combined.pdf, in write-binary mode. Then, passing the resulting File object to the write() method creates the actual PDF file. (Be aware of the identically named write() methods of File objects and PdfWriter objects.) At the end of the program, a single PDF contains all the pages (except the first) of every PDF in a folder, sorted alphabetically by filename.
Ideas for Similar Programs
Being able to create PDFs from the pages of other PDFs will let you make programs that can do the following:
- Cut out specific pages from PDFs.
- Reverse or reorder pages in a PDF.
- Create a PDF from only those pages of other PDFs that have some specific text, identified by the extract_text() method of Page objects.
Word Documents
Python can create and modify Microsoft Word documents, which have the .docx file extension, with the Python-Docx package, which you can install by following the instructions in Appendix A.
WARNING
Be sure to install Python-Docx, not Docx, which belongs to a different package that this book doesn’t cover. When importing the module from the Python-Docx package, however, you’ll need to run import docx, not import python-docx.
If you don’t have Word, you can use the free LibreOffice Writer application for Windows, macOS, and Linux to open .docx files. Download it from https://
Compared to plaintext files, .docx files have many structural elements, which Python-Docx represents using three different data types. At the highest level, a Document object represents the entire document. The Document object contains a list of Paragraph objects for the paragraphs in the document. (A new paragraph begins whenever the user presses ENTER or RETURN while typing in a Word document.) Each of these Paragraph objects contains a list of one or more Run objects. The single-sentence paragraph in Figure 17-4 has four runs.

Figure 17-4: The Run objects identified in a Paragraph object
The text in a Word document is more than just a string. It has font, size, color, and other styling information associated with it. A style in Word is a collection of these attributes. A Run object is a contiguous run of text with the same style. You’ll need a new Run object whenever the text style changes.
Reading Word Documents
Let’s experiment with the docx module. Download demo.docx from the book’s online resources and save the document to the working directory. Then, enter the following into the interactive shell:
>>> import docx
>>> doc = docx.Document('demo.docx')
>>> len(doc.paragraphs)
7
>>> doc.paragraphs[0].text
'Document Title'
>>> doc.paragraphs[1].text
'A plain paragraph with some bold text and some italic'
>>> len(doc.paragraphs[1].runs)
4
>>> doc.paragraphs[1].runs[0].text
'A plain paragraph with some '
>>> doc.paragraphs[1].runs[1].text
'bold'
>>> doc.paragraphs[1].runs[2].text
' and some '
>>> doc.paragraphs[1].runs[3].text
'italic'
We open a .docx file in Python, call docx.Document(), and pass it the filename demo.docx. This will return a Document object, which has a paragraphs attribute that is a list of Paragraph objects. When we call len() on this attribute, it returns 7, which tells us that there are seven Paragraph objects in this document. Each of these Paragraph objects has a text attribute that contains a string of the text in that paragraph (without the style information). Here, the first text attribute contains 'DocumentTitle', and the second contains 'A plain paragraph with some bold text and some italic'.
Each Paragraph object also has a runs attribute that is a list of Run objects. Run objects also have a text attribute, containing just the text in that particular run. Let’s look at the text attributes in the second Paragraph object. Calling len() on this object tells us that there are four Run objects. The first Run object contains 'A plain paragraph with some '. Then, the text changes to a bold style, so 'bold' starts a new Run object. The text returns to an unbolded style after that, which results in a third Run object, ' text and some '. Finally, the fourth and last Run object contains 'italic' in an italic style.
Using Python-Docx, your Python programs can now read the text from a .docx file and use it just like any other string value.
Getting the Full Text from a .docx File
If you care only about a Word document’s text and not about its styling information, you can use this get_text() function here. It accepts a filename of a .docx file and returns a single string value of its text. Open a new file editor tab and enter the following code, saving it as readDocx.py:
import docx

def get_text(filename):
    doc = docx.Document(filename)
    full_text = []
    for para in doc.paragraphs:
        full_text.append(para.text)
    return '\n'.join(full_text)
This get_text() function opens the Word document, loops over all the Paragraph objects in the paragraphs list, and then appends their text to the list in full_text. After the loop, the code joins the strings in full_text with newline characters.
You can import the readDocx.py program like any other module. Now, if you need just the text of a Word document, you can enter the following:
>>> import readDocx
>>> print(readDocx.get_text('demo.docx'))
Document Title
A plain paragraph with some bold text and some italic
Heading, level 1
Intense quote
first item in unordered list
first item in ordered list
You can also adjust get_text() to modify the string before returning it. For example, to indent each paragraph, replace the append() call in readDocx.py with this:
full_text.append(' ' + para.text)To add a double space between paragraphs, change the join() call code to this:
return '\n\n'.join(full_text)As you can see, it takes only a few lines of code to write functions that will read a .docx file and return a string of its content to your liking.
Styling Paragraph and Run Objects
Word and other word processors use styles to keep the visual presentation of text consistent and easy to change. For example, perhaps you want all body paragraphs to be 11-point, Times New Roman, left-justified, ragged-right text. You can create a style with these settings and assign it to all body paragraphs. If you later want to change the presentation of all body paragraphs in the document, you can change the style to automatically update those paragraphs.
To view styles in the browser-based Office 365 Word application, click the Home menu item, then the Headings and Other Styles drop-down menu, which will likely display “Normal” or another style name. Click See More Styles to bring up the More Styles window. In the Microsoft Word desktop application for Windows, you can see the styles by pressing CTRL-ALT-SHIFT-S to display the Styles pane, which looks like Figure 17-5. In LibreOffice Writer, you can view the Styles pane by clicking the ViewStyles menu item.
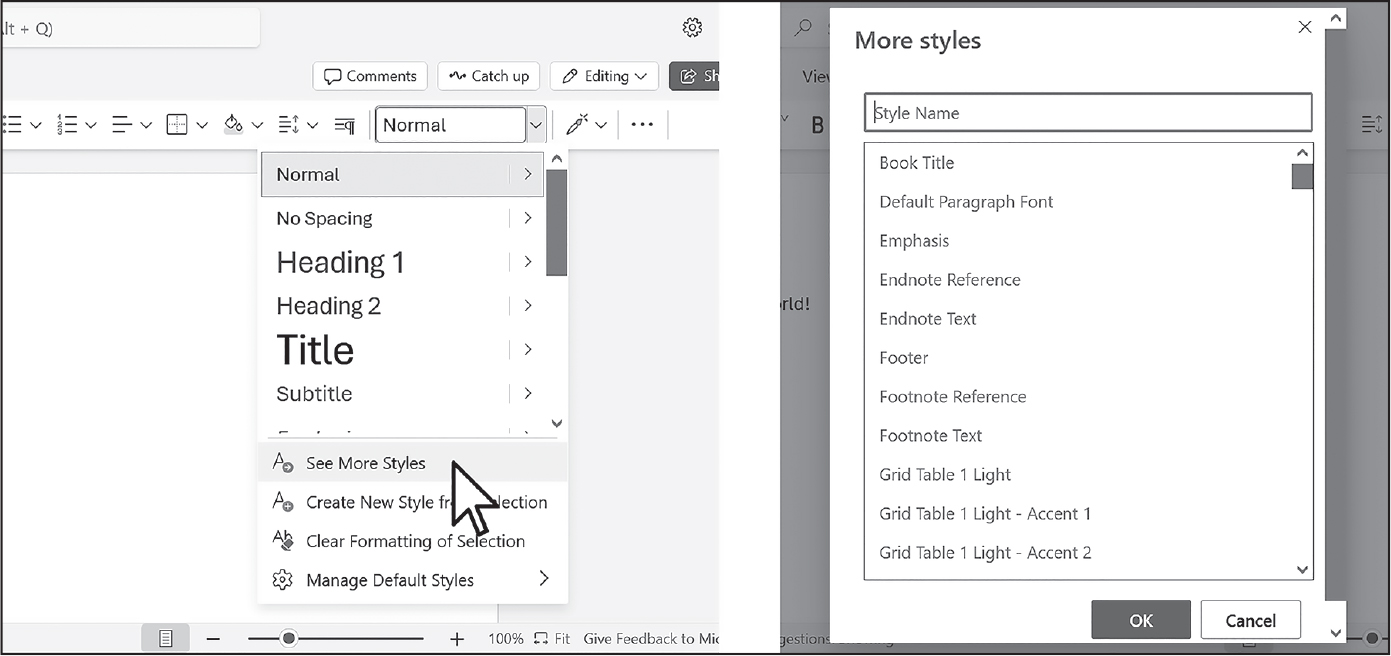
Figure 17-5: The Styles pane
Word documents contain three types of styles: paragraph styles apply to Paragraph objects, character styles apply to Run objects, and linked styles apply to both kinds of objects. To style Paragraph and Run objects, set their style attribute to a string of the style’s name. If style is set to None, no style will be associated with the Paragraph or Run object. The default Word styles have the following string values:
'Normal'   'Heading 5' 'List Bullet'       'List Paragraph'
'Body Text' 'Heading 6' 'List Bullet 2'     'MacroText'
'Body Text 2'   'Heading 7' 'List Bullet 3'     'No Spacing'
'Body Text 3'   'Heading 8' 'List Continue'     'Quote'
'Caption'   'Heading 9' 'List Continue 2'   'Subtitle'
'Heading 1' 'Intense Quote' 'List Continue 3'   'TOC Heading'
'Heading 2' 'List'      'List Number '      'Title'
'Heading 3' 'List 2'    'List Number 2'
'Heading 4' 'List 3'    'List Number 3'
When using a linked style for a Run object, you’ll need to add ' Char' to the end of its name. For example, to set the Quote linked style for a Paragraph object, you would use paragraphObj.style = 'Quote', but for a Run object, you would use runObj.style = 'Quote Char'.
To create custom styles, use the Word application to define them, then read them from the style attribute of a Paragraph or Run object.
Applying Run Attributes
We can further style runs using text attributes. Each attribute can be set to one of three values: True (meaning the attribute is always enabled, no matter what other styles are applied to the run), False (meaning the attribute is always disabled), or None (which defaults to whatever the run’s style is set to). Table 17-1 lists the text attributes that can be set on Run objects.
Attribute |
Description |
|---|---|
bold |
The text appears in bold. |
italic |
The text appears in italic. |
underline |
The text is underlined. |
strike |
The text appears with a strikethrough. |
double_strike |
The text appears with a double strikethrough. |
all_caps |
The text appears in capital letters. |
small_caps |
The text appears in capital letters, with lowercase letters two points smaller. |
shadow |
The text appears with a shadow. |
outline |
The text appears outlined rather than solid. |
rtl |
The text is written right-to-left. |
imprint |
The text appears pressed into the page. |
emboss |
The text appears raised off the page in relief. |
For example, to change the styles of demo.docx, enter the following into the interactive shell:
>>> import docx
>>> doc = docx.Document('demo.docx')
>>> doc.paragraphs[0].text
'Document Title'
>>> doc.paragraphs[0].style  # The exact id may be different.
_ParagraphStyle('Title') id: 3095631007984
>>> doc.paragraphs[0].style = 'Normal'
>>> doc.paragraphs[1].text
'A plain paragraph with some bold text and some italic'
>>> (doc.paragraphs[1].runs[0].text, doc.paragraphs[1].runs[1].text,
doc.paragraphs[1].runs[2].text, doc.paragraphs[1].runs[3].text)
('A plain paragraph with some ', 'bold', ' and some ', 'italic')
>>> doc.paragraphs[1].runs[0].style = 'Quote Char'
>>> doc.paragraphs[1].runs[1].underline = True
>>> doc.paragraphs[1].runs[3].underline = True
>>> doc.save('restyled.docx')
We use the text and style attributes to easily view the paragraphs in the document. As you can see, it’s easy to divide a paragraph into runs and access each run individually. We get the first, second, and fourth runs in the second paragraph, style each run, and save the results to a new document.
Now the words Document Title at the top of restyled.docx should have the Normal style instead of the Title style, the Run object for the text A plain paragraph with some should have the Quote Char style, and the two Run objects for the words bold and italic should have their underline attributes set to True. Figure 17-6 shows how the styles of paragraphs and runs look in restyled.docx.
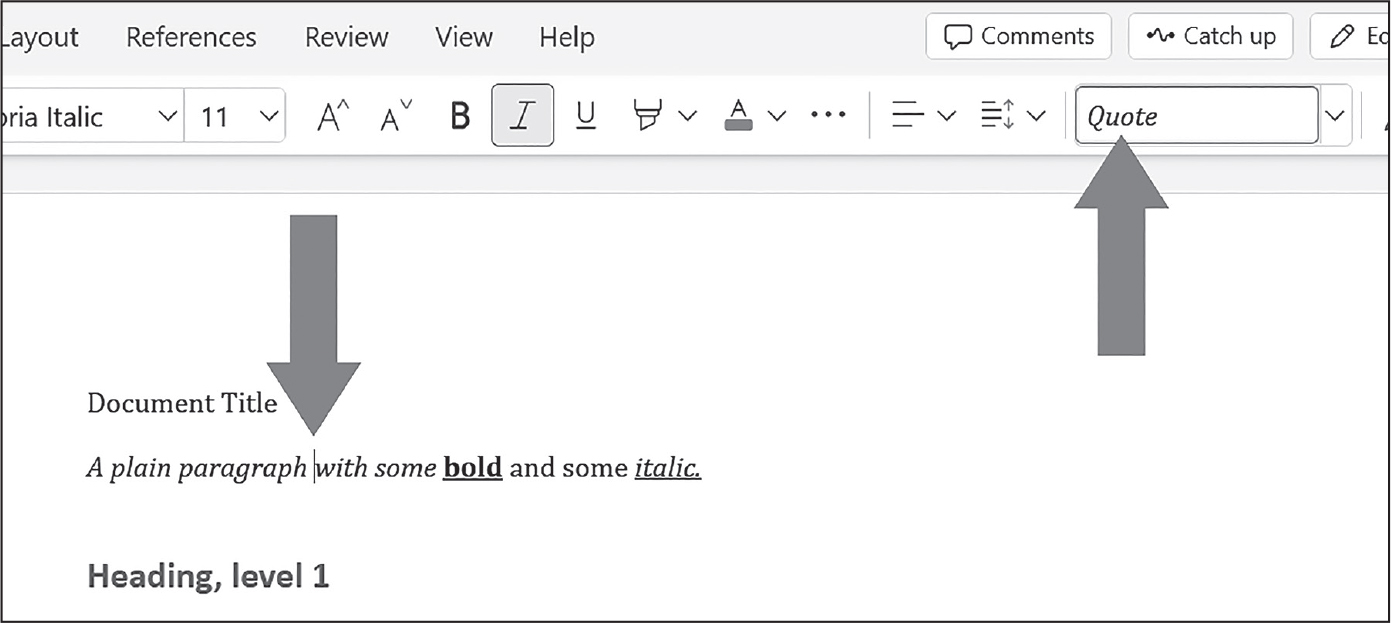
Figure 17-6: The restyled.docx file
You can find complete documentation on Python-Docx’s use of styles at https://
Writing Word Documents
To create your own .docx file, call docx.Document() to return a new, blank Word Document object. For example, enter the following into the interactive shell:
>>> import docx
>>> doc = docx.Document()
>>> doc.add_paragraph('Hello, world!')
<docx.text.paragraph.Paragraph object at 0x0000000003B56F60>
>>> doc.save('helloworld.docx')
The add_paragraph() document method adds a new paragraph of text to the document and returns a reference to the Paragraph object that was added. When you’re done adding text, pass a filename string to the save() document method to save the Document object to a file.
This code will create a file named helloworld.docx in the current working directory. When opened, it should look like Figure 17-7. You can upload this .docx file into Office 365 or Google Docs or open it in Word or LibreOffice.
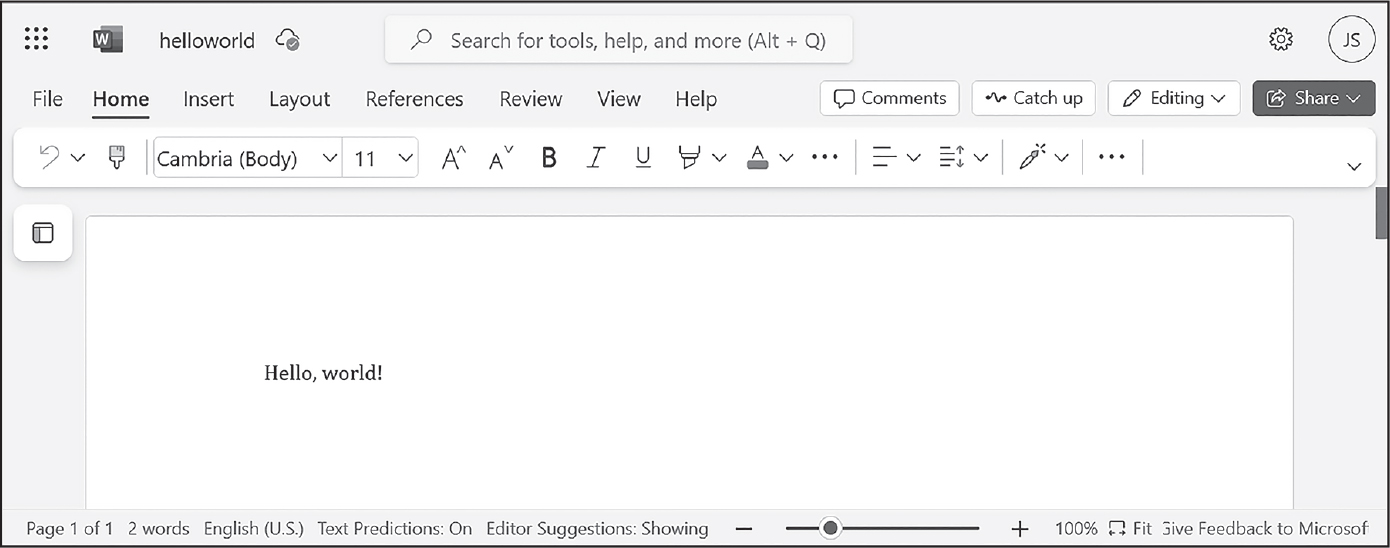
Figure 17-7: The Word document created using add_paragraph('Hello, world!')
You can add paragraphs to the document by calling the add_paragraph() method again with the new paragraph’s text. To add text to the end of an existing paragraph, call the paragraph’s add_run() method and pass it a string. Enter the following into the interactive shell:
>>> import docx
>>> doc = docx.Document()
>>> doc.add_paragraph('Hello world!')
<docx.text.paragraph.Paragraph object at 0x000000000366AD30>
>>> para_obj_1 = doc.add_paragraph('This is a second paragraph.')
>>> para_obj_2 = doc.add_paragraph('This is a yet another paragraph.')
>>> para_obj_1.add_run(' This text is being added to the second paragraph.')
<docx.text.run.Run object at 0x0000000003A2C860>
>>> doc.save('multipleParagraphs.docx')
The resulting document should look like Figure 17-8. Note that the text This text is being added to the second paragraph. was added to the Paragraph object in para_obj_1, which was the second paragraph added to doc. The add_paragraph() and add_run() functions return Paragraph and Run objects, respectively, to save you the trouble of extracting them as a separate step.
Call the save() method again to save the additional changes you’ve made.
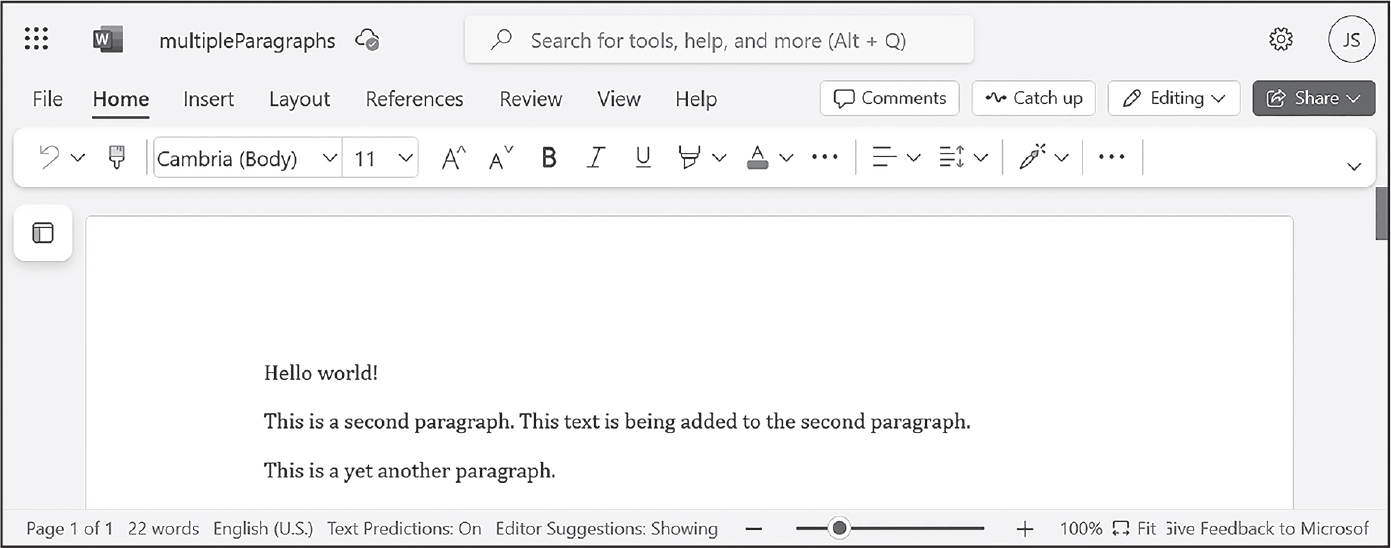
Figure 17-8: The document with multiple Paragraph and Run objects added
Both add_paragraph() and add_run() accept an optional second argument that is a string of the Paragraph or Run object’s style. Here is an example:
>>> doc.add_paragraph('Hello, world!', 'Title')
<docx.text.paragraph.Paragraph object at 0x00000213E6FA9190>
This line adds a paragraph with the text Hello, world! in the Title style.
Adding Headings
Calling add_heading() adds a paragraph with one of the heading styles. Enter the following into the interactive shell:
>>> import docx
>>> doc = docx.Document()
>>> doc.add_heading('Header 0', 0)
<docx.text.paragraph.Paragraph object at 0x00000000036CB3C8>
>>> doc.add_heading('Header 1', 1)
<docx.text.paragraph.Paragraph object at 0x00000000036CB630>
>>> doc.add_heading('Header 2', 2)
<docx.text.paragraph.Paragraph object at 0x00000000036CB828>
>>> doc.add_heading('Header 3', 3)
<docx.text.paragraph.Paragraph object at 0x00000000036CB2E8>
>>> doc.add_heading('Header 4', 4)
<docx.text.paragraph.Paragraph object at 0x00000000036CB3C8>
>>> doc.save('headings.docx')
The resulting headings.docx file should look like Figure 17-9.
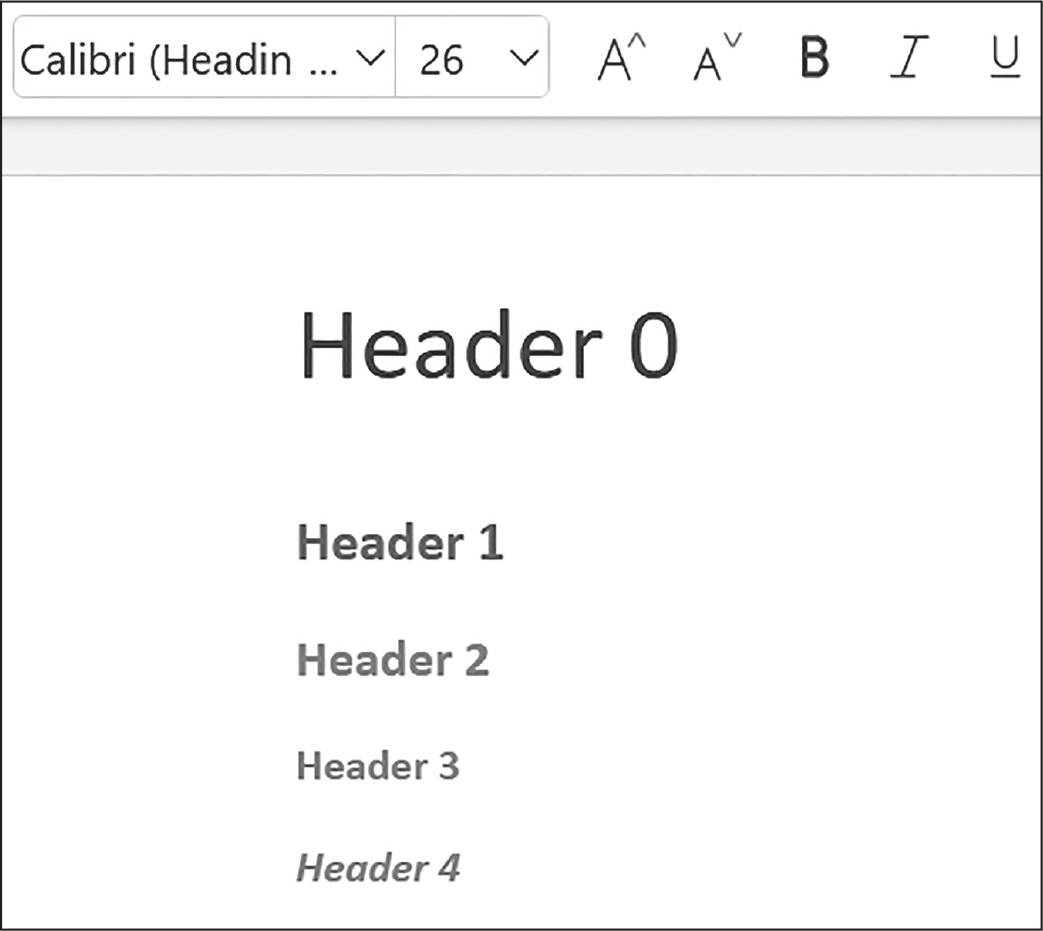
Figure 17-9: The headings.docx document with headings 0 to 4
The arguments to add_heading() are a string containing the heading text and an integer ranging from 0 to 4. The integer 0 makes the heading the Title style, which we use for the top of the document. Integers 1 to 9 are for various heading levels, with 1 being the main heading and 9 being the lowest subheading. The add_heading() function returns a Paragraph object to save you the step of extracting it from the Document object as a separate step.
Adding Line and Page Breaks
To add a line break (rather than starting a whole new paragraph), you can call the add_break() method on the Run object you want to have the break appear after. If you want to add a page break instead, you need to pass the value docx.enum.text.WD_BREAK.PAGE as a lone argument to add_break(), as is done in the middle of the following example:
>>> doc = docx.Document()
>>> doc.add_paragraph('This is on the first page!')
<docx.text.paragraph.Paragraph object at 0x0000000003785518>
❶ >>> doc.paragraphs[0].runs[0].add_break(docx.enum.text.WD_BREAK.PAGE)
>>> doc.add_paragraph('This is on the second page!')
<docx.text.paragraph.Paragraph object at 0x00000000037855F8>
>>> doc.save('twoPage.docx')
This code creates a two-page Word document with This is on the first page! on the first page and This is on the second page! on the second. Even though there was still plenty of space on the first page after the text This is on the first page!, we forced the next paragraph to begin on a new page by inserting a page break after the first run of the first paragraph ❶.
Adding Pictures
You can use the add_picture() method of Document objects to add an image to the end of the document. Say you have a file zophie.png in the current working directory. You can add zophie.png to the end of your document with a width of 1 inch and height of 4 centimeters (Word can use both imperial and metric units) by entering the following:
>>> doc.add_picture('zophie.png', width=docx.shared.Inches(1), height=docx.shared.Cm(4))
<docx.shape.InlineShape object at 0x00000000036C7D30>
The first argument is a string of the image’s filename. The optional width and height keyword arguments will set the width and height of the image in the document. If left out, the width and height will default to the normal size of the image.
You’ll probably prefer to specify an image’s height and width in familiar units such as inches and centimeters, so you can use the docx.shared.Inches() and docx.shared.Cm() functions when you’re specifying the width and height keyword arguments.
Summary
Text information isn’t just for plaintext files; in fact, it’s pretty likely that you deal with PDFs and Word documents much more often. You can use the PyPDF package to read and write PDF documents, but many other Python libraries can read and write PDF files. If you want to go beyond those discussed in this chapter, I recommend searching for pdfplumber, ReportLab, pdfrw, PyMuPDF, pdfkit, and borb on the PyPI website.
Unfortunately, reading text from PDF documents might not always result in a perfect translation to a string, because the file format is complicated and some PDFs might not be readable at all. The pdfminer.six package is a fork of a no-longer-maintained pdfminer package that focuses on extracting text from PDFs. This chapter used pdfminer.six as a fallback mechanism if you’re unable to extract text from a particular PDF file.
Word documents are more reliable, and you can read them with the python-docx package’s docx module. You can manipulate text in Word documents via Paragraph and Run objects. These objects can also be given styles, though they must be from the default set of styles or from styles already in the document. You can add new paragraphs, headings, breaks, and pictures to the ends of documents.
Many of the limitations that come with working with PDFs and Word documents occur because these formats are meant to display nicely for human readers, rather than be easy to parse by software. The next chapter takes a look at some other common formats for storing information: CSV, JSON, and XML files. These formats were designed for use by computers, and you’ll see that Python can work with them much more easily.
Practice Questions
1. What modes does the File object for PdfWriter objects need to be opened in to save the PDF file?
2. How do you acquire a Page object for page 5 from a PdfReader or PdfWriter object?
3. If a PdfReader object’s PDF is encrypted with the password swordfish, what must you do before you can obtain Page objects from it?
4. If the rotate() method rotates pages clockwise, how do you rotate a page counterclockwise?
5. What method returns a Document object for a file named demo.docx?
6. What is the difference between a Paragraph object and a Run object?
7. How do you obtain a list of Paragraph objects for a Document object that’s stored in a variable named doc?
8. What type of object has bold, underline, italic, strike, and outline variables?
9. What is the difference between setting the bold variable to True, False, or None?
10. How do you create a Document object for a new Word document?
11. How do you add a paragraph with the text 'Hello, there!' to a Document object stored in a variable named doc?
12. What integers represent the levels of headings available in Word documents?
Practice Programs
For practice, write programs to do the following tasks.
PDF Paranoia
Using the os.walk() function from Chapter 11, write a script that will go through every PDF in a folder (and its subfolders) and encrypt the PDFs using a password provided on the command line. Save each encrypted PDF with an _encrypted.pdf suffix added to the original filename. Before deleting the original file, have the program attempt to read and decrypt the new file to ensure that it was encrypted correctly.
Then, write a program that finds all encrypted PDFs in a folder (and its subfolders) and creates a decrypted copy of the PDF using a provided password. If the password is incorrect, the program should print a message to the user and continue to the next PDF.
Custom Invitations
Say you have a text file of guest names. This guests.txt file has one name per line, as follows:
Prof. Plum
Miss Scarlet
Col. Mustard
Al Sweigart
RoboCop
Write a program that generates a Word document with custom invitations that look like Figure 17-10.
Because Python-Docx can only use styles that already exist in a Word document, you’ll have to first add these styles to a blank Word file and then open that file with Python-Docx. There should be one invitation per page in the resulting Word document, so call add_break() to add a page break after the last paragraph of each invitation. This way, you will need to open only one Word document to print all of the invitations at once.
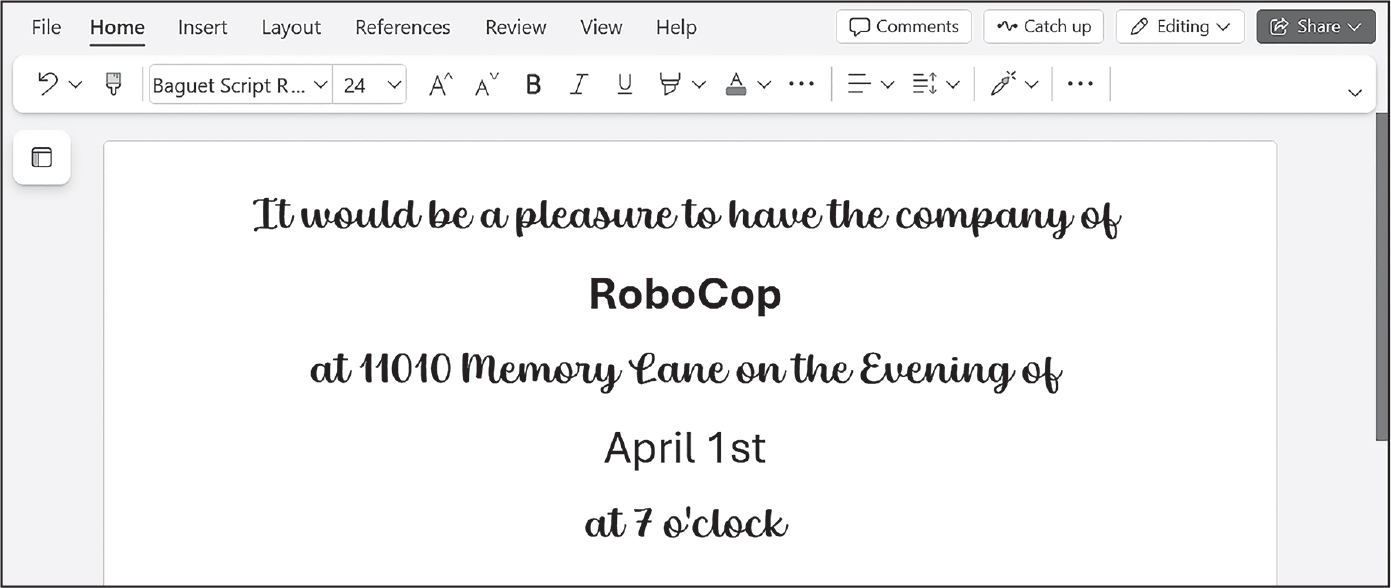
Figure 17-10: The Word document generated by your custom invite script Description
You can download a sample guests.txt file from the book’s online resources.
PDF Password Breaker
Say you have an encrypted PDF that you’ve forgotten the password to, but you remember it was a single English word. Trying to guess your forgotten password is quite a boring task. Instead, you can write a program that will decrypt the PDF by trying every possible English word until it finds one that works. This is called a brute-force password attack. Download the text file dictionary.txt from the book’s online resources. This dictionary file contains over 44,000 English words, with one word per line.
Using the file-reading skills you learned in Chapter 10, create a list of word strings by reading this file. Then, loop over each word in this list, passing it to the decrypt() method. You should try both the uppercase and lowercase forms of each word. (On my laptop, going through all 88,000 uppercase and lowercase words from the dictionary file takes a couple of minutes. This is why you shouldn’t use a simple English word for your passwords.)