Check out other books by Al Sweigart, free online or available for purchase:

...and other books as well! Or register for the online video course. You can also donate to support the author directly.
18 CSV, JSON, AND XML FILES

CSV, JSON, and XML are data serialization formats used to store data as plaintext files. Serialization converts data into a string to save your program’s work to a text file, transfer it over an internet connection, or even just copy and paste it into an email. Python comes with the csv, json, and xml modules to help you work with these file formats.
While files in these formats are essentially text files that you could read and write with Python’s open() function or the other file I/O functions from Chapter 10, it’s easier to use Python’s modules to handle them, just as we used the Beautiful Soup module in Chapter 13 to handle HTML-formatted text. Each format has its own use case:
Comma-separated values (CSV, pronounced “see-ess-vee”) is a simplified spreadsheet format, and works best for storing a variable number of rows of data that share the same columns.
JavaScript Object Notation (JSON, pronounced “JAY-sawn” or “Jason”) uses the same syntax as objects, arrays, and data types in the JavaScript programming language, though it doesn’t require you to know how to program in JavaScript. It was created as a simpler alternative to XML.
Extensible Markup Language (XML, pronounced “ex-em-el”) is an older, more established data serialization format widely used in enterprise software, but is overly complicated to work with if you don’t need its advanced features.
This chapter covers the basics of these formats’ syntax and the Python code to work with them.
The CSV Format
Each line in a CSV file (which uses the .csv file extension) represents a row in a spreadsheet, and commas separate the cells in the row. For example, the spreadsheet example3.xlsx included in the online resources at https://
4/5/2035 13:34,Apples,73
4/5/2035 3:41,Cherries,85
4/6/2035 12:46,Pears,14
4/8/2035 8:59,Oranges,52
4/10/2035 2:07,Apples,152
4/10/2035 18:10,Bananas,23
4/10/2035 2:40,Strawberries,98
I’ll use this file in this chapter’s CSV interactive shell examples. Download it or enter the text into a text editor and save it as example3.csv.
You can think of CSV files as a list of lists of values. Python code could represent the example3.csv content as the value [['4/5/2035 13:34', 'Apples', '73'], ['4/5/2035 3:41', 'Cherries', '85'], ... ['4/10/2035 2:40', 'Strawberries', '98']]. CSV files are simple, lacking many of the features of an Excel spreadsheet. For example, they:
- Don’t have multiple data types; every value is a string
- Don’t have settings for font size or color
- Don’t have multiple worksheets
- Can’t specify cell widths or cell heights
- Can’t merge cells
- Can’t have embedded images or charts
The advantage of CSV files is simplicity. Many apps and programming languages support them, you can view them in text editors (including Mu), and they’re a straightforward way to represent spreadsheet data.
Because CSV files are just text files, you might be tempted to read them as a string and then process that string using the techniques you learned in Chapter 8. For example, because each cell in a CSV file is separated by a comma, you might try to call split(',') on each line of text to get the comma-separated values as a list of strings. But not every comma in a CSV file represents the boundary between two cells. CSV files have a set of escape characters that allow you to include commas and other characters as part of the values. The split() method doesn’t handle these escape characters. Because of these potential pitfalls, the csv module provides a more reliable way to read and write CSV files.
Reading CSV Files
To read a CSV file, you must create a csv.reader object, which lets you iterate over lines in the CSV file. The csv module comes with Python, so you can import it without having to first install it. Place example3.csv in the current working directory, then enter the following into the interactive shell:
>>> import csv
>>> example_file = open('example3.csv')
>>> example_reader = csv.reader(example_file)
>>> example_data = list(example_reader)
>>> example_data
[['4/5/2035 13:34', 'Apples', '73'], ['4/5/2035 3:41', 'Cherries', '85'],
['4/6/2035 12:46', 'Pears', '14'], ['4/8/2035 8:59', 'Oranges', '52'],
['4/10/2035 2:07', 'Apples', '152'], ['4/10/2035 18:10', 'Bananas', '23'],
['4/10/2035 2:40', 'Strawberries', '98']]
>>> example_file.close()
To read a CSV file with the csv module, open it using the open() function, just as you would any other text file, but instead of calling the read() or readlines() method on the File object that open() returns, pass it to the csv .reader() function. This function should return a reader object. Note that you can’t pass a filename string directly to the csv.reader() function.
The easiest way to access the values in the reader object is to convert it to a plain Python list by passing it to list(). Using list() on this reader object returns a list of lists, which you can store in a variable, like example_data. Entering example_data in the shell displays the list of lists.
Now that you have the CSV file as a list of lists, you can access the value at a particular row and column with the expression example_data[row][col], where row is the index of one of the lists in example_data and col is the index of the item you want from that list. Enter the following into the interactive shell:
>>> example_data[0][0]  # First row, first column
'4/5/2035 13:34'
>>> example_data[0][1]  # First row, second column
'Apples'
>>> example_data[0][2]  # First row, third column
'73'
>>> example_data[1][1]  # Second row, second column
'Cherries'
>>> example_data[6][1]  # Seventh row, second column
'Strawberries'
As evident from the output, example_data[0][0] goes into the first list and gives us the first string, example_data[0][2] goes into the first list and gives us the third string, and so on.
Accessing Data in a for Loop
For large CSV files, you may want to use the reader object in a for loop. This approach saves you from having to load the entire file into memory at once. For example, enter the following into the interactive shell:
>>> import csv
>>> example_file = open('example3.csv')
>>> example_reader = csv.reader(example_file)
❶ >>> for row in example_reader:
...   ❷ print('Row #' + str(example_reader.line_num) + ' ' + str(row))
...
Row #1 ['4/5/2035 13:34', 'Apples', '73']
Row #2 ['4/5/2035 3:41', 'Cherries', '85']
Row #3 ['4/6/2035 12:46', 'Pears', '14']
Row #4 ['4/8/2035 8:59', 'Oranges', '52']
Row #5 ['4/10/2035 2:07', 'Apples', '152']
Row #6 ['4/10/2035 18:10', 'Bananas', '23']
Row #7 ['4/10/2035 2:40', 'Strawberries', '98']
After you import the csv module and make a reader object from the CSV file, you can loop through the rows in the reader object ❶. Each row is a list of values stored in the row variable, with each value in the list representing a cell.
The print() function call ❷ prints the number of the current row and the contents of the row. To get the row number, use the reader object’s line_num attribute, which stores an integer. If your CSV file contains column headers in the first row, you could use line_num to check whether you’re on row 1 and run a continue instruction to skip the headers. Unlike Python list indexes, line numbers in line_num begin at 1, not 0.
You can loop over the reader object only once. To reread the CSV file, you must call open() and csv.reader() again to create another reader object.
Writing CSV Files
A csv.writer object lets you write data to a CSV file. To create a writer object, use the csv.writer() function. Enter the following into the interactive shell:
>>> import csv
❶ >>> output_file = open('output.csv', 'w', newline='')
❷ >>> output_writer = csv.writer(output_file)
>>> output_writer.writerow(['spam', 'eggs', 'bacon', 'ham'])
21
>>> output_writer.writerow(['Hello, world!', 'eggs', 'bacon', 'ham'])
32
>>> output_writer.writerow([1, 2, 3.141592, 4])
16
>>> output_file.close()
Call open() and pass it 'w' to open a file in write mode ❶. This code should create an object you can then pass to csv.writer() ❷ to generate a writer object.
On Windows, you’ll also need to pass a blank string for the open() function’s newline keyword argument. For technical reasons that are beyond the scope of this book, if you forget to set the newline argument, the rows in output.csv will be double-spaced, as shown in Figure 18-1.
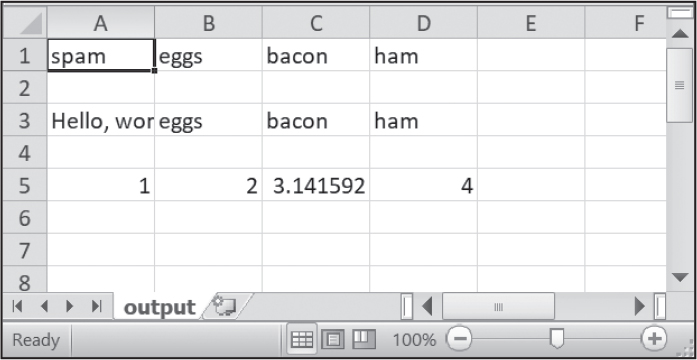
Figure 18-1: A double-spaced CSV file
The writerow() method of writer objects takes a list argument. Each value in the list will appear in its own cell in the output CSV file. The method’s return value is the number of characters written to the file for that row (including newline characters). For example, this code in our example produces an output.csv file that looks like this:
spam,eggs,bacon,ham
"Hello, world!",eggs,bacon,ham
1,2,3.141592,4
Notice how the writer object automatically escapes the comma in the value 'Hello, world!' with double quotes in the CSV file. The csv module saves you from having to handle these special cases yourself.
Using Tabs Instead of Commas
Tab-separated value (TSV) files are similar to CSV files but, unsurprisingly, use tabs instead of commas. Their files have the .tsv file extension. Say you want to separate cells with a tab character instead of a comma and want the rows to be double-spaced. You could enter something like the following into the interactive shell:
>>> import csv
>>> output_file = open('output.tsv', 'w', newline='')
>>> output_writer = csv.writer(output_file, delimiter='\t', lineterminator='\n\n') ❶
>>> output_writer.writerow(['spam', 'eggs', 'bacon', 'ham'])
21
>>> output_writer.writerow(['Hello, world!', 'eggs', 'bacon', 'ham'])
30
>>> output_writer.writerow([1, 2, 3.141592, 4])
16
>>> output_file.close()
This code changes the delimiter and line terminator characters in your file. The delimiter is the character that appears between cells on a row. By default, the delimiter for a CSV file is a comma. The line terminator is the character that comes at the end of a row. By default, the line terminator is a newline. You can change characters to different values by using the delimiter and lineterminator keyword arguments with csv.writer().
Passing delimiter='\t' and lineterminator='\n\n' ❶ changes the delimiter to a tab and the line terminator to two newlines. The code then calls writerow() three times to create three row, producing a file named output.tsv with the following contents:
spam    eggs    bacon   ham

Hello, world!   eggs    bacon   ham

1   2   3.141592    4
Tabs now separate the cells in the spreadsheet.
Handling Header Rows
For CSV files that contain header rows, it’s often more convenient to work with the DictReader and DictWriter objects rather than the reader and writer objects. While reader and writer read and write to CSV file rows by using lists, DictReader and DictWriter perform the same functions using dictionaries, treating the values in the first row as the keys.
Download exampleWithHeader3.csv from the book’s online resources for the next example. This file is the same as example3.csv except it includes Timestamp, Fruit, and Quantity as column headers in the first row. To read the file, enter the following into the interactive shell:
>>> import csv
>>> example_file = open('exampleWithHeader3.csv')
>>> example_dict_reader = csv.DictReader(example_file)
❶ >>> example_dict_data = list(example_dict_reader)
>>> example_dict_data
[{'Timestamp': '4/5/2035 3:41', 'Fruit': 'Cherries', 'Quantity': '85'},
{'Timestamp': '4/6/2035 12:46', 'Fruit': 'Pears', 'Quantity': '14'},
{'Timestamp': '4/8/2035 8:59', 'Fruit': 'Oranges', 'Quantity': '52'},
{'Timestamp': '4/10/2035 2:07', 'Fruit': 'Apples', 'Quantity': '152'},
{'Timestamp': '4/10/2035 18:10', 'Fruit': 'Bananas', 'Quantity': '23'},
{'Timestamp': '4/10/2035 2:40', 'Fruit': 'Strawberries', 'Quantity': '98'}]
>>> example_file = open('exampleWithHeader3.csv')
>>> example_dict_reader = csv.DictReader(example_file)
❷ >>> for row in example_dict_reader:
...     print(row['Timestamp'], row['Fruit'], row['Quantity'])
...
4/5/2035 13:34 Apples 73
4/5/2035 3:41 Cherries 85
4/6/2035 12:46 Pears 14
4/8/2035 8:59 Oranges 52
4/10/2035 2:07 Apples 152
4/10/2035 18:10 Bananas 23
4/10/2035 2:40 Strawberries 98
By passing the DictReader object to list() ❶, you can get the CSV data as a list of dictionaries. Each row corresponds to one dictionary in the list. Alternatively, you can use the DictReader object inside a for loop ❷. The DictReader object sets row to a dictionary object with keys derived from the headers in the first row. Using a DictReader object means you don’t need additional code to skip the first row’s header information, as the DictReader object does this for you.
If you tried to use a DictReader object with example3.csv, which doesn’t have column headers in the first row, the DictReader object would use '4/5/2035 13:34', 'Apples', and '73' as the dictionary keys. To avoid this, you can supply the DictReader() function with a second argument containing made-up header names:
>>> import csv
>>> example_file = open('example3.csv')
>>> example_dict_reader = csv.DictReader(example_file, ['time', 'name', 'amount'])
>>> for row in example_dict_reader:
...     print(row['time'], row['name'], row['amount'])
...
4/5/2035 13:34 Apples 73
4/5/2035 3:41 Cherries 85
4/6/2035 12:46 Pears 14
4/8/2035 8:59 Oranges 52
4/10/2035 2:07 Apples 152
4/10/2035 18:10 Bananas 23
4/10/2035 2:40 Strawberries 98
Because example3.csv’s first row doesn’t contain column headings, we created our own: 'time', 'name', and 'amount'. The DictWriter objects use dictionaries to create CSV files:
>>> import csv
>>> output_file = open('output.csv', 'w', newline='')
>>> output_dict_writer = csv.DictWriter(output_file, ['Name', 'Pet', 'Phone'])
>>> output_dict_writer.writeheader()
16
>>> output_dict_writer.writerow({'Name': 'Alice', 'Pet': 'cat', 'Phone': '555-1234'})
20
>>> output_dict_writer.writerow({'Name': 'Bob', 'Phone': '555-9999'})
15
>>> output_dict_writer.writerow({'Phone': '555-5555', 'Name': 'Carol', 'Pet': 'dog'})
20
>>> output_file.close()
If you want your file to contain a header row, write that row by calling writeheader(). Otherwise, skip calling writeheader() to omit a header row from the file. You can then write each row of the CSV file with a writerow() method call, passing a dictionary that uses the headers as keys and contains the data to write to the file.
The output.csv file that this code creates looks like this:
Name,Pet,Phone
Alice,cat,555-1234
Bob,,555-9999
Carol,dog,555-5555
The double commas indicate that Bob has a blank value for a pet. Notice that the order of the key-value pairs in the dictionaries you passed to writerow() doesn’t matter; they’re written in the order of the keys given to DictWriter(). For example, even though you passed the Phone key and value before the Name and Pet keys and values in the fourth row, the phone number still appears last in the output.
Notice also that any missing keys, such as 'Pet' in {'Name': 'Bob', 'Phone': '555-9999'}, will become empty cells in the CSV file.
Project 13: Remove the Header from CSV Files
Say you have the boring job of removing the first line from several hundred CSV files. Maybe you’ll be feeding them into an automated process that requires just the data, without the headers at the top of the columns. You could open each file in Excel, delete the first row, and resave the file—but that would take hours. Let’s write a program to do it instead.
The program will need to open every file with the .csv extension in the current working directory, read the contents of the CSV file, and rewrite the contents without the first row to a file of the same name. This will replace the old contents of the CSV file with the new, headless contents.
WARNING
As always, whenever you write a program that modifies files, be sure to back up the files first, in case your program doesn’t work the way you expect it to. You don’t want to accidentally erase your original files.
At a high level, the program must do the following:
- Find all the CSV files in the current working directory.
- Read the full contents of each file.
- Write the contents, skipping the first line, to a new CSV file.
At the code level, this means the program will need to do the following:
- Loop over a list of files from os.listdir(), skipping the non-CSV files.
- Create a CSV reader object and read the contents of the file, using the line_num attribute to figure out which line to skip.
- Create a CSV writer object and write the read-in data to the new file.
For this project, open a new file editor window and save it as removeCsvHeader.py.
Step 1: Loop Through Each File
The first thing your program needs to do is loop over a list of all CSV filenames for the current working directory. Make removeCsvHeader.py look like this:
# Removes the header line from csv files
import csv, os

os.makedirs('headerRemoved', exist_ok=True)

# Loop through every file in the current working directory.
for csv_filename in os.listdir('.'):
    if not csv_filename.endswith('.csv'):
      ❶ continue  # Skip non-CSV files.

    print('Removing header from ' + csv_filename + '...')

    # TODO: Read the CSV file (skipping the first row).

    # TODO: Write the CSV file.
The os.makedirs() call create a headerRemoved folder in which to save the headless CSV files. A for loop on os.listdir('.') gets you partway there, but it will loop over all files in the working directory, so you’ll need to add some code at the start of the loop that skips filenames that don’t end with .csv. The continue statement ❶ makes the for loop move on to the next filename when it comes across a non-CSV file.
To see output as the program runs, print a message indicating which CSV file the program is working on. Then, add some TODO comments indicating what the rest of the program should do.
Step 2: Read the File
The program doesn’t remove the first line from the CSV file. Rather, it creates a new copy of the CSV file without the first line. That way, we can use the original file in case a bug incorrectly modifies the new file.
The program will need a way to track whether it’s currently looping on the first row. Add the following to removeCsvHeader.py.
# Removes the header line from csv files
import csv, os

--snip--

    # Read the CSV file (skipping the first row).
    csv_rows = []
    csv_file_obj = open(csv_filename)
    reader_obj = csv.reader(csv_file_obj)
    for row in reader_obj:
        if reader_obj.line_num == 1:
            continue  # Skip the first row.
        csv_rows.append(row)
    csv_file_obj.close()

    # TODO: Write the CSV file.
The reader object’s line_num attribute can be used to determine which line in the CSV file it’s currently reading. Another for loop will loop over the rows returned from the CSV reader object, and all rows but the first will be appended to csv_rows.
As the for loop iterates over each row, the code checks whether reader _obj.line_num is set to 1. If so, it executes a continue to move on to the next row without appending it to csv_rows. For every subsequent row, the condition will be always be False, and the code will append the row to csv_rows.
Step 3: Write the New CSV File
Now that csv_rows contains all rows but the first row, we need to write the list to a CSV file in the headerRemoved folder. Add the following to removeCsvHeader.py:
# Removes the header line from csv files
import csv, os

--snip--

# Loop through every file in the current working directory.
❶ for csv_filename in os.listdir('.'):
    if not csv_filename.endswith('.csv'):
        continue    # Skip non-CSV files.

    --snip--

    # Write the CSV file.
    csv_file_obj = open(os.path.join('headerRemoved', csv_filename), 'w',
                 newline='')
    csv_writer = csv.writer(csv_file_obj)
    for row in csv_rows:
        csv_writer.writerow(row)
    csv_file_obj.close()
The CSV writer object will write the list to a CSV file in headerRemoved using csv_filename (which we also used in the CSV reader). After creating the writer object, we loop over the sublists stored in csv_rows and write each sublist to the file.
The outer for loop ❶ will then loop to the next filename returned by os.listdir('.'). When that loop is finished, the program will be complete.
To test your program, download removeCsvHeader.zip from the book’s online resources and unzip it to a folder. Then, run the removeCsvHeader.py program in that folder. The output will look like this:
Removing header from NAICS_data_1048.csv...
Removing header from NAICS_data_1218.csv...
--snip--
Removing header from NAICS_data_9834.csv...
Removing header from NAICS_data_9986.csv...
This program should print a filename each time it strips the first line from a CSV file.
Ideas for Similar Programs
Programs that work with CSV files are similar to those that work with Excel files, as CSV and Excel are both spreadsheet files. For example, you could write programs to do the following:
- Compare data between different rows in a CSV file, or between multiple CSV files.
- Copy specific data from a CSV file to an Excel file, or vice versa.
- Check for invalid data or formatting mistakes in CSV files and alert the user about these errors.
- Read data from a CSV file as input for your Python programs.
Versatile Plaintext Formats
While CSV files are useful for storing rows of data that have the exact same columns, the JSON and XML formats can store a variety of data structures. (This book skips the less popular but still useful YAML and TOML formats.) These formats aren’t specific to Python; many programming languages have functions for reading and writing data in these formats.
Each of these formats organizes data using the equivalent of nested Python dictionaries and lists. In other programming languages, you’ll see dictionaries referred to as mappings, hash maps, hash tables, or associative arrays (because they map, or associate, one piece of data, the key, to another, the value). Likewise, you may see Python’s lists called arrays in other languages. But the concepts are the same: they organize data into key-value pairs and lists.
You can nest dictionaries and lists within other dictionaries and lists to form elaborate data structures. But if you want to save these data structures to a text file, you’ll need to choose a data serialization format such as JSON or XML. The Python modules in this chapter can parse (that is, read and understand) text written in these formats to create Python data structures from their text.
These human-readable plaintext formats don’t make the most efficient use of disk space or memory, but they have the advantage of being easy to view and edit in a text editor and are language neutral, as programs written in any language can read or write text files. By contrast, the shelve module, covered in Chapter 10, can store all Python data types in binary shelf files, but other languages don’t have modules to load this data into their programs.
In the remainder of this chapter, I’ll represent the following Python data structure, which stores personal details about someone named Alice, in each of these formats, so you can compare and contrast them:
{
    "name": "Alice Doe",
    "age": 30,
    "car": None,
    "programmer": True,
    "address": {
        "street": "100 Larkin St.",
        "city": "San Francisco",
        "zip": "94102"
    },
    "phone": [
        {
            "type": "mobile",
            "number": "415-555-7890"
        },
        {
            "type": "work",
            "number": "415-555-1234"
        }
    ]
}
These text formats have their own histories and occupy specific niches in the computing ecosystem. If you have to choose a data serialization format for storing your data, keep in mind that JSON is simpler than XML and more widely adopted than YAML, and that TOML is chiefly used as a format for configuration files. Lastly, coming up with your own data serialization format might be tempting, but it’s also reinventing the wheel, and you would have to write your own parser for your custom format. It’s better to simply choose an existing format.
JSON
JSON stores information as JavaScript source code, though many non-JavaScript applications use it. In particular, websites often make their data available to programmers in the JSON format through APIs like the OpenWeather API covered in Chapter 13. We save JSON-formatted text in plaintext files with the .json file extension. Here is the example data structure formatted as JSON text:
{
  "name": "Alice Doe",
  "age": 30,
  "car": null,
  "programmer": true,
  "address": {
    "street": "100 Larkin St.",
    "city": "San Francisco",
    "zip": "94102"
  },
  "phone": [
    {
      "type": "mobile",
      "number": "415-555-7890"
    },
    {
      "type": "work",
      "number": "415-555-1234"
    }
  ]
}
The first thing you’ll notice is that JSON is similar to Python syntax. Python’s dictionaries and JSON’s objects both use curly brackets and contain key-value pairs separated by commas, with each key and value separated by a colon. Python’s lists and JSON’s arrays both use square brackets and contain values separated by commas. In JSON, whitespace is insignificant outside of double-quoted strings, meaning you can space values however you like. However, it’s best to format nested objects and arrays with increased indentation, like blocks of indented Python code. In our example data, the list of phone numbers is indented by two spaces, with each phone number dictionary in the list indented by four spaces.
But there are also differences between JSON and Python. Instead of Python’s None value, JSON uses the JavaScript keyword null. The Boolean values are JavaScript’s lowercase true and false keywords. JSON doesn’t allow JavaScript comments or multiline strings; all strings in JSON must use double quotes. Unlike Python lists, JSON arrays can’t have trailing commas, so while ["spam", "eggs"] is valid JSON, ["spam", "eggs",] is not.
Facebook, Twitter, Yahoo!, Google, Tumblr, Wikipedia, Flickr, Data.gov, Reddit, IMDb, Rotten Tomatoes, LinkedIn, and many other popular sites offer APIs that work with JSON data. Some of these sites require registration, which is almost always free. You’ll have to find documentation to learn what URLs your program needs to request in order to get the data you want, as well as the general format of the JSON data structures returned. If the site offering the API has a Developers page, look for the documentation there.
Python’s json module handles the details of translating between a string formatted as JSON data and corresponding Python values with the json.loads() and json.dumps() functions. JSON can’t store every kind of Python value, only those of the following basic data types: strings, integers, floats, Booleans, lists, dictionaries, and NoneType. JSON can’t represent Python-specific objects, such as File objects, CSV reader or writer objects, or Selenium WebElement objects. The full documentation for the json module is at https://
Reading JSON Data
To translate a string containing JSON data into a Python value, pass it to the json.loads() function. (The name means “load string,” not “loads.”) Enter the following into the interactive shell:
❶ >>> import json
>>> json_string = '{"name": "Alice Doe", "age": 30, "car": null, "programmer":
 true, "address": {"street": "100 Larkin St.", "city": "San Francisco", "zip":
 "94102"}, "phone": [{"type": "mobile", "number": "415-555-7890"}, {"type":
"work", "number": "415-555-1234"}]}'
❷ >>> python_data = json.loads(json_string)
>>> python_data
{'name': 'Alice Doe', 'age': 30, 'car': None, 'programmer': True, 'address':
{'street': '100 Larkin St.', 'city': 'San Francisco', 'zip': '94102'},
'phone': [{'type': 'mobile', 'number': '415-555-7890'}, {'type': 'work',
'number': '415-555-1234'}]}
After you import the json module ❶, you can call loads() ❷ and pass it a string of JSON data. Note that JSON strings always use double quotes. It should return the data as a Python dictionary.
Writing JSON Data
The json.dumps() function (which means “dump string,” not “dumps”) will translate Python data into a string of JSON-formatted data. Enter the following into the interactive shell:
>>> import json
>>> python_data = {'name': 'Alice Doe', 'age': 30, 'car': None, 'programmer': True, 'address':
{'street': '100 Larkin St.', 'city': 'San Francisco', 'zip': '94102'}, 'phone': [{'type':
'mobile', 'number': '415-555-7890'}, {'type': 'work', 'number': '415-555-1234'}]}
>>> json_string = json.dumps(python_data) ❶
>>> print(json_string) ❷
{"name": "Alice Doe", "age": 30, "car": null, "programmer": true, "address": {"street":
"100 Larkin St.", "city": "San Francisco", "zip": "94102"}, "phone": [{"type": "mobile",
"number": "415-555-7890"}, {"type": "work", "number": "415-555-1234"}]}
>>> json_string = json.dumps(python_data, indent=2) ❸
>>> print(json_string)
{
  "name": "Alice Doe",
  "age": 30,
  "car": null,
  "programmer": true,
  "address": {
    "street": "100 Larkin St.",
    "city": "San Francisco",
--snip--
}
The value passed to json.dumps() ❶ can consist only of the following basic Python data types: strings, integers, floats, Booleans, lists, dictionaries, and NoneType.
By default, the entire JSON text is written on a single line ❷. This compressed format is fine for reading and writing JSON text between programs, but a multiline, indented form would be nicer for humans to read. The indent=2 keyword argument ❸ formats the JSON text into separate lines, with two spaces of indentation for each nested dictionary or list. Unless your JSON is megabytes in size, increasing the size by adding the space and newline characters is worth it for the readability.
Once you have the JSON text as a Python string value, you can write it to a .json file, pass it to a function, use it in a web request, or perform any other operation you can do with a string.
XML
The XML file format is older than JSON but still widely used. Its syntax is similar to HTML, which we covered in Chapter 18, and involves nesting opening and closing tags inside angle brackets that contain other content. These tags are called elements. SVG image files are made up of text written in XML. The RSS and Atom web feed formats are also written in XML, and Microsoft Word documents are just ZIP files that have the .docx file extension and contain XML files.
We store XML-formatted text in plaintext files with the .xml file extension. Here’s the example data structure formatted as XML:
<person>
    <name>Alice Doe</name>
    <age>30</age>
    <programmer>true</programmer>
    <car xsi:nil="true" xmlns:xsi="http://www.w3.org/2001/XMLSchema-instance"/>
    <address>
        <street>100 Larkin St.</street>
        <city>San Francisco</city>
        <zip>94102</zip>
    </address>
    <phone>
        <phoneEntry>
            <type>mobile</type>
            <number>415-555-7890</number>
        </phoneEntry>
        <phoneEntry>
            <type>work</type>
            <number>415-555-1234</number>
        </phoneEntry>
    </phone>
</person>
In this example, the <person> element has subelements <name>, <age>, and so on. The <name> and <age> subelements are child elements, and <person> is their parent element. Valid XML documents must have a single root element that contains all the other elements, such as the <person> element in this example. A document with multiple root elements like the following is not valid:
<person><name>Alice Doe</name></person>
<person><name>Bob Smith</name></person>
<person><name>Carol Watanabe</name></person>
XML is quite verbose compared to more modern serialization formats like JSON. Each element has an opening and closing tag, such as <age> and </age>. An XML element is a key-value pair, with the key being the element’s tag (in this case, <age>) and the value being the text in between the opening and closing tags. XML text has no data type; everything in between the opening and closing tags is considered a string, including the 94102 and true text in our example data. Lists of data, such as the <phone> element, have to name their individual items with their own elements, such as <phoneEntry>. The “Entry” suffix for these subelements is just a naming convention.
XML’s comments are identical to HTML’s comments: anything in between <!-- and --> is meant to be ignored.
Whitespace outside the opening and closing tags is insignificant, and you can format it however you like. There is no “null” value in XML, but you can approximate it by adding the xsi:nil="true" and xmlns:xsi="http://www.w3.org/2001/XMLSchema-instance" attributes to a tag. XML attributes are key-value pairs written in a key="value" format within the opening tag. The tag is written as a self-closing tag; instead of using a closing tag, the opening tag ends with />, as in <car xsi:nil="true" xmlns:xsi="http://www.w3.org/2001/XMLSchema-instance"/>.
Tag and attribute names can be written in any case, but are lowercase by convention. Attribute values can be enclosed in single or double quotes, but double quotes are standard.
Whether to use subelements or attributes is often ambiguous. Our example data uses these elements for the address data:
<address>
    <street>100 Larkin St.</street>
    <city>San Francisco</city>
    <zip>94102</zip>
</address>
However, it could have easily formatted the subelement data as attributes in a self-closing <address> element:
<address street="100 Larkin St." city="San Francisco" zip="94102" />These sorts of ambiguities, as well as the verbose nature of tags, have made XML less popular than it once was. XML was widely deployed throughout the 1990s and 2000s, and much of that software is still used today. But unless you have a specific reason to use XML, you’re better served by using JSON.
In general, XML software libraries have two ways of reading XML documents. The Document Object Model (DOM) approach reads the entire XML document into memory at once. This makes it easy to access data anywhere in the XML document, but generally only works for small or moderately sized XML documents. The Simple API for XML (SAX) approach reads the XML document as a stream of elements, so it doesn’t have to load the entire document into memory at once. This approach is ideal for XML documents that are gigabytes in size but is less convenient, as you can’t work with elements until you’ve iterated over them in the document.
Python’s standard library has the xml.dom, xml.sax, and xml.etree.ElementTree modules for handling XML text. For our simple examples, we’ll use Python’s xml.etree.ElementTree module to read the entire XML document at once.
Reading XML Files
The xml.etree module uses Element objects to represent an XML element and its child elements. Enter the following into the interactive shell:
❶ >>> import xml.etree.ElementTree as ET
❷ >>> xml_string = """<person><name>Alice Doe</name><age>30</age>
<programmer>true</programmer><car xsi:nil="true" xmlns:xsi=
"http://www.w3.org/2001/XMLSchema-instance”/><address><street>
100 Larkin St.</street><city>San Francisco</city><zip>94102</zip>
</address><phone><phoneEntry><type>mobile</type><number>415-555-
7890</number></phoneEntry><phoneEntry><type>work</type><number>
415-555-1234</number></phoneEntry></phone></person>"""
❸ >>> root = ET.fromstring(xml_string)
>>> root
<Element 'person' at 0x000001942999BBA0>
We import the xml.etree.ElementTree module ❶ with the as ET syntax so that we can enter ET instead of the long xml.etree.ElementTree module name. The xml_string variable ❷ contains the text of the XML we wish to parse, though this text could have just as easily been read from a text file with the .xml file extension. Finally, we pass this text to the ET.fromstring() function ❸, which returns an Element object containing the data we want to access. We’ll store this Element object in a variable named root.
The xml.etree.ElementTree module also has a parse() function. You can pass it the name of a file from which to load XML, and it returns an Element object:
>>> import xml.etree.ElementTree as ET
>>> tree = ET.parse('my_data.xml')
>>> root = tree.getroot()
Once you have an Element object, you can access its tag and text Python attributes to see the name of the tag, as well as the text enclosed within its opening and closing tags. If you pass the Element object to the list() function, it should return a list of its immediate child elements. Continue the interactive shell by entering the following:
>>> root.tag
'person'
>>> list(root)
[<Element 'name' at 0x00000150BA4ADDF0>, <Element 'age' at
0x00000150BA4ADF30>, <Element 'programmer' at 0x00000150BA4ADEE0>,
<Element 'car' at 0x00000150BA4ADD00>, <Element 'address' at
0x00000150BA4ADCB0>, <Element 'phone' at 0x00000150BA4ADA30>]
The child Element objects of a parent Element object are accessible through an integer index, just like Python lists. So, if root contains the <person> element, then root[0] and root[1] contain the <name> and <age> elements, respectively. You can access the tag and text attributes of all of these Element objects. However, any self-closing tags, like <car/>, will use None for their text attribute. For example, enter the following into the interactive shell:
>>> root[0].tag
'name'
>>> root[0].text
'Alice Doe'
>>> root[3].tag
'car'
>>> root[3].text == None  # <car/> has no text.
True
>>> root[4].tag
'address'
>>> root[4][0].tag
'street'
>>> root[4][0].text
'100 Larkin St.'
From the root element, you can explore the data in the entire XML document. You can also iterate over the immediate child elements by putting an Element object in a for loop:
>>> for elem in root:
...     print(elem.tag, '--', elem.text)
...
name -- Alice Doe
age -- 30
programmer -- true
car -- None
address -- None
phone -- None
If you want to iterate over all children underneath the Element, you can call the iter() method in a for loop:
>>> for elem in root.iter():
...     print(elem.tag, '--', elem.text)
...
person -- None
name -- Alice Doe
age -- 30
programmer -- true
car -- None
address -- None
street -- 100 Larkin St.
city -- San Francisco
zip -- 94102
phone -- None
phoneEntry -- None
type -- mobile
number -- 415-555-7890
phoneEntry -- None
type -- work
number -- 415-555-1234
Optionally, you can pass a string to the iter() method to filter for XML elements with a matching tag. This example calls iter('number') to iterate over only the <number> child elements of the root element:
>>> for elem in root.iter('number'):
...     print(elem.tag, '--', elem.text)
...
number -- 415-555-7890
number -- 415-555-1234
There’s much more to browsing the data in an XML document than the attributes and methods covered in this section. For example, just as the CSS selectors covered in Chapter 13 can find elements in a web page’s HTML, a language called XPath can locate elements in an XML document. These concepts are beyond the scope of this chapter, but you can learn about them in the Python documentation at https://
Python’s XML modules have no way to convert XML text to a Python data structure. However, the third-party xmltodict module at https://
>>> import xmltodict
>>> xml_string = """<person><name>Alice Doe</name><age>30</age>
<programmer>true</programmer><car xsi:nil="true" xmlns:xsi=
"http://www.w3.org/2001/XMLSchema-instance”/><address><street>
100 Larkin St.</street><city>San Francisco</city><zip>94102
</zip></address><phone><phoneEntry><type>mobile</type><number>
415-555-7890</number></phoneEntry><phoneEntry><type>work</type>
<number>415-555-1234</number></phoneEntry></phone></person>"""
>>> python_data = xmltodict.parse(xml_string)
>>> python_data
{'person': {'name': 'Alice Doe', 'age': '30', 'programmer': 'true',
'car': {'@xsi:nil': 'true', '@xmlns:xsi': 'http://www.w3.org/2001/
XMLSchema-instance'}, 'address': {'street': '100 Larkin St.', 'city':
'San Francisco', 'zip': '94102'}, 'phone': {'phoneEntry': [{'type':
'mobile', 'number': '415-555-7890'}, {'type': 'work', 'number':
'415-555-1234'}]}}}
One reason the XML standard has fallen to the wayside compared to formats like JSON is that representing data types in XML is more complicated. For example, the <programmer> element was parsed as the string value 'true' instead of the Boolean value True. And the <car> element was parsed into the awkward 'car': {'@xsi:nil': 'true', '@xmlns:xsi': 'http://www.w3.org/2001/XMLSchema-instance'} key-value pair instead of the value None. You must double-check the input and output of any XML module to verify that it is representing your data as you intend.
Writing XML Files
The xml.etree module is a bit unwieldy, so for small projects, you may be better off calling the open() function and write() method to create XML text yourself. But to create an XML document from scratch with the xml.etree module, you’ll need to create a root Element object (such as the <person> element in our example) and then call the SubElement() function to create child elements for it. You can set any XML attributes in the element with the set() method. For example, enter the following:
>>> import xml.etree.ElementTree as ET
>>> person = ET.Element('person')  # Create the root XML element.
>>> name = ET.SubElement(person, 'name')  # Create <name> and put it under <person>.
>>> name.text = 'Alice Doe'  # Set the text between <name> and </name>.
>>> age = ET.SubElement(person, 'age')
>>> age.text = '30'  # XML content is always a string.
>>> programmer = ET.SubElement(person, 'programmer')
>>> programmer.text = 'true'
>>> car = ET.SubElement(person, 'car')
>>> car.set('xsi:nil', 'true')
>>> car.set('xmlns:xsi', 'http://www.w3.org/2001/XMLSchema-instance')
>>> address = ET.SubElement(person, 'address')
>>> street = ET.SubElement(address, 'street')
>>> street.text = '100 Larkin St.'
For brevity, we’ll leave out the rest of the <address> and <phone> elements. Call the ET.tostring() and decode() functions with the root Element object to get a Python string of the XML text:
>>> ET.tostring(person, encoding='utf-8').decode('utf-8')
'<person><name>Alice Doe</name><age>30</age><programmer>true</programmer>
<car xsi:nil="true" xmlns:xsi="http://www.w3.org/2001/XMLSchema-instance"/>
<address><street>100 Larkin St.</street></address></person>'
It’s rather unfortunate that the tostring() function returns a bytes object instead of a string, necessitating a decode() method call to obtain an actual string. But once you have the XML text as a Python string value, you can write it to a .xml file, pass it to a function, use it in a web request, or do anything else you can do with a string.
Summary
CSV, JSON, and XML are common plaintext formats for storing data. They’re easy for programs to parse while still being human readable, so they are often used for simple spreadsheets or web app data. The csv, json, and xml.etree.ElementTree modules in the Python standard library greatly simplify the process of reading and writing these files, so you don’t need to do so with the open() function.
These formats are not specific to Python; many other programming languages and software applications use these file types. This chapter can help you write Python programs that can also interact with any apps that use them.
Practice Questions
1. What are some features that Excel spreadsheets have but CSV spreadsheets don’t?
2. What do you pass to csv.reader() and csv.writer() to create reader and writer objects?
3. What modes do File objects for reader and writer objects need to be opened in?
4. What method takes a list argument and writes it to a CSV file?
5. What do the delimiter and lineterminator keyword arguments do?
6. Of CSV, JSON, and XML, which formats can be easily edited with a text editor application?
7. What function takes a string of JSON data and returns a Python data structure?
8. What function takes a Python data structure and returns a string of JSON data?
9. Which data serialization format resembles HTML, with tags enclosed in angle brackets?
10. How does JSON write None values?
11. How do you write Boolean values in JSON?
Practice Program: Excel-to-CSV Converter
Excel can save a spreadsheet to a CSV file with a few mouse clicks, but if you had to convert hundreds of Excel files to CSVs, it would take hours of clicking. Using the openpyxl module from Chapter 14, write a program that reads all the Excel files in the current working directory and outputs them as CSV files.
A single Excel file might contain multiple sheets; you’ll have to create one CSV file per sheet. The filenames of the CSV files should be <excel filename>_<sheet title>.csv, where <excel filename> is the filename of the Excel file without the file extension (for example, spam_data, not spam_data.xlsx) and <sheet title> is the string from the Worksheet object’s title variable.
This program will involve many nested for loops. The skeleton of the program should look something like this:
for excel_file in os.listdir('.'):
    # Skip non-xlsx files, load the workbook object.
    for sheet_name in wb.sheetnames:
        # Loop through every sheet in the workbook.
        # Create the CSV filename from the Excel filename and sheet title.
        # Create the csv.writer object for this CSV file.

        # Loop through every row in the sheet.
        for row_num in range(1, sheet.max_row + 1):
            row_data = []    # Append each cell to this list.
            # Loop through each cell in the row.
            for col_num in range(1, sheet.max_column + 1):
                # Append each cell's data to row_data

            # Write the row_data list to the CSV file.

        csv_file.close()
Download the ZIP file excelSpreadsheets.zip from the book’s online resources and unzip the spreadsheets into the same directory as your program. You can use these as the files to test the program on.