Check out other books by Al Sweigart, free online or available for purchase:
...and other books as well! Or register for the online video course. You can also donate to support the author directly.
23 CONTROLLING THE KEYBOARD AND MOUSE
Knowing various Python packages for editing spreadsheets, downloading files, and launching programs is useful, but sometimes there just aren’t any packages for the applications you need to work with. The ultimate tools for automating tasks on your computer are programs that you write to directly control the keyboard and mouse. These programs can send other applications virtual keystrokes and mouse clicks, as if you were sitting at your computer and interacting with the applications yourself.
This technique is known as graphical user interface automation, or GUI automation for short. With GUI automation, your programs can do anything that a human user sitting at the computer can do, except spill coffee on the keyboard. Think of GUI automation as programming a robotic arm. You can program the robotic arm to type at your keyboard and move your mouse for you. This technique is particularly useful for tasks that involve a lot of mindless clicking or filling out of forms. This powerful technique is why account sign-up and login web pages have bot-detecting captcha challenges. Otherwise, automation programs could sign up for multiple free accounts, flood social media with spam, or guess account passwords.
Some companies sell innovative (and pricey) “automation solutions,” usually marketed as robotic process automation (RPA) tools. These products are effectively no different from the Python scripts you can make yourself with the PyAutoGUI library, which has functions for simulating mouse movements, button clicks, and keyboard typing. This chapter covers only a subset of PyAutoGUI’s features; you can find the full documentation at https://
WARNING
Don’t save your programs as pyautogui.py. If you do, then when you run import pyautogui Python will import your program instead of PyAutoGUI, and you’ll get error messages like AttributeError: module 'pyautogui' has no attribute 'click'.
Setting Up Accessibility Apps on macOS
As a security measure, macOS doesn’t normally let programs control the mouse or keyboard. To make PyAutoGUI work on macOS, you must set the program running your Python script to be an accessibility application. Without this step, your PyAutoGUI function calls will have no effect.
Whether you run your Python programs from Mu, IDLE, or the Terminal, keep that application open. Then, open System Preferences and go to the Accessibility tab. The currently open applications will appear under the “Allow the apps below to control your computer” label. Check Mu, IDLE, Terminal, or whichever app you use to run your Python scripts. You’ll be prompted to enter your password to confirm these changes.
Staying on Track
Before you jump into a GUI automation, you should know how to escape problems that may arise. Python can move your mouse and type keystrokes at an incredible speed. In fact, it might be too fast for other programs to keep up with. Also, if something goes wrong but your program keeps moving the mouse around, it will be hard to tell exactly what the program is doing or how to recover from the problem. Like the enchanted brooms from “The Sorcerer’s Apprentice” sequence in Disney’s Fantasia, which kept filling (and then overfilling) Mickey’s tub with water, your program could get out of control even though it’s following your instructions perfectly. Stopping the program can be difficult if the mouse is moving around on its own, preventing you from clicking the Mu Editor window to close it. Fortunately, there are several ways to prevent or recover from GUI automation problems.
Pauses and Fail-Safes
If your program has a bug and you’re unable to use the keyboard and mouse to shut it down, you can use PyAutoGUI’s fail-safe feature. Quickly slide the mouse to one of the four corners of the screen. Every PyAutoGUI function call has a one-tenth-of-a-second pause after performing its action to give you enough time to move the mouse to a corner. If PyAutoGUI then finds that the mouse cursor is in a corner, it raises the pyautogui.FailSafeException exception. Non-PyAutoGUI instructions won’t have this pause. You can adjust this pause duration by setting pyautogui.PAUSE to a value other than 0.1.
If you find yourself in a situation where you need to stop your PyAutoGUI program, just slam the mouse toward a screen corner to stop it.
Logouts
Perhaps the simplest way to stop an out-of-control GUI automation program is to log out, which will shut down all running programs. On Windows and Linux, the logout hotkey is CTRL-ALT-DEL. On macOS, it is -SHIFT-Q. By logging out, you’ll lose any unsaved work, but at least you won’t have to wait for a full reboot of the computer.
Controlling Mouse Movement
In this section, you’ll learn how to move the mouse and track its position on the screen using PyAutoGUI, but first you need to understand how PyAutoGUI works with coordinates.
PyAutoGUI’s mouse functions use x- and y-coordinates. Chapter 21. The origin, where x and y are both zero, is at the upper-left corner of the screen. The x-coordinates increase going to the right, and the y-coordinates increase going down. All coordinates are positive integers; there are no negative coordinates.
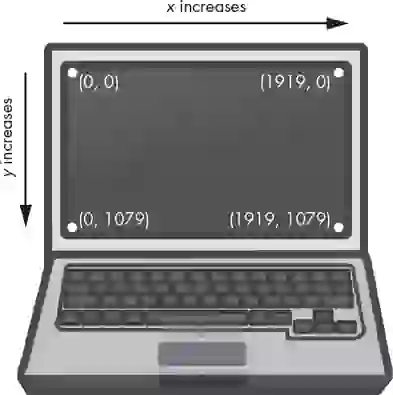
Figure 23-1: The coordinates of a computer screen with 1920×1080 resolution
Your resolution is how many pixels wide and tall your screen is. If your screen’s resolution is set to 1920×1080, then the coordinate for the upper-left corner will be (0, 0), and the coordinate for the bottom-right corner will be (1919, 1079).
The pyautogui.size() function returns a Size named tuple of the screen’s width and height in pixels. Named tuples are beyond the scope of this book, but they are basically tuples with integer indexes that also have named attributes. Enter the following into the interactive shell:
>>> import pyautogui
>>> screen_size = pyautogui.size()  # Obtain the screen resolution.
>>> screen_size
Size(width=1920, height=1080)
>>> screen_size[0], screen_size[1]
(1920, 1080)
>>> screen_size.width, screen_size.height
(1920, 1080)
>>> tuple(screen_size)
(1920, 1080)
The pyautogui.size() function returns a Size object of (1920, 1080) on a computer with a 1920×1080 resolution; depending on your screen’s resolution, your return value may be different.
Moving the Mouse
Now that you understand screen coordinates, let’s move the mouse. The pyautogui.moveTo() function will instantly move the mouse cursor to a specified position on the screen. Integer values for the x- and y-coordinates make up the function’s first and second arguments, respectively. An optional duration integer or float keyword argument specifies the number of seconds it should take to move the mouse to the destination. If you leave it out, the default is 0 for instantaneous movement. (All of the duration keyword arguments in PyAutoGUI functions are optional.) Enter the following into the interactive shell:
>>> import pyautogui
>>> for i in range(10):  # Move the mouse in a square.
...     pyautogui.moveTo(100, 100, duration=0.25)
...     pyautogui.moveTo(200, 100, duration=0.25)
...     pyautogui.moveTo(200, 200, duration=0.25)
...     pyautogui.moveTo(100, 200, duration=0.25)
...
This example moves the mouse cursor clockwise in a square pattern among the four coordinates provided a total of 10 times. Each movement takes one-quarter of a second, as specified by the duration=0.25 keyword argument. If you hadn’t passed a third argument to any of the pyautogui.moveTo() calls, the mouse cursor would have instantly teleported from point to point.
The pyautogui.move() function moves the mouse cursor relative to its current position. The following example moves the mouse in the same square pattern, except it begins the square from wherever the mouse happens to be on the screen when the code starts running:
>>> import pyautogui
>>> for i in range(10):
...     pyautogui.move(100, 0, duration=0.25)  # Right
...     pyautogui.move(0, 100, duration=0.25)  # Down
...     pyautogui.move(-100, 0, duration=0.25)  # Left
...     pyautogui.move(0, -100, duration=0.25)  # Up
...
The pyautogui.move() function also takes three arguments: how many pixels to move horizontally to the right, how many pixels to move vertically downward, and (optionally) how long it should take to complete the movement. A negative integer for the first or second argument will cause the mouse to move left or upward, respectively.
Getting the Current Position
You can determine the mouse’s current position by calling the pyautogui.position() function, which will return a Point named tuple of the mouse cursor’s x and y positions at the time of the function call. You can access the x- and y-coordinates either through the 0 and 1 integer indexes of the Point named tuple or through the x and y attributes. (This is similar to the Size named tuple’s width and height attributes.) Enter the following into the interactive shell, moving the mouse around after each call:
>>> pyautogui.position()  # Get the current mouse position.
Point(x=311, y=622)
>>> pyautogui.position()  # Get the current mouse position again.
Point(x=377, y=481)
>>> p = pyautogui.position()  # And again
>>> p
Point(x=1536, y=637)
>>> p[0]  # The x-coordinate is at index 0.
1536
>>> p.x  # The x-coordinate is also in the x attribute.
1536
Of course, your return values will vary depending on where your mouse cursor is.
Controlling Mouse Interaction
Now that you know how to move the mouse and figure out where it is on the screen, you’re ready to start clicking, dragging, and scrolling.
Clicking
To send a virtual mouse click to your computer, call the pyautogui.click() method. By default, this click uses the left mouse button and takes place wherever the mouse cursor is currently located. You can pass x- and y-coordinates of the click as optional first and second arguments if you want it to take place somewhere other than the mouse’s current position.
If you want to specify which mouse button to use, include the button keyword argument, with a value of 'left', 'middle', or 'right'. For example, pyautogui.click(100, 150, button='left') will click the left mouse button at the coordinates (100, 150), while pyautogui.click(200, 250, button='right') will perform a right-click at (200, 250).
Enter the following into the interactive shell:
>>> import pyautogui
>>> pyautogui.click(10, 5)  # Move the mouse to (10, 5) and click.
You should see the mouse pointer move to near the top-left corner of your screen and click once. A full “click” is defined as pushing a mouse button down and then releasing it without moving the cursor. You can also perform a click by calling pyautogui.mouseDown(), which only pushes the mouse button down, and pyautogui.mouseUp(), which only releases the button. These functions have the same arguments as click(), and in fact, the click() function is just a convenient wrapper around these two function calls.
As a further convenience, the pyautogui.doubleClick() function will perform two clicks with the left mouse button. The pyautogui.rightClick() and pyautogui.middleClick() functions will perform a click with the right and middle mouse buttons, respectively.
Dragging
Dragging means moving the mouse while holding down one of the mouse buttons. For example, you can move files between folders by dragging the folder icons, or you can move appointments around in a calendar app.
PyAutoGUI provides the pyautogui.dragTo() and pyautogui.drag() functions to drag the mouse cursor to a new location or a location relative to its current one. The arguments for dragTo() and drag() are the same as moveTo() and move(): the x-coordinate/horizontal movement, the y-coordinate/vertical movement, and an optional duration of time. (The macOS operating system doesn’t drag correctly when the mouse moves too quickly, so passing a duration keyword argument is recommended.)
To try these functions, open a graphics drawing application such as MS Paint on Windows, Paintbrush on macOS, or GNU Paint on Linux. (If you don’t have a drawing application, you can use the online one at https://
With the mouse cursor over the drawing application’s canvas and the Pencil or Brush tool selected, enter the following into a new file editor window and save it as spiralDraw.py:
import pyautogui
❶ pyautogui.sleep(5)
❷ pyautogui.click()  # Click to make the window active.
distance = 300
change = 20
while distance > 0:
  ❸ pyautogui.drag(distance, 0, duration=0.2)  # Move right.
  ❹ distance = distance - change
  ❺ pyautogui.drag(0, distance, duration=0.2)   # Move down.
  ❻ pyautogui.drag(-distance, 0, duration=0.2)  # Move left.
    distance = distance - change
    pyautogui.drag(0, -distance, duration=0.2)  # Move up.
When you run this program, there will be a five-second delay ❶ during which you can move the mouse cursor over the drawing program’s window with the Pencil or Brush tool selected. PyAutoGUI’s sleep() function is identical to time.sleep() but exists so that you don’t need to add import time to your code. Then, spiralDraw.py will take control of the mouse and click to make the drawing program’s window active ❷. The active window is the window that currently accepts keyboard input, and the actions you take (like typing or, in this case, dragging the mouse) will affect that window. The active window is also known as the focused or foreground window. Once the drawing program is active, spiralDraw.py draws a square spiral pattern like the one on the left of Figure 23-2.
The distance variable starts at 300, so on the first iteration of the while loop, the first drag() call drags the cursor 300 pixels to the right, taking 0.2 seconds ❸. Then, distance is decreased to 280 ❹, and the second drag() call drags the cursor 280 pixels down ❺. The third drag() call drags the cursor –280 horizontally (280 to the left) ❻, distance is decreased to 260, and the last drag() call drags the cursor 260 pixels up. On each iteration, the mouse is dragged right, down, left, and up, and distance is slightly smaller than it was in the previous iteration. By looping over this code, you can move the mouse cursor to draw a square spiral.
While you can also create a square spiral image by using the Pillow package discussed in Chapter 21, creating the image by controlling the mouse to draw it in MS Paint lets you make use of this program’s various brush styles, as shown in Figure 23-2 on the right, as well as other advanced features, such as gradients or the fill bucket. You can preselect the brush settings yourself (or have your Python code select these settings) and then run the spiral-drawing program.
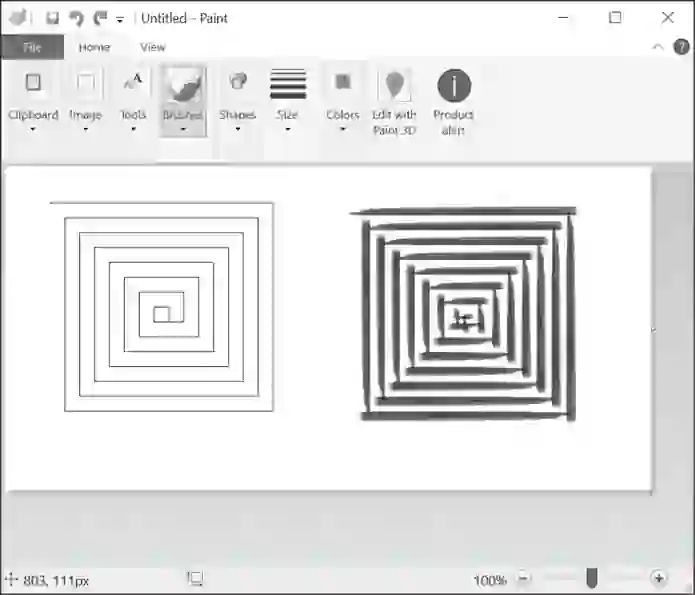
Figure 23-2: The results from the pyautogui.drag() example, drawn with MS Paint’s different brushes
You could draw this spiral by hand (or rather, by mouse), but you’d have to work slowly to be so precise. PyAutoGUI can do it in a few seconds!
Scrolling
The final PyAutoGUI mouse function is scroll(), to which you pass an integer argument for how many units you want to scroll the mouse up or down. The size of a unit varies for each operating system and application, so you’ll have to experiment to see exactly how far it scrolls in your particular situation. The scrolling takes place at the mouse cursor’s current position. Passing a positive integer scrolls up, and passing a negative integer scrolls down. Run the following in the Mu Editor’s interactive shell while the mouse cursor is over the Mu Editor window:
>>> pyautogui.scroll(200)You’ll see Mu scroll upward if the mouse cursor is over a text field that can be scrolled up.
Planning Your Mouse Movements
One of the difficulties of writing a program that will automate clicking the screen is finding the x- and y-coordinates of the things you’d like to click. The pyautogui.mouseInfo() function can help you with this.
The pyautogui.mouseInfo() function is meant to be called from the interactive shell, rather than as part of your program. It launches a small application named MouseInfo that’s included with PyAutoGUI. The window for the application looks like Figure 23-3.
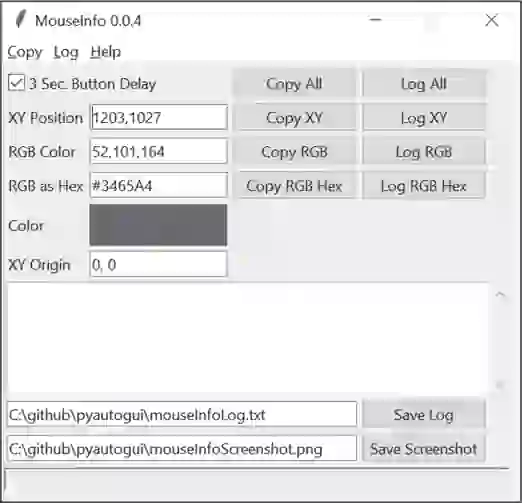
Figure 23-3: The MouseInfo application’s window
Enter the following into the interactive shell:
>>> import pyautogui
>>> pyautogui.mouseInfo()
This makes the MouseInfo window appear. This window gives you information about the mouse cursor’s current position, as well the color of the pixel underneath the mouse cursor, as a three-integer RGB tuple and as a hex value. The color itself appears in the color box in the window.
To help you record this coordinate or pixel information, you can click one of the eight Copy or Log buttons. The Copy All, Copy XY, Copy RGB, and Copy RGB Hex buttons will copy their respective information to the clipboard. The Log All, Log XY, Log RGB, and Log RGB Hex buttons will write their respective information to the large text field in the window. You can save the text in this log text field by clicking the Save Log button.
By default, the 3 Sec. Button Delay checkbox is checked, causing a three-second delay between clicking a Copy or Log button and the copying or logging taking place. This gives you a short amount of time in which to click the button and then move the mouse into your desired position. It may be easier to uncheck this box, move the mouse into position, and press the F1 to F8 keys to copy or log the mouse position. You can look at the Copy and Log menus at the top of the MouseInfo window to find out which key maps to which buttons.
For example, uncheck 3 Sec. Button Delay, then move the mouse around the screen while pressing F6, and notice how the x- and y-coordinates of the mouse are recorded in the large text field in the middle of the window. You can later use these coordinates in your PyAutoGUI scripts.
For more information on MouseInfo, review the complete documentation at https://
Taking Screenshots
Your GUI automation programs don’t have to click and type blindly. PyAutoGUI has screenshot features that can create an image file based on the current contents of the screen. These functions can also return a Pillow Image object of the current screen’s appearance. If you’ve been skipping around in this book, you’ll want to read Chapter 21 and install the Pillow package before continuing with this section.
To take screenshots in Python, call the pyautogui.screenshot() function. Enter the following into the interactive shell:
>>> import pyautogui
>>> im = pyautogui.screenshot()
The im variable will contain the Image object of the screenshot. You can now call methods on the Image object in the im variable, just like any other Image object. Chapter 21 has more information about Image objects.
Say that one of the steps in your GUI automation program is to click a gray button. Before calling the click() method, you might want to take a screenshot and look at the pixel where the script is about to click. If it’s not the same gray as the gray button, then your program knows something is wrong. Maybe the window moved unexpectedly, or maybe a pop-up dialog has blocked the button. At this point, instead of continuing, and possibly wreaking havoc by clicking the wrong thing, your program can stop itself.
You can obtain the RGB color value of a particular pixel on the screen with the pixel() function. Enter the following into the interactive shell:
>>> import pyautogui
>>> pyautogui.pixel(0, 0)
(176, 176, 175)
>>> pyautogui.pixel((50, 200))
(130, 135, 144)
Pass pixel() two integers for an XY coordinate and it will tell you the color of the pixel at those coordinates in your image. The return value from pixel() is an RGB tuple of three integers for the amount of red, green, and blue in the pixel. (There is no fourth value for alpha, because screenshot images are fully opaque.)
PyAutoGUI’s pixelMatchesColor() function will return True if the pixel at the given x- and y-coordinates on the screen matches the given color. The first and second arguments are integers for the x- and y-coordinates, and the third argument is a tuple of three integers for the RGB color the screen pixel must match. Enter the following into the interactive shell:
>>> import pyautogui
❶ >>> pyautogui.pixel((50, 200))
(130, 135, 144)
❷ >>> pyautogui.pixelMatchesColor(50, 200, (130, 135, 144))
True
❸ >>> pyautogui.pixelMatchesColor(50, 200, (255, 135, 144))
False
After using pixel() to get an RGB tuple for the color of a pixel at specific coordinates ❶, pass the same coordinates and RGB tuple to pixelMatchesColor() ❷, which should return True. Then, change a value in the RGB tuple and call pixelMatchesColor() again for the same coordinates ❸. This should return false. This method can be useful to call whenever your GUI automation programs are about to call click(). Note that the color at the given coordinates must match exactly. If it is even slightly different—for example, (255, 255, 254) instead of (255, 255, 255)—then pixelMatchesColor() will return False.
Image Recognition
But what if you do not know beforehand where PyAutoGUI should click? You can use image recognition instead. Give PyAutoGUI an image of what you want to click, and let it figure out the coordinates.
For example, if you have previously taken a screenshot to capture the image of a Submit button in submit.png, the locateOnScreen() function will return the coordinates where that image is found. To see how locateOnScreen() works, try taking a screenshot of a small area on your screen; then save the image and enter the following into the interactive shell, replacing 'submit.png' with the filename of your screenshot:
>>> import pyautogui
>>> box = pyautogui.locateOnScreen('submit.png')
>>> box
Box(left=643, top=745, width=70, height=29)
>>> box[0]
643
>>> box.left
643
The Box object is a named tuple that locateOnScreen() returns and has the x-coordinate of the left edge, the y-coordinate of the top edge, the width, and the height for the first place on the screen the image was found. If you’re trying this on your computer with your own screenshot, your return value will be different from the one shown here.
If the image cannot be found on the screen, locateOnScreen() raises an ImageNotFoundException. Note that the image on the screen must match the provided image perfectly in order to be recognized. If the image is even a pixel off, locateOnScreen() raises an ImageNotFoundException exception. If you’ve changed your screen resolution, images from previous screenshots might not match the images on your current screen because they have a different scaling factor. Scaling factors are beyond the scope of this book, but they are sometimes used in modern, high-resolution displays. You can change the scaling in the display settings of your operating system, as shown in Figure 23-4.
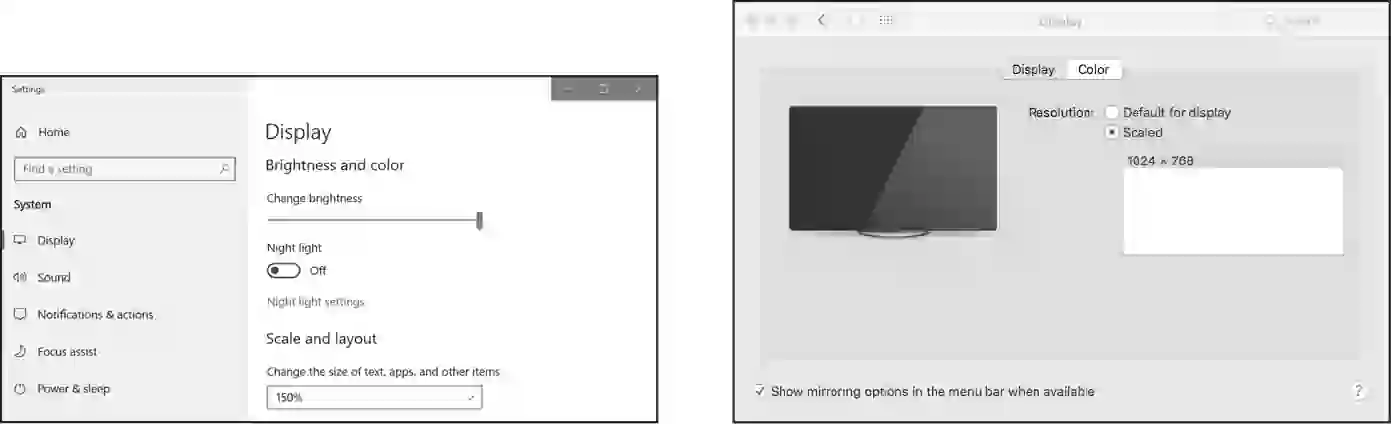
Figure 23-4: The scale display settings in Windows (left) and macOS (right)
If the image can be found in several places on the screen, locateAllOnScreen() will return a Generator object. Generators are beyond the scope of this book, but you can pass them to list() to return a list of Box objects. There will be one Box object for each location where the image is found on the screen. Continue the interactive shell example by entering the following (and replacing 'submit.png' with your own image filename):
>>> list(pyautogui.locateAllOnScreen('submit.png'))
[(643, 745, 70, 29), (1007, 801, 70, 29)]
In this example, the image appears in two locations. If your image is found in only one area, calling list(locateAllOnScreen()) returns a list containing just one Box object.
Once you have the Box object for the specific image you want to select, you can click the center of this area by passing the tuple to click(). Enter the following into the interactive shell:
>>> pyautogui.click((643, 745, 70, 29))As a shortcut, you can also pass the image filename directly to the click() function:
>>> pyautogui.click('submit.png')The moveTo() and dragTo() functions also accept image filename arguments. Remember that locateOnScreen() raises an exception if it can’t find the image on the screen, so you should call it from inside a try statement:
try:
    location = pyautogui.locateOnScreen('submit.png')
except pyautogui.ImageNotFoundException:
    print('Image could not be found.')
Without the try and except statements, the uncaught exception would crash your program. Since you can’t be sure that your program will always find the image, it’s a good idea to use the try and except statements when calling locateOnScreen(). In versions of PyAutoGUI before 1.0.0, locateOnScreen() would return None instead of raising an exception. Call pyautogui.useImageNotFoundException() in these old versions to raise an exception instead, or call pyautogui.useImageNotFoundException(False) for newer versions to return None.
Getting Window Information
Image recognition is a fragile way to find things on the screen; if a single pixel is a different color, then pyautogui.locateOnScreen() won’t find the image. If you need to find where a particular window is on the screen, it’s faster and more reliable to use PyAutoGUI’s window features.
NOTE
As of version 1.0.0, PyAutoGUI’s window features work only on Windows, not on macOS or Linux. These features come from PyAutoGUI’s inclusion of the PyGetWindow package.
Obtaining the Active Window
The active window on your screen is the window currently in the foreground and accepting keyboard input. If you’re presently writing code in the Mu Editor, the Mu Editor’s window is the active window. Of all the windows on your screen, only one will be active at a time.
In the interactive shell, call the pyautogui.getActiveWindow() function to get a Window object (technically a Win32Window object when run on Windows). Once you have that Window object, you can retrieve any of the object’s attributes, which describe its size, position, and title:
left, right, top, bottom A single integer for the x- or y-coordinate of the window’s side
topleft, topright, bottomleft, bottomright A Point named tuple of two integers for the (x, y) coordinate of the window’s corner
midleft, midright, midtop, midbottom A Point named tuple of two integers for the (x, y) coordinate of the middle of the window’s sides
width, height A single integer for one of the window’s dimensions, in pixels
size A Size named tuple of two integers for the (width, height) of the window
area A single integer representing the area of the window, in pixels
center A Point named tuple of two integers for the (x, y) coordinate of the window’s center
centerx, centery A single integer for the x- or y-coordinate of the window’s center
box A Box named tuple of four integers for the (left, top, width, height) measurements of the window
title A string of the text in the title bar at the top of the window
To get the window’s position, size, and title information from the window object, for example, enter the following into the interactive shell:
>>> import pyautogui
>>> active_win = pyautogui.getActiveWindow()
>>> active_win
Win32Window(hWnd=2034368)
>>> str(active_win)
'<Win32Window left="500", top="300", width="2070", height="1208", title="Mu 1.0.1 – test1.py">'
>>> active_win.title
'Mu 1.0.1 – test1.py'
>>> active_win.size
Size(width=2070, height=1208)
>>> active_win.left, active_win.top, active_win.right, active_win.bottom
(500, 300, 2570, 1508)
>>> active_win.topleft
Point(x=500, y=300)
>>> pyautogui.click(active_win.left + 10, active_win.top + 20)
You can now use these attributes to calculate precise coordinates within a window. If you know that a button you want to click is always 10 pixels to the right of and 20 pixels down from the window’s top-left corner, and the window’s top-left corner is at screen coordinates (300, 500), then calling pyautogui.click(310, 520) (or pyautogui.click(active_win.left + 10, active_win.top + 20) if active_win contains the Window object for the window) will click the button. This way, you won’t have to rely on the slower, less reliable locateOnScreen() function to find the button for you.
Finding Windows with Other Functions
While getActiveWindow() is useful for obtaining the window that is active at the time of the function call, you’ll need to use some other function to obtain Window objects for the other windows on the screen. The following three functions return a list of Window objects. If they’re unable to find any windows, they return an empty list:
pyautogui.getAllWindows() Returns a list of Window objects for every visible window on the screen
pyautogui.getWindowsAt(x, y) Returns a list of Window objects for every visible window that includes the point (x, y)
pyautogui.getWindowsWithTitle(title) Returns a list of Window objects for every visible window that includes the string title in its title bar
PyAutoGUI also has a pyautogui.getAllTitles() function, which returns a list of strings of every visible window.
Manipulating Windows
Windows attributes can do more than just tell you the size and position of the window. You can also set their values in order to resize or move the window. For example, enter the following into the interactive shell:
>>> import pyautogui
>>> active_win = pyautogui.getActiveWindow()
❶ >>> active_win.width  # Gets the current width of the window
1669
❷ >>> active_win.topleft  # Gets the current position of the window
Point(x=174, y=153)
❸ >>> active_win.width = 1000  # Resizes the width
❹ >>> active_win.topleft = (800, 400)  # Moves the window
First, we use the Window object’s attributes to find out information about the window’s size ❶ and position ❷. After calling these functions in the Mu Editor, the window should become narrower ❸ and move ❹, as in Figure 23-5.
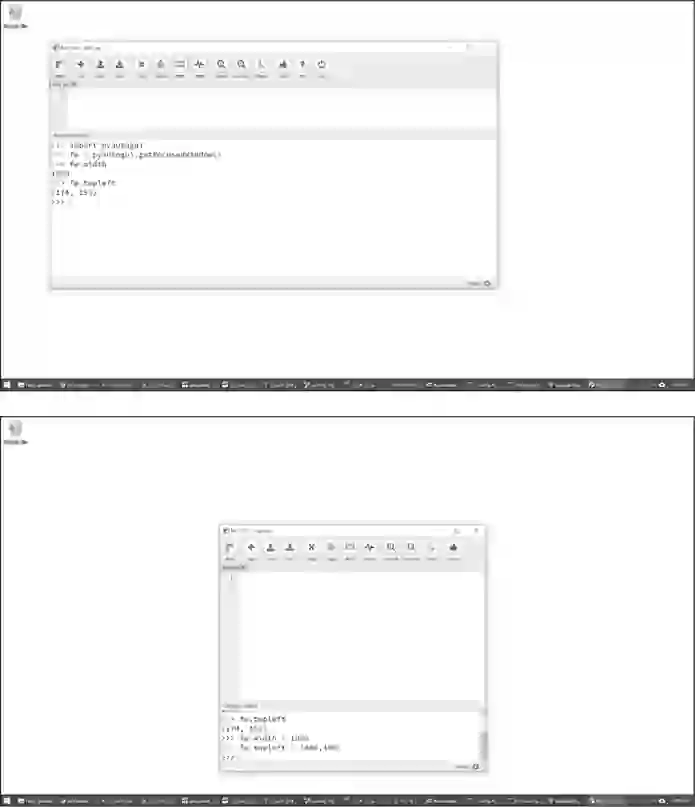
Figure 23-5: The Mu Editor window before (top) and after (bottom) using the Window object attributes to resize and move it
You can also find out and change the window’s minimized, maximized, and activated states. Try entering the following into the interactive shell:
>>> import pyautogui
>>> active_win = pyautogui.getActiveWindow()
>>> active_win.isMaximized  # Returns True if the window is maximized
False
>>> active_win.isMinimized  # Returns True if the window is minimized
False
>>> active_win.isActive  # Returns True if the window is the active window
True
>>> active_win.maximize()  # Maximizes the window
>>> active_win.isMaximized
True
>>> active_win.restore()  # Undoes a minimize/maximize action
>>> active_win.minimize()  # Minimizes the window
>>> import time
>>> # Waits 5 seconds while you activate a different window:
>>> time.sleep(5); active_win.activate()
>>> active_win.close()  # This will close the window you're typing in.
The isMaximized, isMinimized, and isActive attributes contain Boolean values that indicate whether the window is currently in that state. The maximize(), minimize(), activate(), and restore() methods change the window’s state. After you maximize or minimize the window with maximize() or minimize(), the restore() method will restore the window to its former size and position.
The close() method will close a window. Be careful with this method, as it may bypass any message dialogs asking you to save your work before quitting the application.
See the PyAutoGUI documentation for complete details on its window-controlling features.
Controlling the Keyboard
PyAutoGUI also has functions for sending virtual key presses to your computer, which enables you to fill out forms or enter text into applications.
Sending Key Press Strings
The pyautogui.write() function sends virtual key presses to the computer. What these key presses do depends on what window is active and what text field has focus. You may want to first send a mouse click to the text field you want in order to ensure that it has focus.
As a simple example, let’s use Python to automatically type the words Hello, world! into a file editor window. First, open a new file editor window and position it in the upper-left corner of your screen so that PyAutoGUI will click in the right place to bring it into focus. Next, enter the following into the interactive shell:
>>> pyautogui.click(100, 200); pyautogui.write('Hello, world!')Notice how placing two commands on the same line, separated by a semicolon, keeps the interactive shell from prompting you for input between running the two instructions. This prevents you from accidentally bringing a new window into focus between the click() and write() calls, which would mess up the example.
Python will first send a virtual mouse click to the coordinates (100, 200), which should click the file editor window and put it in focus. The write() call will send the text Hello, world! to the window, making it look like Figure 23-6. You now have code that can type for you!
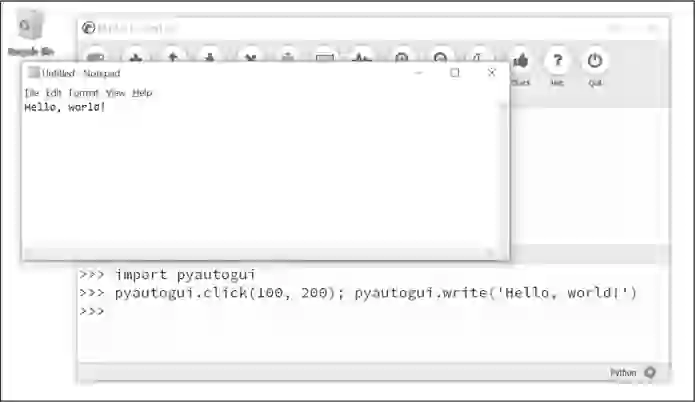
Figure 23-6: Using PyAutoGUI to click the file editor window and enter Hello, world! into it
By default, the write() function will enter the full string instantly. However, you can pass an optional second argument to add a short pause between each character. This second argument is an integer or float value of the number of seconds to pause. For example, pyautogui.write('Hello, world!', 0.25) will wait a quarter-second after typing H, another quarter-second after e, and so on. This gradual typewriter effect may be useful for slower applications that can’t process keystrokes fast enough to keep up with PyAutoGUI.
For characters such as A or !, PyAutoGUI will automatically simulate holding down the SHIFT key as well.
Specifying Key Names
Not all keys are easy to represent with single text characters. For example, how do you represent SHIFT or the left arrow key as a single character? In PyAutoGUI, these keyboard keys are represented by short string values instead: 'esc' for the ESC key or 'enter' for the ENTER key.
Instead of a single string argument, a list of these keyboard key strings can be passed to write(). For example, the following call presses the A key, then the B key, then the left arrow key twice (moving the cursor in front of the “a”), and finally the X and Y keys:
>>> pyautogui.write(['a', 'b', 'left', 'left', 'X', 'Y'])Because pressing the left arrow key moves the keyboard cursor, this will output XYab. Table 23-1 lists the PyAutoGUI keyboard key strings that you can pass to write() to simulate pressing any combination of keys.
You can also examine the pyautogui.KEYBOARD_KEYS list to see all possible keyboard key strings that PyAutoGUI will accept. The 'shift' string refers to the left SHIFT key and is equivalent to 'shiftleft'. The same applies for 'ctrl', 'alt', and 'win' strings; they all refer to the left-side key.
Keyboard key string |
Meaning |
|---|---|
'a', 'b', 'c', 'A', 'B', 'C', '1', '2', '3', '!', '@', '#', and so on |
The keys for single characters |
'enter' (or 'return' or '\n') |
The ENTER key |
'esc' |
The ESC key |
'shiftleft', 'shiftright' |
The left and right SHIFT keys |
'altleft', 'altright' |
The left and right ALT keys |
'ctrlleft', 'ctrlright' |
The left and right CTRL keys |
'tab' (or '\t') |
The TAB key |
'backspace', 'delete' |
The BACKSPACE and DELETE keys |
'pageup', 'pagedown' |
The PAGE UP and PAGE DOWN keys |
'home', 'end' |
The HOME and END keys |
'up', 'down', 'left', 'right' |
The up, down, left, and right arrow keys |
'f1', 'f2', 'f3', and so on |
The F1 to F12 keys |
'volumemute', 'volumedown', 'volumeup' |
The mute, volume down, and volume up keys (some keyboards do not have these keys, but your operating system will still be able to understand these simulated key presses) |
'pause' |
The PAUSE key |
'capslock', 'numlock', 'scrolllock' |
The CAPS LOCK, NUM LOCK, and SCROLL LOCK keys |
'insert' |
The INS or INSERT key |
'printscreen' |
The PRTSC or PRINT SCREEN key |
'winleft', 'winright' |
The left and right WIN keys (on Windows) |
'command' |
The COMMAND () key (on macOS) |
'option' |
The OPTION key (on macOS) |
Pressing and Releasing the Keyboard
Much like the mouseDown() and mouseUp() functions, pyautogui.keyDown() and pyautogui.keyUp() will send virtual key presses and releases to the computer. They are passed a keyboard key string (see Table 23-1) for their argument. For convenience, PyAutoGUI provides the pyautogui.press() function, which calls both of these functions to simulate a complete key press.
Run the following code, which will type a dollar sign ($) character (obtained by holding the SHIFT key and pressing 4):
>>> pyautogui.keyDown('shift'); pyautogui.press('4'); pyautogui.keyUp('shift')This line holds down SHIFT, presses (and releases) 4, and then releases SHIFT. If you need to type a string into a text field, the write() function is more suitable. But for applications that take single-key commands, the press() function is the simpler approach.
Running Hotkey Combinations
A hotkey or shortcut is a combination of key presses to invoke some application function. The common hotkey for copying a selection is CTRL-C (on Windows and Linux) or -C (on macOS). The user presses and holds the CTRL key, then presses the C key, and then releases the C and CTRL keys. To do this with PyAutoGUI’s keyDown() and keyUp() functions, you would have to enter the following:
pyautogui.keyDown('ctrl')
pyautogui.keyDown('c')
pyautogui.keyUp('c')
pyautogui.keyUp('ctrl')
This is rather complicated. Instead, use the pyautogui.hotkey() function, which takes multiple keyboard key string arguments, presses them in order, and releases them in the reverse order. For the CTRL-C example, the code would simply be as follows:
pyautogui.hotkey('ctrl', 'c')This function is especially useful for larger hotkey combinations. In Word, the CTRL-ALT-SHIFT-S hotkey combination displays the Style pane. Instead of making eight different function calls (four keyDown() calls and four keyUp() calls), you can just call hotkey('ctrl', 'alt', 'shift', 's').
Setting Up GUI Automation Scripts
GUI automation scripts are a great way to automate the boring stuff, but your scripts can also be finicky. If a window is in the wrong place on a desktop or some pop-up appears unexpectedly, your script could be clicking the wrong things on the screen. Here are some tips for setting up your GUI automation scripts:
- Use the same screen resolution each time you run the script so that the position of windows doesn’t change.
- The application window that your script clicks should be maximized so that its buttons and menus are in the same place each time you run the script.
- Add generous pauses while waiting for content to load; you don’t want your script to begin clicking before the application is ready.
- Use locateOnScreen() to find buttons and menus to click, rather than relying on coordinates. If your script can’t find the thing it needs to click, stop the program rather than letting it continue blindly clicking.
- Use getWindowsWithTitle() to ensure that the application window you think your script is clicking exists, and use the activate() method to put that window in the foreground.
- Use the logging module from Chapter 5 to keep a logfile of what your script has done. This way, if you have to stop your script halfway through a process, you can change it to pick up from where it left off.
- Add as many checks as you can to your script. Think about how it could fail if an unexpected pop-up window appears or if your computer loses its internet connection.
- You may want to supervise the script when it first begins to ensure that it’s working correctly.
You might also want to put a pause at the start of your script so that the user can set up the window the script will click on. PyAutoGUI has a sleep() function that acts identically to time.sleep() (but frees you from having to add import time to your scripts). There is also a countdown() function that prints numbers counting down to give the user a visual indication that the script will continue soon. Enter the following into the interactive shell:
>>> import pyautogui
>>> pyautogui.sleep(3)  # Pauses the program for 3 seconds
>>> pyautogui.countdown(10)  # Counts down over 10 seconds
10 9 8 7 6 5 4 3 2 1
>>> print('Starting in ', end=''); pyautogui.countdown(3)
Starting in 3 2 1
These tips can help make your GUI automation scripts easier to use and better able to recover from unforeseen circumstances.
Displaying Message Boxes
The programs you’ve been writing so far all tend to use plaintext output (with the print() function) and input (with the input() function). However, PyAutoGUI programs will use your entire desktop as its playground. The text-based window that your program runs in, whether it’s Mu or a terminal window, will probably be lost as your PyAutoGUI program clicks and interacts with other windows. This can make getting input and output from the user difficult if the Mu or terminal window gets hidden under other windows.
To solve this, PyAutoGUI includes the PyMsgBox module to create pop-up notifications to the user and receive input from them. There are four message box functions:
pyautogui.alert(text) Displays text and has a single OK button
pyautogui.confirm(text) Displays text and has OK and Cancel buttons, returning either 'OK' or 'Cancel' depending on the button clicked
pyautogui.prompt(text) Displays text and has a text field for the user to type in, which it returns as a string
pyautogui.password(text) Is the same as prompt(), but displays asterisks so that the user can enter sensitive information such as a password
These functions are identical to the four covered in the “Pop-Up Message Boxes with PyMsgBox” in Chapter 12.
Summary
GUI automation with the PyAutoGUI package allows you to interact with applications on your computer by controlling the mouse and keyboard. While this approach is flexible enough to do anything that a human user can do, the downside is that these programs are fairly blind to what they are clicking or typing. When writing GUI automation programs, try to ensure that they will crash quickly if they’re given bad instructions. Crashing is annoying, but it’s much better than the program continuing in error.
You can move the mouse cursor around the screen and simulate mouse clicks, keystrokes, and keyboard shortcuts with PyAutoGUI. The PyAutoGUI package can also check the colors on the screen, which can provide your GUI automation program with enough of an idea of the screen contents to know whether it has gotten off track. You can even give PyAutoGUI a screenshot and let it figure out the coordinates of the area you want to click.
You can combine all of these PyAutoGUI features to automate any mindlessly repetitive task on your computer. In fact, it can be downright hypnotic to watch the mouse cursor move on its own and to see text appear on the screen automatically. Why not spend the time you saved by sitting back and watching your program do all your work for you? There’s a certain satisfaction that comes from seeing how your cleverness has saved you from the boring stuff.
Practice Questions
1. How can you trigger PyAutoGUI’s fail-safe to stop a program?
2. What function returns the current screen resolution?
3. What function returns the coordinates for the mouse cursor’s current position?
4. What is the difference between pyautogui.moveTo() and pyautogui.move()?
5. What functions can be used to drag the mouse?
6. What function call will type out the characters of "Hello, world!"?
7. How can you do key presses for special keys, such as the keyboard’s left arrow key?
8. How can you save the current contents of the screen to an image file named screenshot.png?
9. What code would set a two-second pause after every PyAutoGUI function call?
10. If you want to automate clicks and keystrokes inside a web browser, should you use PyAutoGUI or Selenium?
11. What makes PyAutoGUI error prone?
12. How can you find the size of every window on the screen that includes the word Notepad in its title?
13. How can you make, say, the Firefox browser active and in front of every other window on the screen?
Practice Programs
For practice, write programs to do the following tasks.
Looking Busy
Many instant messaging programs determine whether you are idle, or away from your computer, by detecting a lack of mouse movement over some period of time—say, 10 minutes. Maybe you’re away from your computer but don’t want others to see your instant messenger status go into idle mode to give the impression that you’re slacking. Write a script to nudge your mouse cursor by one pixel to the left every 10 seconds, and then one pixel to the right 10 seconds after that. The nudge should be small and infrequent enough so that it won’t get in the way if you do happen to need to use your computer while the script is running.
Reading Text Fields with the Clipboard
While you can send keystrokes to an application’s text fields with pyautogui.write(), you can’t use PyAutoGUI alone to read the text already inside a text field. This is where the pyperclip module can help. You can use PyAutoGUI to obtain the window for a text editor such as Mu or Notepad, bring it to the front of the screen by clicking it, click inside the text field, and then send the CTRL-A or -A hotkey to “select all” and CTRL-C or -C hotkey to “copy to clipboard.” Your Python script can then read the clipboard text by running import pyperclip and pyperclip.paste().
Write a program that follows this procedure for copying the text from a window’s text fields. Use pyautogui.getWindowsWithTitle('Notepad') (or whichever text editor you choose) to obtain a Window object. The top and left attributes of this Window object can tell you where this window is, while the activate() method will ensure that it is at the front of the screen. You can then click the main text field of the text editor by adding, say, 100 or 200 pixels to the top and left attribute values with pyautogui.click() to put the keyboard focus there. Call pyautogui.hotkey('ctrl', 'a') and pyautogui.hotkey('ctrl', 'c') to select all the text and copy it to the clipboard. Finally, call pyperclip.paste() to retrieve the text from the clipboard and paste it into your Python program. From there, you can use this string however you want, but just pass it to print() for now.
Note that the window functions of PyAutoGUI only work on Windows as of PyAutoGUI version 1.0.0, and not on macOS or Linux.
Writing a Game-Playing Bot
There is an old Flash game called Sushi Go Round. The game involves clicking the correct ingredient buttons to fill customers’ sushi orders. The faster you fill orders without mistakes, the more points you get. This is a perfectly suited task for a GUI automation program—and a way to cheat to a high score! Although Flash is discontinued as a product, there are instructions for playing it offline on your computer and a list of websites that host the Sushi Go Round game at https://